The issue tracking integrations, implemented as job steps, enable you to associate an issue with a particular build, link to that issue in your issue tracker, and view the status of the issue. The integrations also allow AnthillPro to perform tasks within the issue tracking tool. For example, if your SCM allows you to submit issue tracking information, AnthillPro will extract that information and create a new issue when necessary. (If your SCM does not support this feature, AnthillPro can create an issue based on a regular expression pattern in the commit comment.)
In addition, AnthillPro will collect the output of your issue tracking tool and store it in the AnthillPro data warehouse. This makes it possible for you to publish reports generated by the tool.
For most issue tracking integrations, AnthillPro performs the following tasks:
Create a new issue. You can have AnthillPro automatically create a new issue in you issue tracking system based on conditions you define (e.g., if a failure occurs).
Add comments to an issue. AnthillPro can be configured to parse the current changelog and then add your comment to any issues that it finds.
Resolve or update an issue. When AnthillPro runs a build and finds that an issue status has change, it can change the status to resolved or another status (depending on the system) based on the issue ID you set.
Publish reports. You can have AnthillPro collect reports from your issue tracking system and then publish that information in the UI.
The AccuWork integration enables AnthillPro to utilize AccuWork's bridge between third-party issue trackers (such as Bugzilla and JIRA) and AccuRev to publish the generated issue report to AnthillPro Build Life. Once the report is published to AnthillPro, it is then be made available on the Build Life Issues tab.
AccuWork Step:
Publish Issue Report. Creates a report of AccuWork issues from the current changelog. The step parses the AccuRev change package for any commit comments.
To start using the integration, configure AccuWork integration on the System page. Once that is done, you will typically include the job step near the end of your build job, before the assign status step(s), etc.
You will need administrative permissions to the System and Administration pages to configure the integration.
The AccuWork integration must be used in conjunction with your AccuRev projects.
The agent running the AccuWork job step must be installed on the same machine as the AccuRev client and be able to contact AccuRev.
The AccuWork issue DB (AccuRev depot) must be available.
The user name and password AnthillPro will use to connect to AccuWork must already be configured in AccuWork.
Before you can start using the integration, you need to tell AnthillPro about AccuWork. This is done on the System page, under the Integration menu. Any steps within AnthillPro relying on AccuWork will not work until the integration is configured.
The AccuWork integration requires an issue DB where AccuWork will look for issues as well a user name and password for accessing it.
Go to System > AccuWork from the Integration menu.
On the AccuWork page, click Create New.
Give the following (all fields may contain scripts and/or property lookups):
Issue DB (AccuRev depot). Give the AccuWork issue DB that AccuWork will use to find issues.
Issue URL. Give the AccuWork issue URL. For example, if you provide a URL template such as:
http://accuwork.company.com/browse/${issueId}, the value${issueId}will be replaced in the template with the issue id of the associated issue. This will allow the AnthillPro UI to generate links directly to the AccuWork issue page.User Name. Give user name AnthillPro will use to be used to connect to AccuWork. This name must be configured in AccuWork in order for the integration to work.
Password. The password used to connect to AccuWork. This password must correspond to the AccuWork user name and must be configured in AccuWork.
Password Script (optional). To use a script or property lookups for the password, leave the Password field blank and enter it here. See Scripting.
Click Save then Done.
See Add AccuWork Step to Job.
Once the integration is configured, you can add the Publish Issue Report step to your build job. Typically, this will be included near the end of the job. Once the step is added to your job, the next time the build is run and a defect is found, AnthillPro will generate a report and make it available on the Build Life's Issues tab. To configure the job:
Go to Administration and select the job you want to add the step to.
Add Publish Issue Report step. Add the step to create a report of AccuWork issues from the build's changelog. The step parses the AccuRev change package to retrieve the commit comments. Insert the step near the end of job, typically before the assign status step(s).
On the Steps page, go to Issue Tracking > AccuWork, select the step, and click Select.
Configure step:
Name. Give this step a name. For example, Publish AccuWork Issues.
Description (optional). Provide a description of this step.
Issue Id Pattern. Give a regular expression to locate AccuWork-issue ids within the changelog comments. You may add "()"'s around the portion of the pattern which identifies the actual Issue ID. The pattern "TST-[0-9]+" would match (returning the same string as issue ids) "TST-1" and "TST-932415", but not match "TST-a", "TST-", or "TST.1" The pattern "Bug:\[(TST-[0-9]+)\]" would match "Bug:[TST-1]" using bug id TST-1.
In the example, the pattern includes TST, identifies the issues as belonging to AccuWork. Whenever AnthillPro comes across this regular expression, it will automatically generate an issue report for the Build Life.
Include Dependencies. Check the box if you want AnthillPro to include any issues associated with a dependent project. By checking the box, AnthillPro will pars the dependency changelogs when looking for issues.
Show Additional Options (advanced). Select the Show Additional Options link to configure more options.
Is Active. Select No to temporarily deactivate the step without deleting it; otherwise select Yes.
Pre-Condition Script. From the drop down menu, select the condition which must be met for the step to continue. Before editing an existing script or creating a new one, see Step Pre-Condition Scripts.
Ignore Failures. Select Yes if this step should not effect the determination for step continuation or the status determination of the job.
PostProcessingScript. Select a script for determining when commands should count as fail or succeed. See Post Processing Scripts.
Timeout. Enter the time in minutes after the start of the step when AnthillPro will consider the step as timed out and abort it.
Click Save then Done.
Run workflow and view report. The next time the build runs and an issue is detected, AnthillPro will make the report available on the Build Life Issues tab. From there, you can click on the issue link to go to the AccuWork page.
Create a new bug, add comments to a bug, and resolve bugs with the Bugzilla 2.22.2 integration. AnthillPro users can also create a report of Bugzilla bugs from the changelog.
In order to use the integration, AnthillPro must first be configured with Bugzilla. The integration is implemented as AnthillPro job steps configured on the Job Configuration page. When using the integration, click the Create Step button (or select the Insert After/Before icon) to add steps to a job. Once the job is configured, it is then added to the workflow under the Definition tab.
Bugzilla Steps:
Create Bug. Create a new bug in Bugzilla. Typically used during a build job.
Add Comments. Add Comments from the current changelog to matching Bugzilla Bugs. In order to use this step, a set working directory, get changelog, and publish changelog step is necessary.
Resolve Bug. Resolve or Close a Bugzilla Issue. In order to use this step, a set working directory, get changelog, and publish changelog step is necessary. Can be used as a post-deployment step added to a deploy workflow to update the state of a Bugzilla bug.
Publish Bug Report. Create a Report of Bugzilla Bugs from the current changelog. In order to use this step, a set working directory, get changelog, and publish changelog step is necessary.
This tutorial will follow a simple project configuration that uses the Create Bug, Add Comment, and Publish Bug Report steps as part of a build workflow. The Resolve Bug step is used as a post-deployment step as part of a deploy workflow. The example in this tutorial uses Subversion, but the basic configuration is similar for any repository type. Your jobs will vary, but the Bugzilla integration is added as a job step similar to what is described below. Though the example goes through the manual creation of a build job, it is possible to use the Job Wizard to create a build job and then manually configure a second job to run as part of the same workflow.
You must have AnthillPro administrative privileges to configure the integration. See Manage Security.
A project must be active in AnthillPro.
A Life-Cycle Model must be configured with the appropriate Status and Artifact Sets. See Using Life-Cycle Models.
Let AnthillPro know about Bugzilla. Any steps within AnthillPro relying on Bugzilla will not work until this integration is configured. These fields may all contain scripts and/or property lookups. See Scripting.
Go to System > Bugzilla from the Integrations menu.
On the Bugzilla Integration page, click Edit.
Configure the integration:
Bugzilla Server URL. Input the Bugzilla server URL.
Bugzilla Issue URL. You can have AnthillPro automatically generate a link to all of the issues it associates with a Build Life if you give the Issue URL here. Once you give the URL pattern, the issues that appear on the Issues Tab of a Build Life will be linked to the issue in your issue tracker tool for reviewing the issue, adding additional comments, making edits, etc.
Please provide a URL template such as
http://bugs.company.com/browse/${issueId}. The value${issueId}will be replaced in the template with the issue id of the associated issue. This field provides a template which is used throughout AnthillPro to generate links from issues directly to an issue description page within your issue tracker.User Name. Give the user name to be used to connect to the Bugzilla server.
Password. Provide the password to be used to connect to the Bugzilla server.
Password Script. To use a script or property lookups for the password, leave the Password field blank and enter it here. See Scripting.
Ignore Certificate. In some instances, the a security certificate error may interfere with the integration (e.g., when using https). If this is the case, check the box.
Click Set then Done.
This step will follow a job configuration that adds a comment, publishes a report, creates a bug, and resolves a bug in Bugzilla as part of a AnthillPro workflows. Before configuring jobs, see Configure Bugzilla.
The Add Comments, Publish Bug Report, and Create Bug steps are included after the Populate Workspace, Changelog, Stamp, Dependency, Build, Publish Changelog, and Artifact Delivery steps of the Build job.
Go to Administration, select the appropriate project, and click the Add Job icon.
On the New Job Configuration page, choose No (do not use the Job Wizard). Click Select.
Follow the steps for creating a build job.
Add Comments. Select the Insert After icon of the step prior to the point where the Bugzilla step is to be included (Artifact Delivery step in this example). Go to Issue Tracking > Bugzilla, select the Add Comments step, and click Select.
Name the step.
Description. Provide a short description.
Bug Id Pattern. Give a regular expression to locate a Bugzilla bug Id within changelog comments. Add "()" around the portion of the pattern which identifies the actual Issue Id. The pattern "TST-[0-9]+" would match (returning the same string as Issue Id) "TST-1" and "TST-932415", but not match "TST-a", "TST-", or "TST.1". The pattern "Issue:\[(TST-[0-9]+)\]" would match "Issue:[TST-1]" using issue Id TST-1.
In the example, the pattern includes TST which identifies the issue as belonging to a Bugzilla project. Whenever AnthillPro comes across this regular expression, it will automatically add the appropriate comment in Bugzilla.
Additional Comment. Give any information to be added to the JIRA comment (in addition to the commit comment).
Additional Form Fields. Provide the enabled Bugzilla preferences which have required attributes. They must be specified in order for the integration to work. For example, target_milestone. See Bugzilla Documentation.
Show Additional Options (advanced). Select the Show Additional Options link to configure more options.
Is Active. Select No to temporarily deactivate the step without deleting it; otherwise select Yes.
Pre-Condition Script. From the drop down menu, select the condition which must be met for the step to continue. Before editing an existing script or creating a new one, see Step Pre-Condition Scripts.
Ignore Failures. Select Yes if this step should not effect the determination for step continuation or the status determination of the job.
PostProcessingScript. Select a script for determining when commands should count as fail or succeed. See Post Processing Scripts.
Timeout. Enter the time in minutes after the start of the step when AnthillPro will consider the step as timed out and abort it.
Click Save.
Publish Bug Report. Select the Insert After icon of the Add Comments step. Go to Issue Tracking > Bugzilla, select the Publish Bug Report step, and click Select.
Name the step.
Description. Provide a short description.
Issue Id Pattern. Give a regular expression to locate a Bugzilla bug Id within changelog comments. Add "()" around the portion of the pattern which identifies the actual Issue Id. The pattern "TST-[0-9]+" would match (returning the same string as Issue Id) "TST-1" and "TST-932415", but not match "TST-a", "TST-", or "TST.1". The pattern "Bug:\[(TST-[0-9]+)\]" would match "Bug:[TST-1]" using Bug Id TST-1.
In the example, the pattern includes TST, which identifies the issue as belonging to a Bugzilla project. Whenever AnthillPro comes across this regular expression, it will automatically add the appropriate comment in Bugzilla.
Include Dependencies. Check the box to include change logs from dependencies when searching for bug references.
Show Additional Options. See Show Additional Options.
Click Save.
Create Bug. Select the Insert After icon of the Publish Bug Report step. Go to Issue Tracking > Bugzilla, select the Create Bug step, and click Select.
Name the step.
Description. Provide a short description.
Product. Enter the Bugzilla product name.
Component. Give the summary for the bug.
Version. Provide the product version to use for the bug (e.g., AnthillPro 3.4). If left blank this will defaults to Other.
Short Description. Give a short description of the bug. If left blank, this will default to Anthill3 Bug within Bugzilla.
Assigned To. Provide the assignee for the new bug. If left blank this will default to the Bugzilla User AnthillPro logs in as.
Bug File Location. Enter the environment of this issue.
Initial Comment. Give the initial comment to add upon bug creation.
Priority. Provide the Bugzilla priority.
Severity. Enter the Bugzilla severity.
Show Additional Options. See Show Additional Options.
Click Save.
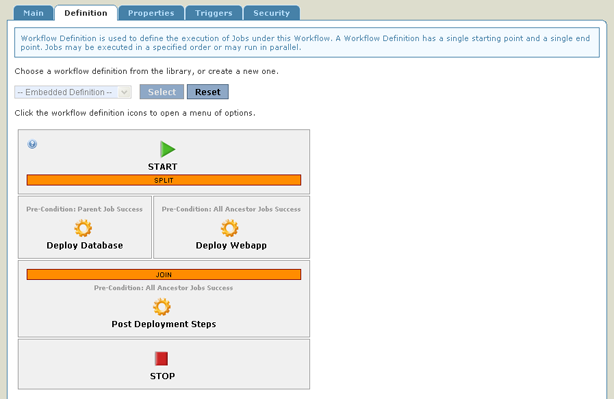
The Resolve Bug step is typically used as part of a post-deployment job. Once the artifacts have been deployed (in the example there are two artifact sets: Database and Webapp), the Resolve Bug step is run as a separate job in order to ensure that all Bugzilla bugs are resolved.
While each job is different, every job will typically run an Assign Status step; the Resolve Bug step; a Get Changelog step; a Publish Changelog step; and a Create Stamp Step.
Go to Administration, select the appropriate project, and click the Add Job icon.
On the New Job Configuration page, choose No (do not use the Job Wizard). Click Select.
Follow the steps for creating a build job.
Select the Insert After icon of the step prior to the point where the Bugzilla step is to be included (Artifact Delivery step in this example). Go to Issue Tracking > Bugzilla, select the Resolve Bug step, and click Select.
Name the step.
Description. Provide a short description.
Bug Key. Enter the bug key to be resolved in Bugzilla.
Resolution. Provide the resolution method to use when resolving the bug.
Form Name. Specify the form names of any Bugzilla preferences that require attributes (e.g., target_milestone). If not specified here, the Bugzilla integration may not work properly.
Show Additional Options. See Show Additional Options.
Click Save.
The Jobs created in the Configure Bugzilla Jobs section must be executed as part of a workflow. This section will assume that an originating workflow has already been configured, and will cover the process of adding the Bugzilla job to the appropriate workflows. Complete workflow configuration is beyond the scope of this tutorial. The topics covered in detail below are specific to using the Bugzilla integration.
Go to Administration, select the project, and select the build workflow.
On the workflow Main page, select the Definition tab.
From the drop-down menu, choose Embedded Definition and click Select.
Left-click the Start icon and select Insert Job After.
Select the Build job created in Configure Bugzilla Jobs, a job pre-condition script, and click Insert Job.
Go to Administration, select the project, and select the deploy workflow.
On the workflow Main page, select the Definition tab.
From the drop-down menu, choose Embedded Definition and click Select.
Left-click the Start icon and select Insert Job After.
Select the Post Deployment Steps job created in the Configure Bugzilla Jobs steps, a job pre-condition script, and click Insert Job.
Note the jobs deploy two artifact sets and that the Post Deploy Steps job will change the Bugzilla bug status for both artifact sets.

Go to Dashboard and select the workflow created in the Add Bugzilla Jobs to Workflows section.
On the workflow Main page, click the Build button for the workflow.
This procedure is the same for the build and deploy workflows.
Once the workflow has completed, select the appropriate Build Life and click the Reports tab.
Select a link to view a report. To go to the issue that was generated in Bugzilla, follow the Bug Id link.

Click the Issues tab to view the issues AnthillPro created in Bugzilla.

To drill down on each Bugzilla step on the Build Life Summary page, see Trace a Build Life to Source.
Create a new defect, add comments to a defect, and resolve issues with the IBM Rational ClearQuest integration. AnthillPro users can also create a report of ClearQuest defects from the changelog.
In order to use the integration, AnthillPro must first be configured with ClearQuest. The integration is implemented as AnthillPro job steps configured on the Job Configuration page. When using the integration, click the Create Step button (or select the Insert After/Before icon) to add steps to a job. Once the job is configured, it is then added to the workflow under the Definition tab. See Using the ClearQuest Integration.
ClearQuest Steps:
Create Defect. Create a new defect in a ClearQuest defect tracker. Typically used during a build job.
Add Comments. Add Comments from the current changelog to matching ClearQuest defects. In order to use this step, a set working directory, get changelog, and publish changelog step is necessary.
Resolve Issue. Resolve a ClearQuest defect. In order to use this step, a set working directory, get changelog, and publish changelog step is necessary. Can be used as a post-deployment step added to a deploy workflow to update the state of a ClearQuest defect.
Publish Defect Report. Create a Report of ClearQuest defects from the current changelog. In order to use this step, a set working directory, get changelog, and publish changelog step is necessary.
This tutorial will follow a simple project configuration that uses the Create Defect, Add Comments, and Publish Defect Report steps as part of a build workflow. The Resolve Issue step is used as a post-deployment step as part of a deploy workflow. The example in this tutorial uses Subversion, but the basic configuration is similar for any repository type. Your jobs will vary, but the ClearQuest integration is added as a job step similar to what is described below. Though the example goes through the manual creation of a build job, it is possible to use the Job Wizard to create a build job and then manually configure a second job to run as part of the same workflow.
See also ClearCase.
The agent running any ClearQuest jobs must be installed on the same Windows machine as the
cqperlclient.You must have AnthillPro administrative privileges to configure the integration. See Manage Security.
A project must be active in AnthillPro.
A Life-Cycle Model must be configured with the appropriate Status and Artifact Sets. See Using Life-Cycle Models.
Let AnthillPro know about ClearQuest. Any steps within AnthillPro relying on ClearQuest will not work until this integration is configured. These fields may all contain scripts and/or property lookups. See Scripting.
Go to System > ClearQuest from the Integrations menu.
On the ClearQuest Integration page, click Edit.
Configure the integration:
User Name. Give the user name to be used to connect to the ClearQuest server.
Password. Provide the password to be used to connect to the ClearQuest server.
Password Script. To use a script or property lookups for the password, leave the Password field blank and enter it here. See Scripting.
Database Name. Give the ClearQuest database name.
Database Schema. Provide the ClearQuest database schema name.
Issue URL. You can have AnthillPro automatically generate a link to all of the issues it associates with a Build Life if you give the Issue URL here. Once you give the URL pattern, the issues that appear on the Issues Tab of a Build Life will be linked to the issue in your issue tracker tool for reviewing the issue, adding additional comments, making edits, etc.
Please provide a URL template such as
http://bugs.company.com/browse/${issueId}. The value${issueId}will be replaced in the template with the issue id of the associated issue. This field provides a template which is used throughout AnthillPro to generate links from issues directly to an issue description page within your issue tracker.
Select the Add Mapping button. Tell AnthillPro about the ClearQuest Schema that will be used. AnthillPro must know the correct Record Type(s) and the corresponding fields for the Name, Status, and Description that will be used when AnthillPro executes the ClearQuest job steps. See Using the ClearQuest Integration.

Record Type. Enter the ClearQuest Record Type to be used in AnthillPro. For example, if the Record Type "Defect" is to be used by the AnthillPro server when executing ClearQuest job steps, enter it in the filed.

Name Mapping. Give the ClearQuest field name that will be used by AnthillPro as the name. For example, if the "Defect" Record Type has a field called "Headline" which you want to use as the name, enter it in the field.
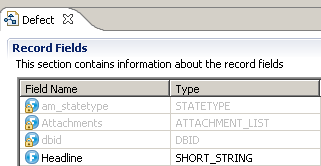
Status Mapping. Give the ClearQuest filed name to be used as the status in AnthillPro. For example, if the "Defect" Record Type has a field named "State" you would like to use as the status, enter it in the field.

Description Mapping. Give the ClearQuest field name to be used as the description in AnthillPro. For example, if the "Defect" Record Type has a field named "Description" you would like to use, enter it in the field.

Click Save.
To have AnthillPro use multiple Record Types, repeat Items 4 and 5. For example, add a ClearQuest Record Type "Task" and/or "Story" (along with its corresponding fields) in addition to the "Defect" record type mentioned above.
Click Set then Done.
This tutorial adds a ClearQuest comment, publishes a ClearQuest report, and creates a defect as part of the build workflow. Complete job configuration is beyond the scope of this tutorial. The topics covered in detail below are specific to using the ClearQuest integration.
The Configure ClearQuest section of this tutorial must be complete.
You must have AnthillPro administrative privileges to configure the integration. See Manage Security.
A project with at least one Build Life must be active in AnthillPro.
A Life-Cycle Model must be configured with the appropriate Status and Artifact Sets. See Using Life-Cycle Models.
This step will follow a job configuration that adds a comment, publishes a report, creates a bug, and resolves a bug in ClearQuest as part of AnthillPro workflows.
The Add Comments, Publish Defect Report, and Create Defect steps are included after the Populate Workspace, Changelog, Stamp, Dependency, Build, Publish Changelog, and Artifact Delivery steps of the Build job.
Go to Administration, select the appropriate project, and click the Add Job icon.
On the New Job Configuration page, choose No (do not use the Job Wizard). Click Select.
Follow the steps for creating a build job.
Add Comments. Select the Insert After icon of the step prior to the point where the ClearQuest step is to be included (Artifact Delivery step in this example). Go to Issue Tracking > ClearQuest, select the Add Comments step, and click Select.
Name the step.
Description. Provide a short description.
Defect Id Pattern. Give a regular expression to locate a ClearQuest defect Id within changelog comments. Add "()" around the portion of the pattern which identifies the actual Issue Id. The pattern "TST-[0-9]+" would match (returning the same string as Issue Id) "TST-1" and "TST-932415", but not match "TST-a", "TST-", or "TST.1". The pattern "Issue:\[(TST-[0-9]+)\]" would match "Issue:[TST-1]" using issue Id TST-1.
In the example, the pattern includes CQDE which identifies the issue as belonging to a ClearQuest project. Whenever AnthillPro comes across this regular expression, it will automatically add the appropriate comment in ClearQuest.
Additional Comment. Give any information to be added to the JIRA comment (in addition to the commit comment).
Show Additional Options (advanced). Select the Show Additional Options link to configure more options.
Is Active. Select No to temporarily deactivate the step without deleting it; otherwise select Yes.
Pre-Condition Script. From the drop down menu, select the condition which must be met for the step to continue. Before editing an existing script or creating a new one, see Step Pre-Condition Scripts.
Ignore Failures. Select Yes if this step should not effect the determination for step continuation or the status determination of the job.
PostProcessingScript. Select a script for determining when commands should count as fail or succeed. See Post Processing Scripts.
Timeout. Enter the time in minutes after the start of the step when AnthillPro will consider the step as timed out and abort it.
Click Save.
Publish Defect Report. Select the Insert After icon of the Add Comments step. Go to Issue Tracking > ClearQuest, select the Publish Defect Report step, and click Select.
Name the step.
Description. Provide a short description.
Defect Id Pattern. Give a regular expression to locate a ClearQuest defect Id within changelog comments. Add "()" around the portion of the pattern which identifies the actual Issue Id. The pattern "TST-[0-9]+" would match (returning the same string as Issue Id) "TST-1" and "TST-932415", but not match "TST-a", "TST-", or "TST.1". The pattern "Bug:\[(TST-[0-9]+)\]" would match "Bug:[TST-1]" using Bug Id TST-1.
In the example, the pattern includes CQDE which identifies the issue as belonging to a ClearQuest project. Whenever AnthillPro comes across this regular expression, it will automatically add the appropriate comment in ClearQuest.
Show Additional Options. See Show Additional Options.
Click Save.
Create Defect. Select the Insert After icon of the Publish Defect Report step. Go to Issue Tracking > ClearQuest, select the Create Defect step, and click Select.
Name the step.
Description. Provide a short description.
Headline. Enter the ClearQuest headline.
Severity. Enter the ClearQuest severity.
Project Name. Provide the ClearQuest product name.
Priority. Provide the ClearQuest priority.
Owner. Provide the owner of the defect.
Defect Description. Enter the description to be sent to ClearQuest.
Show Additional Options. See Show Additional Options.
Click Save.
The Resolve Issue step is typically used as part of a post-deployment job. Once the artifacts have been deployed (in the example there are two artifact sets: Database and Webapp), the Resolve Issue step is run as a separate job in order to ensure that all ClearQuest bugs are resolved.
While each job is different, every job will typically run an Assign Status step; the Resolve issue step; a Get Changelog step; a Publish Changelog step; and a Create Stamp Step.
Go to Administration, select the appropriate project, and click the Add Job icon.
On the New Job Configuration page, choose No (do not use the Job Wizard).
Click Select.
Follow the steps for creating a build job.
Select the Insert After icon of the step prior to the point where the ClearQuest step is to be included (Artifact Delivery step in this example). Go to Issue Tracking > ClearQuest, select the Resolve Issue step, and click Select.
Name the step.
Description. Provide a short description.
Defect Id. Enter the defect Id to be resolved in ClearQuest.
Resolution. Provide the resolution that resolved the issue.
Show Additional Options. See Show Additional Options.
Click Save.
The Jobs created in the Configure Jobs section must be executed as part of a workflow. This section will assume that an originating workflow has already been configured, and will cover the process of adding the ClearQuest job to the appropriate workflows. Complete workflow configuration is beyond the scope of this tutorial. The topics covered in detail below are specific to using the ClearQuest integration.
Go to Administration, select the project, and select the build workflow.
On the workflow Main page, select the Definition tab.
From the drop-down menu, choose Embedded Definition and click Select.
Left-click the Start icon and select Insert Job After.
Select the Build job created in the Configure Jobs section, a job pre-condition script, and click Insert Job.
Go to Administration, select the project, and select the deploy workflow.
On the workflow Main page, select the Definition tab.
From the drop-down menu, choose Embedded Definition and click Select.
Left-click the Start icon and select Insert Job After.
Select the Post Deployment Steps job created in the Configure Jobs section, a job pre-condition script, and click Insert Job.
Note that this jobs deploy two artifact sets and that the Post Deploy Steps job will change the ClearQuest bug status for both artifact sets.

Go to Dashboard and select the workflow created in the Add Jobs to Workflow section.
On the workflow Main page, click the Build button for the workflow.
This procedure is the same for the build and deploy workflows.
Once the workflow has completed, select the appropriate Build Life and click the Reports tab.
Select a link to view a report. To go to the issue that was generated in ClearQuest, follow the link.
Click the Issues tab to view the issues AnthillPro created in ClearQuest.
To drill down on each ClearQuest step on the Build Life Summary page, see Trace a Build Life to Source.
The CollabNet TeamForge integration allows AnthillPro to automatically create a list of TeamForge artifacts related to source changes; comment on those artifacts; provide a link from an artifact (defect, task, story) to a build; and file new artifacts. The integration also takes advantage of TeamForge's release management features, enabling AnthillPro to: create new TeamForge Releases; upload Codestation files (AP artifacts) to the TeamForge File Release System; and upload a file to the FRS that links back to AnthillPro.
| The integration is written as an AnthillPro Plugin, included in the normal distribution. For older AnthillPro 3.7 versions, you will need to download the integration from Supportal and then upload it to the server. Once uploaded, ensure the Plugin is active. |
The integration is implemented as AnthillPro job steps configured on the Job Configuration page. When using the integration, click the Create Step button (or select the Insert After/Before icon) to add steps to a job. Once the job is configured, it is then added to the workflow under the Definition tab. Currently, you can add the following steps to your job:
Comment on Tracker Artifacts. Add comments to the TeamForge Tracker artifacts that are associated with the Build Life. This step is typically used on the originating workflow, as part of your build job.
Create Release. Create a TeamForge release within a project. This step is typically used on the secondary workflow, as part of your release job.
Create Tracker Artifact. Create a new TeamForge Tracker artifact. This step is typically used on the originating workflow, as part of your build job, if you plan on deploying and running tests as part of the job.
Tracker Artifact Report. Parses the TeamForge Tracker artifact identifiers from the Build Life change comments (source changes) and retrieves information on the artifacts. This step is typically used on the originating workflow, as part of your build job. If you are using a Comment on Tracker Artifacts step, include this step in you job before the comment step.
Upload Release Files. Upload files to a TeamForge release. This step is typically used on the secondary workflow, as part of your release job.
The TeamForge base URL is needed to complete the integration.
The user name and password AnthillPro will use must be created in TeamForge prior to using the integration.
The AnthillPro agent performing the work must be able to communicate with the TeamForge server.
Let AnthillPro know about TeamForge. The information given here will be used by multiple jobs: any steps within AnthillPro relying on TeamForge will not work until this integration is configured.
| The integration is written as an AnthillPro Plugin, included in the normal distribution. For older AnthillPro 3.7 versions, you will need to download the integration from Supportal and then upload it to the server. Once uploaded, ensure the Plugin is active. |
If you have multiple installations of TeamForge that AnthillPro must integrate with, configure a separate integration for each. Then, when configuring jobs, select the correct installation.
Go to System > TeamForge from the Integrations menu.
On the TeamForge page, click Create New.
Configure the integration:
Name. Give a unique name for this integration. The name given here will be used throughout the AnthillPro system -- specifically during job creation. If you are configuring integrations with multiple TeamForge installations, ensure that each name is unique.
TeamForge URL. Enter the base URL to the TeamForge installation base URL: e.g.
http://teamforge.company.com.Username. Give the user name to be used to connect to TeamForge. This must be configured in TeamForge prior to running any jobs using this integration.
Password. Provide the password associated with the user given above. This must be configured in TeamForge prior to running any jobs using this integration.
Confirm password.
Click Save then Done.
Once the integration is configured, you can add build and release jobs (that use TeamForge integration) to your project. How you configure the jobs will depend on how your TeamForge platform is set up, as well as on your AnthillPro processes.
| If you are unfamiliar with setting up projects and workflows, please see the Getting Started section before continuing. Specifically, the Setting Up a Build and Setting Up a Deployment sections. |
There are two basic usage scenarios, one for build workflows and one for release workflows:
Steps used with your build job. In general, you add the following steps to your build job after the actual build steps, near the end of your job, and as part of your originating workflow. In order for the Tracker Artifact Report step to work, it must parse the source changes associated with the build. If AnthillPro finds any appropriate Tracker artifacts, it will then comment on them. The steps may be included in the following order:
Tracker Artifact Report. Parses the TeamForge Tracker artifact identifiers from the Build Life change comments (source changes) and retrieves information on the artifacts. This step is typically used on the originating workflow, as part of your build job. If you are using a Comment on Tracker Artifacts step, include this step in you job before the comment step.
Comment on Tracker Artifacts. Add comments to the TeamForge Tracker artifacts that are associated with the Build Life. This step is typically used on the originating workflow, as part of your build job, and requires a Tracker Artifact Report step that sets the artifacts on the Build Life prior to the comment step.
Create Tracker Artifact (optional). Create a new TeamForge Tracker artifact. This step is typically used on the originating workflow, as part of your build job, if you plan on deploying and running tests as part of the job.
See Add TeamForge to Build Job (Build Workflow) for more.
Steps used with your release job. In general, you add the following steps to your release job, as part of a secondary workflow. The steps may be included in the following order:
Create Release. Create a TeamForge release within a project. This step is typically used on the secondary workflow, as part of your release job.
Upload Release Files. Upload files to a TeamForge release. This step is typically used on the secondary workflow, as part of your release job.
See Add TeamForge to Release Job (Secondary Workflow) for more.
Either add the following steps to an existing build job or create a new build job that uses the steps. What follows assumes you are already familiar with basic AnthillPro job configuration (if not, please see Setting Up a Build before continuing). The TeamForge steps, specifically the Tracker Artifact Report step, rely on any Tracker comments found in the source being built, so the steps need to be placed after the actual build steps. Typically, you should include the steps near the end of the job, prior to any assign status steps. To configure a build job:
Go to Administration, and select the appropriate project and either select an existing build job or create a new one. If you are creating a new job, the use the Create Step button to add the first job step. Add the following job steps:
Add the Tracker Artifact Report step. Parses the TeamForge Tracker artifact identifiers from the Build Life change comments (source changes) and retrieves information on the artifacts. This step is typically used on the originating workflow, as part of your build job.
If you are using a Comment on Tracker Artifacts step, include this step in you job before the comment step.
Name the step. This name will be used by the AnthillPro system: e.g., Get TeamForge Tracker Artifacts.
Description. Give an optional description of this step.
Working Directory Offset (optional). Give the working directory to use when executing this command. This is relative to current working directory. To use the current directory, leave this field blank.
Artifact Pattern. Give the pattern to parse the TeamForge Tracker artifact identifier from the change comments: e.g.,
artf[0-9]+.TeamForge. Select the correct integration from the drop-down menu (this is the integration set up in the Configure TeamForge section). If you configured multiple integrations on the AnthillPro System page, make sure you select the correct one. Note that it is possible for a single job -- but not a step -- to use different AnthillPro/TeamForge-server configurations.
Show Environment Variables (optional; advanced). Give any optional environment variables in "name=value" format.
Environment variables values may contain references to existing values in the following format:
name=${env/<NAME>};value. If the value of the <NAME> variable is "value2" in the current environment, then the above example will be expanded to:name=value2;value.Using this technique, it is possible add an entry to PATH in the following manner:
PATH=my/path/entry;0. Case is significant even on Windows systems.Show Additional Options (optional; advanced). Select the Show Additional Options link to configure more options.
Is Active. Select No to temporarily deactivate the step without deleting it; otherwise select Yes.
Pre-Condition Script. From the drop down menu, select the condition which must be met for the step to continue. Before editing an existing script or creating a new one, see Step Pre-Condition Scripts in the User Documentation.
Ignore Failures. Select Yes if this step should not effect the determination for step continuation or the status determination of the job.
PostProcessingScript. Select a script for determining when commands should count as fail or succeed. See Post Processing Scripts in the User Documentation.
Timeout. Enter the time in minutes after the start of the step when AnthillPro will consider the step as timed out and abort it.
Click Save.
Add the Comment on Tracker Artifacts step. Add comments to the TeamForge Tracker artifacts that are associated with the Build Life. This step is typically used on the originating workflow, as part of your build job.
This requires a Tracker Artifact Report step that sets the artifacts on the Build Life prior to the comment step. Name the step. This name will be used by the AnthillPro system.
Description. Give an optional description of this step.
Working Directory Offset (optional). Give the working directory to use when executing this command. This is relative to current working directory. To use the current directory, leave this field blank.
Comment. Give the template to use for adding a comment to TeamForge Tracker artifacts. For example:
AnthillPro found this artifact referenced in a build of ${bsh:
  ProjectLookup.getCurrent().getName()}
  - ${bsh:WorkflowLookup.getCurrent().getName()}
 Build Life: ${bsh:
   BuildLifeLookup.getCurrent().getId()} - ${bsh:
   UrlHelper.getBuildLifeUrl(BuildLifeLookup.getCurrent())}
 Source Revisions: ${bsh:
   import com.urbancode.anthill3.domain.repository.*;
   StringBuilder changeIds = new StringBuilder();
   for (RepositoryChangeSet changeSet : ChangeSetHelper.getChangeSetArray()) {
     changeIds.append(changeSet.getChangeId()).append(" ");
   \}
   return changeIds;
}
TeamForge. Select the correct integration from the drop-down menu (this is the integration set up in the Configure TeamForge section). If you configured multiple integrations on the AnthillPro System page, make sure you select the correct one. Note that it is possible for a single job -- but not a step -- to use different AnthillPro/TeamForge-server configurations.
Show Environment Variables (optional; advanced). See Show Environment Variables above.
Show Additional Options (optional; advanced). See Show Additional Options above.
Click Save.
Add the Create Tracker Artifact step (optional). Create a new TeamForge Tracker artifact. This step is typically used on the originating workflow, as part of your build job, if you plan on deploying and running tests as part of the job.
Name the step. This name will be used by the AnthillPro system.
Description. Give an optional description of this step.
Working Directory Offset (optional). Give the working directory to use when executing this command. This is relative to current working directory. To use the current directory, leave this field blank.
Project. Give the name of the TeamForge project to add the artifact to.
Tracker. Enter the name of the TeamForge Tracker to add the artifact to: e.g., Defects, Epics, Stories, Tasks, Tests, etc.
Artifact Title. Provide the title of the artifact.
Artifact Description. Give a brief description of the artifact.
Artifact Group. Give the group of the artifact.
Artifact Category. Enter the category of the artifact.
Artifact Customer. Give the customer of the artifact.
Artifact Priority. Select the priority of the artifact.
Artifact Est. Hours. Give the estimated hours of the artifact.
Artifact Assignee. Enter the assigned user name of the artifact.
TeamForge. Select the correct integration from the drop-down menu (this is the integration set up in the Configure TeamForge section). If you configured multiple integrations on the AnthillPro System page, make sure you select the correct one. Note that it is possible for a single job -- but not a step -- to use different AnthillPro/TeamForge-server configurations.
Show Environment Variables (optional; advanced). See Show Environment Variables above.
Show Additional Options (optional; advanced). See Show Additional Options above.
Click Save.
Add job to workflow. If you are configuring a new build job, you will need to add the job to your build workflow. Complete documentation is outlined in the Setting Up a Build section.
Either add the following steps to an existing release job or create a new release job that uses the steps. What follows assumes you are already familiar with basic AnthillPro job configuration. The process for running a TeamForge release is the same as outlined in the Setting Up a Deployment section -- it is run as a secondary process. Typically, the Create Release step should be included prior to the Upload Release File step -- before any of your assign status steps. To configure a release job:
Go to Administration, and select the appropriate project and either select an existing release job or create a new one. When adding steps, you select either the Insert After or Insert Before icons of existing steps. If you are creating a new job, the use the Create Step button to add the first job step. Add the following job steps:
Add the Create Release step. Create a TeamForge release within a project.
Name the step. This name will be used by the AnthillPro system.
Description. Give an optional description of this step.
Working Directory Offset (optional). Give the working directory to use when executing this command. This is relative to current working directory. To use the current directory, leave this field blank.
Project. Give the name of the TeamForge project to create in the release: e.g., Brokerage System.
Package. Provide the name of the TeamForge package to create the release in: e.g., Product 1.
Release. Enter the name of the TeamForge release to create: e.g.,
Release
                ${bsh:StampLookup.getLatestStampValue()}
. The example, using a simple BeanShell lookup, will append the "Release" with the latest stamp value of the Build Life. If you stamp value is 1.2.3, then the release name passed to TeamForge will be "Release 1.2.3".Status. Select the status of the TeamForge release to create.
TeamForge. Select the correct integration from the drop-down menu (this is the integration set up in the Configure TeamForge section). If you configured multiple integrations on the AnthillPro System page, make sure you select the correct one. Note that it is possible for a single job -- but not a step -- to use different AnthillPro/TeamForge-server configurations.
Show Environment Variables (optional; advanced). See Show Environment Variables above.
Show Additional Options (optional; advanced). See Show Additional Options above.
Click Save.
Add the Upload Release Files step. Upload files to a TeamForge release.
Name the step. This name will be used by the AnthillPro system.
Description. Give an optional description of this step.
Working Directory Offset (optional). Give the working directory to use when executing this command. This is relative to current working directory. To use the current directory, leave this field blank.
Project. Give the name of the TeamForge project to create in the release: e.g., Brokerage System.
Package. Provide the name of the TeamForge package to create the release in: e.g., Product 1.
Release. Enter the name of the TeamForge release to create: e.g.,
Release
                ${bsh:StampLookup.getLatestStampValue()}
. The example, using a simple BeanShell lookup, will append the "Release" with the latest stamp value of the Build Life. If you stamp value is 1.2.3, then the release name passed to TeamForge will be "Release 1.2.3".Base Directory. Here, you need to give the relative base directory path from the current working directory to use the Includes and Excludes patterns within. If your files are in a "uploadrelease" directory, you would specify
uploadrelease/here.Includes. List the files to be retrieved from within the base directory. You can specify the names of files that reside in the base directory: e.g.,
AnthillBuildLife.html. Or, if the files are located in a sub directory, you specify something likehtml/AnthillBuildLife.html. Each include pattern must be entered on a separate line.You can also use the following wild cards to tell AnthillPro what to include:
**Indicates include every directory within the base directory.*Used to include every file. So, if you use*.html, the files matching this pattern will be included.**/*Tells AnthillPro to retrieve the entire file tree underneath the base directory.
Excludes. Give the patterns of the files that should be skipped from the include. This field is set in the same way as the Include Artifacts field, only you are telling AnthillPro what NOT to include. If you leave this filed blank, AnthillPro will exclude no files.
TeamForge. Select the correct integration from the drop-down menu (this is the integration set up in the Configure TeamForge section). If you configured multiple integrations on the AnthillPro System page, make sure you select the correct one. Note that it is possible for a single job -- but not a step -- to use different AnthillPro/TeamForge-server configurations.
Show Environment Variables (optional; advanced). See Show Environment Variables above.
Show Additional Options (optional; advanced). See Show Additional Options above.
Click Save.
Add job to workflow. If you are configuring a new release job, you will need to add the job to your release (secondary) workflow. Complete documentation is outlined in the Setting Up a Deployment section.
Create a new issue, add comments to an issue, and update issues with the JIRA integration. AnthillPro users can also create a report of JIRA issues from the changelog. Additionally, you can have AnthillPro publish a link to any JIRA issue page by configuring the Issue URL field. When configured, the data on the Build Life's Issue page becomes a link.
In order to use the JIRA integration, AnthillPro must first be configured to run the appropriate steps within JIRA. The JIRA integration is implemented as AnthillPro job steps configured on the Job Configuration page. When using the integration, click the Create Step button (or select the Insert After/Before icon) to add steps to a job. Once the job is configured, it is then added to the workflow under the Definition tab.
JIRA Steps:
Create Issue. Create a new issue in a JIRA. Typically used during a build job.
Add Comments. Add comments from the current changelog to matching JIRA issues. In order to use this step, a set working directory, get changelog, and publish changelog step is necessary.
Update Issue. Used to resolve or close a JIRA issue. In order to use this step, a set working directory, get changelog, and publish changelog step is necessary. You can also have AnthillPro pass a comment at the time the issue is updated. Can be used as a post-deployment step added to a deploy workflow to update the state of a JIRA issue.
Publish Issue Report. Create a Report of JIRA issues from the current changelog. In order to use this step, a set working directory, get changelog, and publish changelog step is necessary.
This tutorial will follow a simple project configuration using the JIRA integration steps. The example in this tutorial uses Subversion, but the basic configuration is similar for any repository type. Your jobs will vary, but the JIRA integration is added similar to what is described below. The example goes through the manual creation of a build job; however, it is possible to use the Job Wizard to create a build job and then manually configure a second job to run as part of the same workflow.
Let AnthillPro know about JIRA. Any steps within AnthillPro relying on JIRA will not work until this integration is configured. The JIRA integration requires a base URL where the JIRA server is located as well a user name and password for accessing it. These fields may all contain scripts and/or property lookups. See Scripting.
You must have AnthillPro administrative privileges to configure the integration. See Manage Security.
A project must be active in AnthillPro.
A Life-Cycle Model must be configured with the appropriate Status and Artifact Sets. See Using Life-Cycle Models.
Go to System > JIRA from the Integrations menu.
On the JIRA Integration page, click Edit.
Configure the integration:
JIRA Base URL. Input the JIRA server URL.
Issue URL. You can have AnthillPro automatically generate a link to all of the issues it associates with a Build Life if you give the Issue URL here. Once you give the URL pattern, the issues that appear on the Issues Tab of a Build Life will be linked to the issue in your issue tracker tool for reviewing the issue, adding additional comments, making edits, etc.
Please provide a URL template such as
http://bugs.company.com/browse/${issueId}. The value${issueId}will be replaced in the template with the issue id of the associated issue. This field provides a template which is used throughout AnthillPro to generate links from issues directly to an issue description page within your issue tracker.User Name. Give the user name to be used to connect to the JIRA server.
Password. Provide the password to be used to connect to the JIRA server.
Password Script. To use a script or property lookups for the password, leave the Password field blank and enter it here. See Scripting.
Server Version. Specify the JIRA server version (e.g., version 3.6.5 to 3.10.x, select 3.6.5).
Click Set then Done.
This tutorial will follow a job configuration that adds a JIRA comment, publishes a JIRA report, and creates an issue as part of a build workflow. The update issue step is added as a post-deployment step to a deploy workflow.
The Configure JIRA section of this tutorial must be complete.
You must have AnthillPro administrative privileges to configure the integration. See Manage Security.
A project with at least one Build Life must be active in AnthillPro.
A Life-Cycle Model must be configured with the appropriate Status and Artifact Sets. See Using Life-Cycle Models.
Two jobs need to be created to use all the JIRA integration steps. (a.) A build job is created with the JIRA comment, publishes a JIRA report, and creates an issue steps. (b.) The update issue step is added as a post-deployment job.
The Add Comments, Create Issue, and Publish Issue Report steps are included after the Populate Workspace, Changelog, Stamp, Dependency, Build, Publish Changelog, and Artifact Delivery steps of the typical Build job.
Go to Administration, select the appropriate project, and click the Add Job icon.
On the New Job Configuration page, choose No (do not use the Job Wizard). Click Select.
Follow the steps for creating a build job.
Add Comments. Select the Insert After icon of the step prior to the point where the JIRA step is to be included (Artifact Delivery step in this example). Go to Issue Tracking > JIRA, select the Add Comments step, and click Select.
Name the step.
Description. Provide a short description.
Issue Id Pattern. Give a regular expression to locate a JIRA defect Id within changelog comments. Add "()" around the portion of the pattern which identifies the actual Issue Id. The pattern "TST-[0-9]+" would match (returning the same string as Issue Id) "TST-1" and "TST-932415", but not match "TST-a", "TST-", or "TST.1". The pattern "Issue:\[(TST-[0-9]+)\]" would match "Issue:[TST-1]" using issue Id TST-1.
In the example below, the pattern identifies the issue as belonging to a specific JIRA project. Whenever AnthillPro comes across this regular expression, it will automatically add the appropriate comment in JIRA.
Additional Comment. Give any information to be added to the JIRA comment (in addition to the commit comment).
Show Additional Options (advanced). Select the Show Additional Options link to configure more options.
Is Active. Select No to temporarily deactivate the step without deleting it; otherwise select Yes.
Pre-Condition Script. From the drop down menu, select the condition which must be met for the step to continue. Before editing an existing script or creating a new one, see Step Pre-Condition Scripts.
Ignore Failures. Select Yes if this step should not effect the determination for step continuation or the status determination of the job.
PostProcessingScript. Select a script for determining when commands should count as fail or succeed. See Post Processing Scripts.
Timeout. Enter the time in minutes after the start of the step when AnthillPro will consider the step as timed out and abort it.
Click Save.
Create Issue. Select the Insert After icon of the Add Comments step. Go to Issue Tracking > JIRA, select the Create Issue step, and click Select. This step will create an issue if a failure occurs.
Name the step.
Description. Provide a short description.
Project Key. Enter the JIRA project key.
Assignee. Provide the assignee for the new issue. An assignee of -1 will use JIRA's automatic assignment.
Summary. Enter the issue summary.
Environment. Give the environment for the issue.
Issue Description. Enter the description.
Show Additional Options. See Show Additional Options.
Click Save.
Publish Issue Report. Select the Insert After icon of the Create Issue step. Go to Issue Tracking > JIRA, select the Publish Issue Report step, and click Select.
Name the step.
Description. Provide a short description.
Report Name. If a new name is not given, the step name will be used.
Issue Id Pattern. Give a regular expression to locate a JIRA defect Id within changelog comments. Add "()" around the portion of the pattern which identifies the actual Issue Id. The pattern "TST-[0-9]+" would match (returning the same string as Issue Id) "TST-1" and "TST-932415", but not match "TST-a", "TST-", or "TST.1". The pattern "Issue:\[(TST-[0-9]+)\]" would match "Issue:[TST-1]" using issue Id TST-1.
Include Dependencies. Check to include change logs from dependencies when searching for issues.
Show Additional Options. See Show Additional Options.
Click Save.
The Update Issue step is typically used as part of a post-deployment job. Once the artifacts have been deployed (in the example there are two artifact sets: Database and Webapp), the Update Issue step can be run as a separate job to ensure that all JIRA issues are resolved.
Go to Administration, select the appropriate project, and click the Add Job icon.
On the New Job Configuration page, choose No (do not use the Job Wizard). Click Select.
Follow the steps for creating a build job.
Select the Insert After icon of the step prior to the point where the JIRA step is to be included (Artifact Delivery step in this example). Go to Issue Tracking > JIRA, select the Update Issue step, and click Select.
Name the step.
Description. Provide a short description.
Action Name. Give the JIRA action which should be performed on the issues (e.g. Resolve Issue or Close Issue).
Issue Key. Enter the issue key to be resolved in JIRA.
Issue Id Pattern in Changelog. Give a regular expression to locate a JIRA defect Id within changelog comments. Add "()" around the portion of the pattern which identifies the actual Issue Id. The pattern "TST-[0-9]+" would match (returning the same string as Issue Id) "TST-1" and "TST-932415", but not match "TST-a", "TST-", or "TST.1". The pattern "Issue:\[(TST-[0-9]+)\]" would match "Issue:[TST-1]" using issue Id TST-1.
Additional Comment. Give any comments to accompany the updated issue; for example, include the Build Life that the issue was resolved in. To use scripts with this field, see Scripting.
Show Additional Options. See Show Additional Options.
Click Save.
The Jobs created in the Configure Jobs section must be executed as part of a workflow. This section will assume that an originating workflow has already been configured, and will cover the process of adding the JIRA jobs to the appropriate workflows. Complete workflow configuration is beyond the scope of this tutorial. The topics covered in detail below are specific to using the JIRA integration.
Go to Administration, select the project, and select the build workflow.
On the workflow Main page, select the Definition tab.
From the drop-down menu, choose Embedded Definition and click Select.
Left-click the Start icon and select Insert Job After.
Select the Build job created in the Configure Jobs section, a job pre-condition script, and click Insert Job.
Go to Administration, select the project, and select the deploy workflow.
On the workflow Main page, select the Definition tab.
From the drop-down menu, choose Embedded Definition and click Select.
Left-click the Start icon and select Insert Job After.
Select the Post Deployment Steps job created in the Configure Jobs section, a job pre-condition script, and click Insert Job.
Note that this jobs deploy two artifact sets and that the Post Deploy Steps job will change the JIRA issue status for both artifact sets.
Go to Dashboard and select the workflow created in the Create Workflow section.
On the workflow Main page, click the Build button for the workflow.
This procedure is the same for the build and deploy workflows.
Once the workflow has completed, select the appropriate Build Life and click the Reports tab.
Select a link to view a report. To go to the issue that was generated in JIRA, follow the Issue Id link.

Click the Issues tab to view the issues AnthillPro created in JIRA.

To drill down on each JIRA step on the Build Life Summary page, see Trace a Build Life to Source.
With the PVCS Tracker integration, AnthillPro users add comments to, resolve, or create a report of PVCS Tracker issues from the changelog.
In order to use the PVCS Tracker integration, AnthillPro must first be configured with an existing PVCS repository. Once the PVCS repository is configured, AnthillPro must then be configured with PVCS Tracker to run the appropriate steps. The PVCS Tracker integration is implemented as AnthillPro job steps configured on the Job Configuration page. When using the integration, click the Create Step button (or select the Insert After/Before icon) to add steps to a job. Once the job is configured, it is then added to the workflow under the Definition tab. See
PVCS Tracker Steps:
Add Comments. Add comments from the current changelog to matching PVCS Tracker issues. In order to use this step, a set working directory, get changelog, and publish changelog step is necessary.
Resolve Issue. Resolve PVCS Tracker issue. In order to use this step, a set working directory, get changelog, and publish changelog step is necessary. Can be used as a post-deployment step added to a deploy workflow to update the state of a PVCS Tracker issue.
Publish Issue Report. Create a Report of PVCS Tracker issues from the current changelog. In order to use this step, a set working directory, get changelog, and publish changelog step is necessary.
This tutorial will follow a simple project configuration using the PVCS Tracker integration steps. The example in this tutorial uses Subversion, but the basic configuration is similar for any repository type. Your jobs will vary, but the PVCS Tracker integration is added as a job step similar to what is described below. The example goes through the manual creation of a build job; however, it is possible to use the Job Wizard to create a build job and then manually configure a second job to run as part of the same workflow.
Let AnthillPro know about PVCS Tracker. Any steps within AnthillPro relying on PVCS Tracker will not work until a PVCS repository and this integration is configured. The PVCS Tracker integration requires the PVCS Tracker server name, a user name, and a password. These fields may all contain scripts and/or property lookups. See Scripting.
You must have AnthillPro administrative privileges to configure the integration. See Manage Security.
A PVCS repository must be configured with AnthillPro. See PVCS Source Control.
A project must be active in AnthillPro.
A Life-Cycle Model must be configured with the appropriate Status and Artifact Sets. See Using Life-Cycle Models.
Go to System > PVCS Tracker from the Integrations menu.
On the PVCS Tracker Integration page, click Edit.
Configure the integration:
Server Name. Input the PVCS Tracker server URL.
Issue URL. You can have AnthillPro automatically generate a link to all of the issues it associates with a Build Life if you give the Issue URL here. Once you give the URL pattern, the issues that appear on the Issues Tab of a Build Life will be linked to the issue in your issue tracker tool for reviewing the issue, adding additional comments, making edits, etc.
Please provide a URL template such as
http://bugs.company.com/browse/${issueId}. The value${issueId}will be replaced in the template with the issue id of the associated issue. This field provides a template which is used throughout AnthillPro to generate links from issues directly to an issue description page within your issue tracker.User Name. Give the user name to be used to connect to the PVCS Tracker server.
Password. Provide and confirm the password to be used to connect to the PVCS Tracker server.
Password Script. To use a script or property lookups for the password, leave the Password field blank and enter it here. See Scripting.
Click Set then Done.
This tutorial will follow a job configuration that adds a PVCS Tracker comment and publishes a PVCS Tracker report as part of a build workflow. The resolve defect step is added as a post-deployment step to a deploy workflow.
The Configure PVCS Tracker of this tutorial must be complete.
You must have AnthillPro administrative privileges to configure the integration. See Manage Security.
A project with at least one Build Life must be active in AnthillPro.
A Life-Cycle Model must be configured with the appropriate Status and Artifact Sets. See Using Life-Cycle Models.
Two jobs need to be created to use all the PVCS Tracker integration steps. (a.) A build job is created with the Add Comments and Publish Issue Report steps. (b.) The Resolve Issue step is added as a post-deployment job.
The Add Comments and Publish Issue Report steps are included after the Populate Workspace, Changelog, Stamp, Dependency, Build, Publish Changelog, and Artifact Delivery steps of the Build job.
Go to Administration page, select the appropriate project, and click the Add Job icon.
On the New Job Configuration page, choose No (do not use the Job Wizard). Click Select.
Follow the steps for creating a build job.
Add Comments. Select the Insert After icon of the step prior to the point where the PVCS Tracker step is to be included (Artifact Delivery step in this example). Go to Issue Tracking > PVCS Tracker, select the Add Comments step, and click Select.
Name the step.
Description. Provide a short description.
Issue Id Pattern. Give a regular expression to locate a PVCS Tracker defect Id within changelog comments. Add "()" around the portion of the pattern which identifies the actual Issue Id. The pattern "TST-[0-9]+" would match (returning the same string as Issue Id) "TST-1" and "TST-932415", but not match "TST-a", "TST-", or "TST.1". The pattern "Issue:\[(TST-[0-9]+)\]" would match "Issue:[TST-1]" using issue Id TST-1.
In the example below, the pattern identifies the issue as belonging to a specific PVCS Tracker project. Whenever AnthillPro comes across this regular expression, it will automatically add the appropriate comment in PVCS Tracker.
Additional Comment. Use this field to add any additional information to the PVCS Tracker commit comment.
Project Name. Enter the name of the PVCS Tracker project where the issues are to be located.
Show Additional Options (advanced). Select the Show Additional Options link to configure more options.
Is Active. Select No to temporarily deactivate the step without deleting it; otherwise select Yes.
Pre-Condition Script. From the drop down menu, select the condition which must be met for the step to continue. Before editing an existing script or creating a new one, see Step Pre-Condition Scripts.
Ignore Failures. Select Yes if this step should not effect the determination for step continuation or the status determination of the job.
PostProcessingScript. Select a script for determining when commands should count as fail or succeed. See Post Processing Scripts.
Timeout. Enter the time in minutes after the start of the step when AnthillPro will consider the step as timed out and abort it.
Click Save.
Publisher Issue Report. Select the Insert After icon of the Add Comments step. Go to Issue Tracking > PVCS Tracker, select the Publisher Issue Report step, and click Select.
Name the step.
Description. Provide a short description.
Report Name. If a new name is not given, the step name will be used.
Defect Id Pattern. Give a regular expression to locate a PVCS Tracker defect Id within changelog comments. Add "()" around the portion of the pattern which identifies the actual Issue Id. The pattern "TST-[0-9]+" would match (returning the same string as Issue Id) "TST-1" and "TST-932415", but not match "TST-a", "TST-", or "TST.1". The pattern "Issue:\[(TST-[0-9]+)\]" would match "Issue:[TST-1]" using issue Id TST-1.
Project Name. Enter the name of the PVCS Tracker project where the issues are to be located.
Show Additional Options. See Show Additional Options.
Click Save.
The Resolve Issue step is typically used as part of a post-deployment job. Once the artifacts have been deployed (in the example there are two artifact sets: Database and Webapp), the Resolve Issue step is run as a separate job in order to ensure that all PVCS Tracker issues are resolved.
Go to Administration, select the appropriate project, and click the Add Job icon.
On the New Job Configuration page, choose No (do not use the Job Wizard). Click Select.
Follow the steps for creating a build job.
Select the Insert After icon of the step prior to the point where the PVCS Tracker step is to be included (Artifact Delivery step in this example). Go to Issue Tracking > PVCS Tracker, select the Resolve Issue step, and click Select.
Name the step.
Description. Provide a short description.
Defect Id. Enter the Defect Id to be resolved in PVCS Tracker.
State. Give the PVCS Tracker state the issue is to be moved into.
Project Name. Enter the name of the PVCS Tracker project where the issues are to be located.
Show Additional Options. See Show Additional Options.
Click Save.
The Jobs created in the Configure Jobs section must be executed as part of a workflow. This section will assume that an originating workflow has already been configured, and will cover the process of adding the PVCS Tracker jobs to the appropriate workflows. Complete workflow configuration is beyond the scope of this tutorial. The topics covered in detail below are specific to using the PVCS Tracker integration.
Go to Administration, select the project, and select the build workflow.
On the workflow Main page, select the Definition tab.
From the drop-down menu, choose Embedded Definition and click Select.
Left-click the Start icon and select Insert Job After.
Select the Build job created in the Configure Jobs section, a job pre-condition script, and click Insert Job.
Go to Administration, select the project, and select the deploy workflow.
On the workflow Main page, select the Definition tab.
From the drop-down menu, choose Embedded Definition and click Select.
Left-click the Start icon and select Insert Job After.
Select the Post Deployment Steps job created in the Configure Jobs section, a job pre-condition script, and click Insert Job.
Note that this jobs deploy two artifact sets and that the Post Deploy Steps job will change the PVCS Tracker issue status for both artifact sets.

Go to Dashboard and select the workflow created in the Create Workflow section.
On the workflow Main page, click the Build button for the workflow.
This procedure is the same for the build and deploy workflows.
Once the workflow has completed, select the appropriate Build Life and click the Reports tab.
Select a link to view a report. To go to the issue that was generated in PVCS Tracker, follow the Issue Id link.
Click the Issues tab to view the issues AnthillPro created in PVCS Tracker.
To drill down on each PVCS Tracker step on the Build Life Summary page, see Trace a Build Life to Source.
The Quality Center integration allows Windows users (through the COM interface) of AnthillPro to add comments, resolve issues, create issues, and publish reports to the AnthillPro UI.
| The integration will only work if the agent(s) running the Quality Center steps uses the 32-bit JVM. If the agent(s) use a 64-bit JVM, the steps will fail. However, the AnthillPro server, which does not run the steps, can run on the 64-bit JVM. |
The Quality Center integration is implemented as AnthillPro job steps configured on the Job Configuration page. When using the integration, click the Create Step button (or select the Insert After/Before icon) to add steps to a job. Once the job is configured, it is then added to the workflow under the Definition tab.
Quality Center Issue Tracking Steps:
Create Issue. Creates a new issue in a Quality Center. This step can be included as part of the job (if run on Windows) without any additional steps.
Add Comments. Adds comments from the current changelog to matching Quality Center Issues. In order to use this step, a set working directory, get changelog, and publish changelog step is necessary.
Resolve Issue. Resolves or closes an issue. This step can be used as a workflow property to specify which defect gets resolved with the action the workflow takes. For example, if deploying to QA resolves an issue, use this step and have the Id be a workflow property. Step can be included as part of the job (if run on Windows) without any additional steps. Can be used as a post-deployment step added to a deploy workflow to update the state of an issue.
Publish Issue Report. Creates a report of issues from the current changelog. In order to use this step, a set working directory, get changelog, and publish changelog step is necessary.
| The Quality Center integration also allows you to run Quality Center and QTP tests. If you using the QTP integration, you must configure the Quality Center integration on the System page. See Quality Center Testing and QuickTest Pro. |
You must have AnthillPro administrative privileges to configure the integration. See Manage Security.
The Mercury Quality Center URL must be available.
AnthillPro must be able to access Quality Center as a user with permissions to run tests.
An AnthillPro agent must be installed on a Windows machine (XP, 2003, Vista, Windows 7) with the Quality Center API installed. For example, the Quality Center server. This may require configuring a Fixed Agent Filter to ensure the job runs on the appropriate machine. Alternately, the agent with the Quality Center API can be added to the Build Farm. This requires the use of a scripted filter to look for the presence of a variable/property (e.g., qc.agent=true) which must be added to the agent. If this option is chosen, it is advisable to include a filter on every build job that excludes the Quality Center agent. See Configure and Edit Agent Filters.
The integration will only work if the agent(s) running the Quality Center steps uses the 32-bit JVM. If the agent(s) use a 64-bit JVM, the steps will fail. However, the AnthillPro server, which does not run the steps, can run on the 64-bit JVM.
The AnthillPro agent that will perform the QualityCenter steps must be installed on the same machine as the QualityCenter client. You can download the client from the QualityCenter server, typically located here:
http://<qc_server>:8080/qcbin/ClientSide_index.html. Follow the instructions on that page to install.
Go to System > Quality Center under the Integration menu.
On the Mercury Quality Center Integration page, click Edit.
Configure the integration:
Enter the Quality Center server URL.
Issue URL. You can have AnthillPro automatically generate a link to all of the issues it associates with a Build Life if you give the Issue URL here. Once you give the URL pattern, the issues that appear on the Issues Tab of a Build Life will be linked to the issue in your issue tracker tool for reviewing the issue, adding additional comments, making edits, etc.
For example, provide a URL template such as
http://bugs.company.com/browse/${issueId}. The value${issueId}will be replaced in the template with the issue id of the associated issue. This field provides a template which is used throughout AnthillPro to generate links from issues directly to an issue description page within your issue tracker.User Name. Enter the user name to be used to connect to the Quality Center server. Make sure that Quality Center user AnthillPro will use to connect to the server has the appropriate permissions.
Password. Enter the password to be used to connect to the Quality Center server.
Password Script (optional). To use a script or property lookups for the password, leave the Password field blank and enter it here. See Scripting.
Click Set and click Done.
Configure the job to automatically add comments, create and resolve issues, and deliver Quality Center bug reports to AnthillPro by setting up the job to run on the agent with the QC COM API installed. While each job is different, most jobs typically run a get changelog step; run steps to interact with the changelog and Quality Center; and generate reports and make issue comments.
For example, the Add Comments, Create Issue, and Publish Issue Report steps are included after the Populate Workspace, Changelog, Stamp, Dependency, Build, Publish Changelog, and Artifact Delivery steps of the typical job.
Go to Administration, select the appropriate project, and configure the job.
Add Comments. Select the Insert After icon of the step prior to the point where the Quality Center step is to be included (Artifact Delivery step in this example). Go to Issue Tracking > Mercury Quality Center, select the Add Comments step, and click Select.
Name. Provide a short name.
Description (optional). Give a short description.
Issue Id Pattern. Input a regular expression to locate Quality Center Issue Id within changelog comments. Add "()" around the portion of the pattern identifying the Quality Center Issue Id (which is simply a number). The pattern "TST-[0-9]+" would match (returning the same string as issue Ids) "TST-1" and "TST-932415", but not match "TST-a", "TST-", or "TST.1". The pattern "Issue:\[(TST-[0-9]+)\]" would match "Issue:[TST-1]" using issue id TST-1.
In the example, the pattern includes XPSSVNQC which identifies the issues as belonging to the Xpetstore project (XPS) that uses Subversion (SVN), and is a Quality Center issue (QC). Whenever AnthillPro comes across this regular expression, it will automatically add the appropriate comment in Quality Center.
Additional Comment. Add any information to be added to the Quality Center comment (in addition to the commit comment).
Domain Name. Provide the name of the Quality Center Domain where projects are located.
Project Name. Give the name of the Quality Center Project where issues are located.
Fail Mode. Select the action you wish AnthillPro to take when an unknown issue ID is encountered.
Show Additional Options (advanced). Select the Show Additional Options link to configure more options.
Is Active. Select No to temporarily deactivate the step without deleting it; otherwise select Yes.
Pre-Condition Script. From the drop down menu, select the condition which must be met for the step to continue. Before editing an existing script or creating a new one, see Step Pre-Condition Scripts.
Ignore Failures. Select Yes if this step should not effect the determination for step continuation or the status determination of the job.
PostProcessingScript. Select a script for determining when commands should count as fail or succeed. See Post Processing Scripts.
Timeout Enter the time in minutes after the start of the step when AnthillPro will consider the step as timed out and abort it.
Click Save.
Publish Issue Report. Select the Insert After icon of the Add Comments step. Go to Issue Tracking > Mercury Quality Center, select the Publish Issue Report step, and click Select.
Name. Provide a short name.
Description (optional). Give a short description.
Report Name. Input the name for this report (default is same as step name).
Issue Id Pattern. Input a regular expression to locate Quality Center Issue Id within changelog comments. Add "()" around the portion of the pattern identifying the Quality Center Issue Id (which is simply a number). The pattern "TST-[0-9]+" would match (returning the same string as issue Ids) "TST-1" and "TST-932415", but not match "TST-a", "TST-", or "TST.1". The pattern "Issue:\[(TST-[0-9]+)\]" would match "Issue:[TST-1]" using issue id TST-1.
In the example, the pattern includes XPSSVNQC which identifies any the issues as belonging to the Xpetstore project (XPS) that uses Subversion (SVN), and is a Quality Center issue (QC). Whenever AnthillPro comes across this regular expression, it will automatically add the appropriate comment in Quality Center.
Include Dependencies. Check to include change logs from dependencies when searching for Issue References.
Domain Name. Provide the name of the Quality Center Domain where projects are located. Make sure this corresponds to the settings in the previous step.
Project Name. Give the name of the Quality Center Project where issues are located. Make sure this corresponds to the settings in the previous step.
Show Additional Options (advanced). See Show Additional Options.
Click Save.
Create Issue. Select the Insert After icon of the step prior to the point where the Quality Center step is to be included (e.g., it may be included after an Artifact Delivery step). Go to Issue Tracking > Mercury Quality Center, select the Add Comments step, and click Select.
Name. Provide a short name.
Description (optional). Give a short description.
Project Key. You must include the Quality Center project key for the project being tested.
Assignee. You must include the Quality Center user this issue must be assigned to. This can be any user with appropriate permissions set in Quality Center.
Summary. Give the Quality Center summary for this issue.
Issue Description. Optionally, you can include any information identifying this issue when it is created. For example, you can include a description that identifies the issue was created by AnthillPro, etc.
Detected By. If you want to use a different name than the default Anthill3, give it here. The name you provide will be displayed in the logs.
Priority. Optionally, you can have AnthillPro set a priority when the issue is created. Make sure that the priority matches those set in Quality Center.
Severity. Optionally, you can have AnthillPro set a severity when the issue is created. Make sure that the severity matches those set in Quality Center.
Status. If you want to use a different status than the default of new, give it here. Make sure that the status matches those set in Quality Center.
Domain Name. Provide the name of the Quality Center Domain where projects are located. Make sure this corresponds to the settings in the previous step.
Project Name. Give the name of the Quality Center Project where issues are located. Make sure this corresponds to the settings in the previous step.
Additional Parameters. Optionally, you can set custom Parameters for the issue. This is entered as a listing of name=value pairs. Each pair must be included on a separate line.
Show Additional Options (advanced). See Show Additional Options.
Click Save.
The Resolve Issue step is typically used as part of a post-deployment job that is run after the deploy job, but part of the same workflow. Once the artifacts have been deployed, the Resolve Issue step is run as a separate job in order to ensure that all issues are resolved.
While each job is different, every job will typically run an Assign Status step; the Resolve Issue step; a Get Changelog step; a Publish Changelog step; and a Create Stamp Step.
Go to Administration, select the appropriate project, and configure the job if not already done.
Select the Insert After icon of the step prior to the point where the ClearQuest step is to be included. Go to Issue Tracking > Quality Center, select the Resolve Issue step, and click Select.
Name the step.
Description. Provide a short description.
Issue ID. Give the issue key to be resolved in Quality Center. You must specify either this or the Issue ID Pattern below.
Issue ID Pattern. If you did not specify the Issue ID, input a regular expression to locate Quality Center Issue ID within changelog comments. Add "()" around the portion of the pattern identifying the Quality Center Issue ID (which is simply a number). The pattern "TST-[0-9]+" would match (returning the same string as issue Ids) "TST-1" and "TST-932415", but not match "TST-a", "TST-", or "TST.1". The pattern "Issue:\[(TST-[0-9]+)\]" would match "Issue:[TST-1]" using issue id TST-1.
In the example, the pattern includes XPSSVNQC which identifies any the issues as belonging to the Xpetstore project (XPS) that uses Subversion (SVN), and is a Quality Center issue (QC). Whenever AnthillPro comes across this regular expression, it will automatically add the appropriate comment in Quality Center.
Status. If you want to use a different status than the default of new, give it here. Make sure that this matches those set for the Quality Center testing step.
Domain Name. Provide the name of the Quality Center Domain where projects are located. Make sure that this matches those set for the Quality Center testing step.
Project Name. Give the name of the Quality Center Project where issues are located. Make sure that this matches those set for the Quality Center testing step.
Show Additional Options. See Show Additional Options.
Click Save.
Complete workflow configuration is beyond the scope of this tutorial. The topics covered in detail below are specific to using the Quality Center integration. The process is the same for both jobs that include the Quality Center steps.
Go Administration and select the appropriate workflow. You can add the job to either your build workflow or as part of a secondary (i.e., testing) workflow.
Go to workflow Main > Definition tab.
From the drop-down menu, choose Embedded Definition and click Select.
Left-click the Start icon and select Insert Job After.
Select the job created in the Create Job section, a job pre-condition script, and click Insert Job.
Select the Properties tab and add a workflow property. This will ensure that the job runs on the appropriate agent when using a scripted agent filter. Make sure that the property you set here is also configured on the agent.
Name. Give the name of the Property (the property <name> will be accessed as ${property:<name>}).
Description. Provide a description for this Property shown when prompting users for value.
Default Value. Input the value for this property.
User May Override. Check if users are able to specify a new value when running this workflow.
Label. Provide a label for this Property shown when prompting users for value (leave blank to use the Name as the Label).
Is Required. Check if a non-empty value for this property is required to run workflow.
Allowed Values. Give the values users are allowed to select for this property (blank for no restriction of value). Separate each value by entering it on its own line.
If you created a post-deploy job with the Resolve step, add it after the original job.
Click Save.
Go to Dashboard and select the appropriate workflow.
On the workflow Main page, click the Build button.
Once the workflow is complete, select the Reports tab.
Select a link to view a report.

To drill down on each Quality Center step on the Build Life Summary page, see Trace a Build Life to Source.
Following is a list of the function calls used in the Quality Center integration:
| TDApiOle80.TDConnection | TestSet.StartExecution | TestSet.TSTestFactory | Step.Field |
| TDConnection.BugFactory | TSScheduler.RunAllLocally | TSTestFactory.NewList | BugFactory.Filter |
| TDConnection.InitConnectionEx | TSScheduler.TdHostName | TSTest.Name | BugFactory.Item |
| TDConnection.Login | TSScheduler.Run | TSTest.Type | BugFactory.AddItem |
| TDConnection.Connect | TSScheduler.ExecutionStatus | TSTest.Status | Filter.Filter |
| TDConnection.Disconnect | ExecutionStatus.RefreshExecStatusInfo | TSTest.HostName | Filter.NewList |
| TDConnection.Logout | ExecutionStatus.Finished | TSTest.TestId | Bug.ID |
| TDConnection.ReleaseConnection | ExecutionStatus.EventsList | TSTest.TestName | Bug.Summary |
| TDConnection.TestSetTreeManager | ExecEventInfo.EventType | TSTest.LastRun | Bug.Field |
| TestSetTreeManager.NodeByPath | ExecEventInfo.EventDate | Run.Name | Bug.AssignedTo |
| TestSetFolder.FindTestSets | ExecEventInfo.EventTime | Run.Status | Bug.DetectedBy |
| TestSet.Id | TestExecStatus.TestId | Run.Field | Bug.Priority |
| TestSet.Item | TestExecStatus.TestInstance | Run.StepFactory | Bug.Project |
| TestSet.Name | TestExecStatus.TsTestId | StepFactory.NewList | Bug.Status |
| TestSet.TestSetFolder | TestExecStatus.Message | Step.Name | Bug.Post |
| TestSet.Status | TestExecStatus.Status | Step.Status |
The Quality Center integration allows Windows users (through the COM interface) of AnthillPro to add comments, resolve issues, create issues, and publish reports to the AnthillPro UI.
| The integration is written as an AnthillPro Plugin, and expands upon the existing Quality Center (Issue Tracking) integration. The integration is included in the normal distribution. For older AnthillPro 3.7 versions, you will need to download the integration from Supportal and then upload it to the server. Once uploaded, ensure the Plugin is active. |
The Quality Center integration is implemented as AnthillPro job steps configured on the Job Configuration page. When using the integration, click the Create Step button (or select the Insert After/Before icon) to add steps to a job.
| The integration will only work if the agent(s) running the Quality Center steps uses the 32-bit JVM. If the agent(s) use a 64-bit JVM, the steps will fail. However, the AnthillPro server, which does not run the steps, can run on the 64-bit JVM. |
Once the job is configured, it is then added to the workflow under the Definition tab.
Quality Center Issue Tracking Steps:
Create Quality Center Issue. Creates a new issue in a Quality Center. This step can be included as part of the job (if run on Windows) without any additional steps.
Add Comments to Quality Center Issue. Adds comments from the current changelog to matching Quality Center Issues. In order to use this step, a set working directory, get changelog, and publish changelog step is necessary.
Update Quality Center Issue. Resolves or closes an issue. This step can be used as a workflow property to specify which defect gets resolved with the action the workflow takes. For example, if deploying to QA resolves an issue, use this step and have the Id be a workflow property. Step can be included as part of the job (if run on Windows) without any additional steps. Can be used as a post-deployment step added to a deploy workflow to update the state of an issue.
Publish Quality Center Issue Report. Creates a report of issues from the current changelog. In order to use this step, a set working directory, get changelog, and publish changelog step is necessary.
| The Quality Center integration also allows you to run Quality Center and QTP tests. If you using the QTP integration, you must configure the Quality Center integration on the System page. See Quality Center Plugin (Testing) and QuickTest Pro. |
You must have AnthillPro administrative privileges to configure the integration. See Manage Security.
The Mercury Quality Center URL must be available.
AnthillPro must be able to access Quality Center as a user with permissions to run tests.
An AnthillPro agent must be installed on a Windows machine (XP, 2003, Vista, Windows 7) with the Quality Center API installed. For example, the Quality Center server. This may require configuring a Fixed Agent Filter to ensure the job runs on the appropriate machine. Alternately, the agent with the Quality Center API can be added to the Build Farm. This requires the use of a scripted filter to look for the presence of a variable/property (e.g., qc.agent=true) which must be added to the agent. If this option is chosen, it is advisable to include a filter on every build job that excludes the Quality Center agent. See Configure and Edit Agent Filters.
The AnthillPro agent that will perform the QualityCenter steps must be installed on the same machine as the QualityCenter client. You can download the client from the QualityCenter server, typically located here:
http://<qc_server>:8080/qcbin/ClientSide_index.html. Follow the instructions on that page to install.
The information given here will be used by your AnthillPro projects. If you are using both the Quality Center (Testing) and Quality Center (Issue Tracking) Plugins, you need only configure the integration once (assuming you have only one Quality Center server) -- both integrations use the same System configuration.
| If you are configuring integrations with multiple Quality Center servers, create a new integration for each one. |
Go to System > Quality Center Plugin under the Integration menu.
On the Quality Center Plugin page, click Create New.
Configure the integration:
Name. Give a unique name for this integration. The name given here will be used throughout the AnthillPro system -- specifically during job creation. If you are configuring integrations with multiple Quality Center servers, ensure that each name is unique.
Server URL. Enter the base URL to the TeamForge installation base URL: e.g.
http://qualitycenter.company.com.User Name. Enter the user name to be used to connect to the Quality Center server. Make sure that Quality Center user AnthillPro will use to connect to the server has the appropriate permissions.
Password. Enter the password to be used to connect to the Quality Center server. If using a password script below, leave this filed blank.
Confirm password.
Password Script. To use a script or property lookups for the password, leave the Password field blank and enter it here. See Scripting.
Click Set and click Done.
Configure the job to automatically add comments, create and resolve issues, and deliver Quality Center bug reports to AnthillPro by setting up the job to run on the agent with the QC COM API installed. While each job is different, most jobs typically run a get changelog step; run steps to interact with the changelog and Quality Center; and generate reports and make issue comments.
For example, the Add Comments, Create Issue, and Publish Issue Report steps are included after the Populate Workspace, Changelog, Stamp, Dependency, Build, Publish Changelog, and Artifact Delivery steps of the typical job.
Go to Administration, select the appropriate project, and configure the job.
Add Comments to Quality Center Issue. Select the Insert After icon of the step prior to the point where the Quality Center step is to be included (Artifact Delivery step in this example). Go to Issue Tracking > Quality Center Plugin, select the Add Comments to Quality Center Issue step, and click Select.
Name. Provide a short name.
Description (optional). Give a short description.
Working Directory Offset (optional). Give the working directory to use when executing this command. This is relative to current working directory. To use the current directory, leave this field blank.
QC Server. Select the correct integration from the drop-down menu (this is the integration set up in the Configure Quality Center Plugin (Issue Tracking) section). If you configured multiple integrations on the AnthillPro System page, make sure you select the correct one. Note that it is possible for a single job -- but not a step -- to use different AnthillPro/Quality-Center-server configurations.
Domain Name. Provide the name of the Quality Center Domain where projects are located.
Project Name. Give the name of the Quality Center Project where issues are located.
Issue Id Pattern. Input a regular expression to locate Quality Center Issue Id within changelog comments. Add "()" around the portion of the pattern identifying the Quality Center Issue Id (which is simply a number).
The default value,
QC-([0-9]+)is a regex that parses the change log and applies the attributes of the step to matching issues. For example, if QC-52 was located in the comment of a change, this step would act on issue 52 in the Quality Center database.Additional Comment. Add any information to be added to the Quality Center comment (in addition to the commit comment).
Fail Mode. Select the action you wish AnthillPro to take when an unknown issue ID is encountered.
Show Environment Variables (optional; advanced). Give any optional environment variables in "name=value" format.
Environment variables values may contain references to existing values in the following format:
name=${env/<NAME>};value. If the value of the <NAME> variable is "value2" in the current environment, then the above example will be expanded to:name=value2;value.Using this technique, it is possible add an entry to PATH in the following manner:
PATH=my/path/entry;0. Case is significant even on Windows systems.Show Additional Options (advanced). Select the Show Additional Options link to configure more options.
Is Active. Select No to temporarily deactivate the step without deleting it; otherwise select Yes.
Pre-Condition Script. From the drop down menu, select the condition which must be met for the step to continue. Before editing an existing script or creating a new one, see Step Pre-Condition Scripts.
Ignore Failures. Select Yes if this step should not effect the determination for step continuation or the status determination of the job.
PostProcessingScript. Select a script for determining when commands should count as fail or succeed. See Post Processing Scripts.
Timeout Enter the time in minutes after the start of the step when AnthillPro will consider the step as timed out and abort it.
Click Save.
Publish Quality Center Issue Report. Select the Insert After icon of the Add Comments step. Go to Issue Tracking > Quality Center Plugin, select the Publish Quality Center Issue Report step, and click Select.
Name. Provide a short name.
Description (optional). Give a short description.
Working Directory Offset (optional). Give the working directory to use when executing this command. This is relative to current working directory. To use the current directory, leave this field blank.
QC Server. Select the correct integration from the drop-down menu (this is the integration set up in the Configure Quality Center Plugin (Issue Tracking) section). If you configured multiple integrations on the AnthillPro System page, make sure you select the correct one. Note that it is possible for a single job -- but not a step -- to use different AnthillPro/Quality-Center-server configurations.
Domain Name. Provide the name of the Quality Center Domain where projects are located. Make sure this corresponds to the settings in the previous step.
Project Name. Give the name of the Quality Center Project where issues are located. Make sure this corresponds to the settings in the previous step.
Issue Id Pattern. Input a regular expression to locate Quality Center Issue Id within changelog comments. Add "()" around the portion of the pattern identifying the Quality Center Issue Id (which is simply a number).
The default value,
QC-([0-9]+)is a regex that parses the change log and applies the attributes of the step to matching issues. For example, if QC-52 was located in the comment of a change, this step would act on issue 52 in the Quality Center database.Fail Mode. Select the action you wish AnthillPro to take when an unknown issue ID is encountered.
Show Environment Variables (optional; advanced). See Show Environment Variables above.
Show Additional Options (advanced). See Show Additional Options.
Click Save.
Create Quality Center Issue. Select the Insert After icon of the step prior to the point where the Quality Center step is to be included (e.g., it may be included after an Artifact Delivery step). Go to Issue Tracking > Quality Center Plugin, select the step, and click Select.
Name. Provide a short name.
Description (optional). Give a short description.
Working Directory Offset (optional). Give the working directory to use when executing this command. This is relative to current working directory. To use the current directory, leave this field blank.
QC Server. Select the correct integration from the drop-down menu (this is the integration set up in the Configure Quality Center Plugin (Issue Tracking) section). If you configured multiple integrations on the AnthillPro System page, make sure you select the correct one. Note that it is possible for a single job -- but not a step -- to use different AnthillPro/Quality-Center-server configurations.
Domain Name. Provide the name of the Quality Center Domain where projects are located. Make sure this corresponds to the settings in the previous step.
Project Name. Give the name of the Quality Center Project where issues are located. Make sure this corresponds to the settings in the previous step.
Project Key. You must include the Quality Center project key for the project being tested.
Assignee. You must include the Quality Center user this issue must be assigned to. This can be any user with appropriate permissions set in Quality Center.
Summary. Give the Quality Center summary for this issue.
Detected By. If you want to use a different name than the default Anthill3, give it here. The name you provide will be displayed in the logs.
Priority. Optionally, you can have AnthillPro set a priority when the issue is created. Make sure that the priority matches those set in Quality Center.
Severity. Optionally, you can have AnthillPro set a severity when the issue is created. Make sure that the severity matches those set in Quality Center.
Status. If you want to use a different status than the default of new, give it here. Make sure that the status matches those set in Quality Center.
Additional Parameters. Optionally, you can set custom Parameters for the issue. This is entered as a listing of name=value pairs (adheres specifically to the j
ava.util.Propertiesformat). Each pair must be included on a separate line. For example:BG_USER_03=SPANIS ENGLISH FRENCH ITALIANShow Environment Variables (optional; advanced). See Show Environment Variables above.
Show Additional Options (advanced). See Show Additional Options.
Click Save.
The Resolve Issue step is typically used as part of a post-deployment job that is run after the deploy job, but part of the same workflow. Once the artifacts have been deployed, the Resolve Issue step is run as a separate job in order to ensure that all issues are resolved.
While each job is different, every job will typically run an Assign Status step; the Resolve Issue step; a Get Changelog step; a Publish Changelog step; and a Create Stamp Step.
Go to Administration, select the appropriate project, and configure the job if not already done.
Select the Insert After icon of the step prior to the point where the ClearQuest step is to be included. Go to Issue Tracking > Quality Center Plugin, select the Update Quality Center Issue step, and click Select.
Name the step.
Description. Provide a short description.
Working Directory Offset (optional). Give the working directory to use when executing this command. This is relative to current working directory. To use the current directory, leave this field blank.
QC Server. Select the correct integration from the drop-down menu (this is the integration set up in the Configure Quality Center Plugin (Issue Tracking) section). If you configured multiple integrations on the AnthillPro System page, make sure you select the correct one. Note that it is possible for a single job -- but not a step -- to use different AnthillPro/Quality-Center-server configurations.
Domain Name. Provide the name of the Quality Center Domain where projects are located. Make sure that this matches those set for the Quality Center testing step.
Project Name. Give the name of the Quality Center Project where issues are located. Make sure that this matches those set for the Quality Center testing step.
Capture mode. Choose how to locate bugs to update. If you will list the bug id's, comma separated, such as '4, 24, 13', choose list. If you will match a regex, such as 'QC-([0-9]+)', choose regex.
Issue Id Pattern. Input a regular expression to locate Quality Center Issue Id within changelog comments. Add "()" around the portion of the pattern identifying the Quality Center Issue Id (which is simply a number).
The default value,
QC-([0-9]+)is a regex that parses the change log and applies the attributes of the step to matching issues. For example, if QC-52 was located in the comment of a change, this step would act on issue 52 in the Quality Center database.Assignee. You must include the Quality Center user this issue must be assigned to. This can be any user with appropriate permissions set in Quality Center.
Summary. Give the Quality Center summary for this issue.
Priority. Optionally, you can have AnthillPro set a priority when the issue is created. Make sure that the priority matches those set in Quality Center.
Severity. Optionally, you can have AnthillPro set a severity when the issue is created. Make sure that the severity matches those set in Quality Center.
Status. If you want to use a different status than the default of new, give it here. Make sure that this matches those set for the Quality Center testing step.
Fail Mode. Select the action you wish AnthillPro to take when an unknown issue ID is encountered.
Additional Parameters. Optionally, you can set custom Parameters for the issue. This is entered as a listing of name=value pairs (adheres specifically to the j
ava.util.Propertiesformat). Each pair must be included on a separate line. For example:BG_USER_03=SPANIS ENGLISH FRENCH ITALIANShow Environment Variables (optional; advanced). See Show Environment Variables above.
Show Additional Options (advanced). See Show Additional Options.
Click Save.
Complete workflow configuration is beyond the scope of this tutorial. The topics covered in detail below are specific to using the Quality Center integration. The process is the same for both jobs that include the Quality Center steps.
Go Administration and select the appropriate workflow. You can add the job to either your build workflow or as part of a secondary (i.e., testing) workflow.
Go to workflow Main > Definition tab.
From the drop-down menu, choose Embedded Definition and click Select.
Left-click the Start icon and select Insert Job After.
Select the job created in the Create Job section, a job pre-condition script, and click Insert Job.
Select the Properties tab and add a workflow property. This will ensure that the job runs on the appropriate agent when using a scripted agent filter. Make sure that the property you set here is also configured on the agent.
Name. Give the name of the Property (the property <name> will be accessed as ${property:<name>}).
Description. Provide a description for this Property shown when prompting users for value.
Default Value. Input the value for this property.
User May Override. Check if users are able to specify a new value when running this workflow.
Label. Provide a label for this Property shown when prompting users for value (leave blank to use the Name as the Label).
Is Required. Check if a non-empty value for this property is required to run workflow.
Allowed Values. Give the values users are allowed to select for this property (blank for no restriction of value). Separate each value by entering it on its own line.
If you created a post-deploy job with the Resolve step, add it after the original job.
Click Save.
Go to Dashboard and select the appropriate workflow.
On the workflow Main page, click the Build button.
Once the workflow is complete, select the Reports tab.
Select a link to view a report.
To drill down on each Quality Center step on the Build Life Summary page, see Trace a Build Life to Source.
Following is a list of the function calls used in the Quality Center integration:
| TDApiOle80.TDConnection | TestSet.StartExecution | TestSet.TSTestFactory | Step.Field |
| TDConnection.BugFactory | TSScheduler.RunAllLocally | TSTestFactory.NewList | BugFactory.Filter |
| TDConnection.InitConnectionEx | TSScheduler.TdHostName | TSTest.Name | BugFactory.Item |
| TDConnection.Login | TSScheduler.Run | TSTest.Type | BugFactory.AddItem |
| TDConnection.Connect | TSScheduler.ExecutionStatus | TSTest.Status | Filter.Filter |
| TDConnection.Disconnect | ExecutionStatus.RefreshExecStatusInfo | TSTest.HostName | Filter.NewList |
| TDConnection.Logout | ExecutionStatus.Finished | TSTest.TestId | Bug.ID |
| TDConnection.ReleaseConnection | ExecutionStatus.EventsList | TSTest.TestName | Bug.Summary |
| TDConnection.TestSetTreeManager | ExecEventInfo.EventType | TSTest.LastRun | Bug.Field |
| TestSetTreeManager.NodeByPath | ExecEventInfo.EventDate | Run.Name | Bug.AssignedTo |
| TestSetFolder.FindTestSets | ExecEventInfo.EventTime | Run.Status | Bug.DetectedBy |
| TestSet.Id | TestExecStatus.TestId | Run.Field | Bug.Priority |
| TestSet.Item | TestExecStatus.TestInstance | Run.StepFactory | Bug.Project |
| TestSet.Name | TestExecStatus.TsTestId | StepFactory.NewList | Bug.Status |
| TestSet.TestSetFolder | TestExecStatus.Message | Step.Name | Bug.Post |
| TestSet.Status | TestExecStatus.Status | Step.Status |
Create defects, add comments to a defect, update the status of a defect, and report the build success with the Rally 1.05 (backwards compatible) integration. AnthillPro users can also create a report of Rally defects from the changelog.
In order to use the Rally integration, AnthillPro must first be configured with Rally user permissions to create defects, add comments to a defect, update the status of a defect, and report the build success, etc.
The Rally integration is implemented as AnthillPro job steps configured on the Job Configuration page. When using the integration, click the Create Step button (or select the Insert After/Before icon) to add steps to a job. Once the job is configured, it is then added to the workflow under the Definition tab.
Rally Steps:
Create Defect. Creates a new issue in Rally. Typically used during a build job.
Add Comments. Adds Comments from the current changelog to matching Rally defects in the user story. Typically used during a build job.
Change Defect Status. Updates the status of a Rally defect. Can be used as a post-deployment step added to a deploy workflow to update the state of a Rally defect.
Publish Defect Report. Creates A Report of Rally defects from the current changelog. Typically used during a build job.
Report Build Status. Reports the build status to Rally. Typically used during a build job.
This tutorial will follow a simple project configuration that (a.) uses the add comments, publish defect report, create defect, and report build status steps as part of the build process; (b.) uses the change defect step as part of a post-deployment process; and (c.) makes the Rally defect report and issues available to the AnthillPro UI.
The Rally integration requires a base URL where the Rally server is located as well a user name and password for accessing it.
You must have AnthillPro administrative privileges to configure the integration. See Manage Security.
A project must be active in AnthillPro.
A Life-Cycle Model must be configured with the appropriate Status and Artifact Sets. See Using Life-Cycle Models.
All the fields on the Rally Integration page may contain scripts and/or property lookups. See Scripting.
Go to System > Rally from the Integration menu.
On the Rally Integration page, click Edit.
Enter:
Rally Base URL.
Issue URL. You can have AnthillPro automatically generate a link to all of the issues it associates with a Build Life if you give the Issue URL here. Once you give the URL pattern, the issues that appear on the Issues Tab of a Build Life will be linked to the issue in your issue tracker tool for reviewing the issue, adding additional comments, making edits, etc.
Please provide a URL template such as
http://bugs.company.com/browse/${issueId}. The value${issueId}will be replaced in the template with the issue id of the associated issue. This field provides a template which is used throughout AnthillPro to generate links from issues directly to an issue description page within your issue tracker.User Name. The user name to be used to connect to the Rally server. This name must be configured in Rally in order for the integration to work.
Password. The password used to connect to the Rally server. This password must correspond to the Rally user name and must be configured in Rally.
Password Script (optional). To use a script or property lookups for the password, leave the Password field blank and enter it here. See Scripting.
Click Set then Done.
The Rally integration allows AnthillPro users to create defects, add comments to a defect, update the status of a defect, and report the build success in Rally. The integration also allows AnthillPro users to create a report of Rally defects from the changelog.
The example in this tutorial uses Subversion, but the basic configuration is the same for any repository type. Your build job will vary, but the Rally integration is added as a job step similar to what is described below. Though the example goes through the manual creation of a build job, it is possible to use the Job Wizard to create a build job and then manually configure a second job to run as part of the build workflow. For simplicity, the Rally integration steps have been included as part of the build job and part of the post-deployment job in the example. The change defect status is included as part of the post-deployment steps run as part of a deploy workflow.
Configuring the Rally Integration must be complete.
You must have AnthillPro administrative privileges to configure the integration. See Manage Security.
A project with at least one Build Life must be active in AnthillPro.
A Life-Cycle Model must be configured with the appropriate Status and Artifact Sets. See Using Life-Cycle Models.
Complete job configuration is beyond the scope of this tutorial. The topics covered in detail below are specific to using the Rally integration.
Go to Administration, select the appropriate project, and click the Add Job icon.
On the New Job Configuration page, choose No (do not use the Job Wizard). Click Select.
Follow the steps for creating a build job.
For this tutorial, the Rally steps are included after the Populate Workspace, Changelog, Stamp, Dependency, Build, Publish Changelog, and Artifact Delivery step.
Add Comments. Select the Insert After icon of the step prior to the point where the Rally step is to be included (Artifact Delivery step in this example). Go to Issue Tracking > Rally, select the Add Comments step, and click Select.
Name. Provide a name.
Description (optional). Give a description of the step.
Issue Id Pattern. Give a regular expression to locate a Rally defect Id within changelog comments. Add "()" around the portion of the pattern which identifies the actual Issue Id. The pattern "DE[0-9]+" would match (returning the same string as Issue Id) "DE1" and "DE932415", but not match "DEa", "DE", or "DE.1". The pattern "Issue:\[(DE[0-9]+)\]" would match "Issue:[DE1]" using Issue Id DE1.
In the example, the pattern includes DE which identifies the issues as belonging to Rally. Whenever AnthillPro comes across this regular expression, it will automatically add the appropriate defect comment in Rally.
Additional Comment (optional). Use this field to add any additional information to the Rally defect.
Show Additional Options (advanced). Select the Show Additional Options link to configure more options.
Is Active. Select No to temporarily deactivate the step without deleting it; otherwise select Yes.
Pre-Condition Script. From the drop down menu, select the condition which must be met for the step to continue. Before editing an existing script or creating a new one, see Step Pre-Condition Scripts.
Ignore Failures. Select Yes if this step should not effect the determination for step continuation or the status determination of the job.
PostProcessingScript. Select a script for determining when commands should count as fail or succeed. See Post Processing Scripts.
Timeout. Enter the time in minutes after the start of the step when AnthillPro will consider the step as timed out and abort it.
Click Save.
Publish Defect Report. Select the Insert After icon of the Add Comments step. Go to Issue Tracking > Rally, select the Publish Defect Report step, and click Select.
Name. Provide a name.
Description (optional). Give a description of the step.
Report Name. Provide a name for the report in AnthillPro (default is the step name).
Issue Id Pattern. Give a regular expression to locate a Rally defect Id within changelog comments. Add "()" around the portion of the pattern which identifies the actual Issue Id. The pattern "DE[0-9]+" would match (returning the same string as Issue Id) "DE1" and "DE932415", but not match "DEa", "DE", or "DE.1". The pattern "Issue:\[(DE[0-9]+)\]" would match "Issue:[DE1]" using Issue Id DE1.
In the example, the pattern includes DE identifies the issues as belonging to Rally. Whenever AnthillPro comes across this regular expression, it will automatically add the appropriate defect comment in Rally.
Include Dependencies. Check this field to include change logs from dependencies when searching for issue references.
Show Additional Options (advanced). See Show Additional Options.
Click Save.
Create Defect. Select the Insert After icon of the Publish Defect Report step. Go to Issue Tracking > Rally, select the Create Defect step, and click Select. This step will create a defect in Rally on if one of the steps fail.
Name. Provide a name.
Description (optional). Give a description of the step.
Project Key. Enter the Rally project key to create a general project but not for a specific requirement. Either use this field or the Requirement Key field below.
Requirement Key. Enter the Rally requirement key to create a defect under a specific Rally requirement. Either use this field or the Project Key field above.
Defect Name. Give a name for the defect to be created in Rally.
Defect Description. Give a brief description of the defect. A URL may be included in this field.
Severity. Select the Rally severity (from the drop-down menu) to be assigned to this step.
Priority. Select the Rally priority (from the drop-down menu) to be assigned to this step.
Environment. Select the Rally environment (from the drop-down menu) to be assigned to this step.
State. Select the Rally state (from the drop-down menu) to be assigned to this step.
Submitted By. Input the name of the person that submitted the defect. This field must match the AnthillPro Rally user name.
Found in Build. Identify what build the defect was found in.
Show Additional Options (advanced). See Show Additional Options.
Click Save.
Report Build Status. Select the Insert After icon of the step prior to where the Report Build Status is to be included (typically after the Assign Status step). Go to Issue Tracking > Rally, select the Report Build Status step, and click Select.
To have AnthillPro notify Rally of a successful build, an Assign Status (with the success option selected) step must run prior to adding the Rally-Report Build Status (success) step.
Name. Provide a name.
Description (optional). Give a description of the step.
Build Definition Id. Give the Rally Build Definition Id associated with the project status is being assigned to.
Status. Select the status from the drop-down menu.
Duration (optional). Identify the duration of the build in milliseconds.
Label. Provide the Label applied to the build.
Message (optional). Provide any messages to be sent to Rally.
Show Additional Options (advanced). See Show Additional Options.
Click Save.
Report Build Status. Select the Insert After icon of the Report Build Status (success) step. Go to Issue Tracking > Rally, select the Report Build Status step, and click Select. To have AnthillPro notify Rally of a failed build, an Assign Status (with the failure option selected) step must run prior to adding the Rally-Report Build Status (failure) step. The Status-Failure step is typically included in the job just after the Status-Success step.
Configure the Step as in Step 7 (previous), but select Failed from the drop-down menu.
The Rally-Change Defect Status step is typically used as part of a post-deployment job. Once the artifacts have been deployed (in the example there are two artifact sets: Database and Webapp), the Rally-Change Defect Status step is run as a separate job in order to ensure that all Rally user-story defects are resolved.
While each job is different, every job will typically run an Assign Status step; the Rally-Change Defect Status step; a Get Changelog step; a Publish Changelog step; and a Create Stamp Step.
Go to Administration, select the appropriate project, and click the Add Job Icon.
On the New Job Configuration page, choose No (do not use the Job Wizard). Click Select.
Follow the steps for creating a build job.
For this tutorial, the Rally-Change Defect Status is included after the Assign Status Step and prior to the other steps.
Change Defect Status. Select the Insert After icon of the step prior to where the Change Defect Step is to be inserted (typically after the Assign Status Step). Go to Issue Tracking > Rally, select the Change Defect Status step, and click Select.
Name. Provide a name.
Description (optional). Give a description.
Defect Key. The Rally defect key for the state that should be updated.
New State. Select the Rally state from the drop-down menu.
Show Additional Options (advanced). See Show Additional Options.
Click Save.
The Jobs created in the Configure Jobs section must be executed as part of a workflow. This section will assume that an originating workflow and a deploy workflow have already been configured, and will cover the process of adding the jobs to the appropriate workflows. Complete workflow configuration is beyond the scope of this tutorial. The topics covered in detail below are specific to using the Rally integration.
Go to Administration, select the project, and select the build workflow.
On the workflow Main page, select the Definition tab.
From the drop-down menu, choose Embedded Definition and click Select.
Left-click the Start icon and select Insert Job After.
Select the Build Job created in Configure Jobs, a job pre-condition script, and click Insert Job.
Go to Administration, select the project, and select the deploy workflow.
On the workflow Main page, select the Definition tab.
From the drop-down menu, choose Embedded Definition and click Select.
Left-click the Stop icon and select Insert Job After.
Select the Post Deployment Steps Job created in the Configure Jobs section, a job pre-condition script, and click Insert Job.
Note that this jobs deploy two artifact sets and that the Post Deploy Steps job will change the Rally defect status for both artifact sets.

Go to Dashboard and select the workflows created in the Create Workflows section.
On the Workflow Main page, click the Build button for each workflow.
Once the workflows have completed, select the appropriate Build Life and click the Reports tab.
Select a link to view a report. To go to the defect that was generated in Rally, follow the Defect Id link.

Click the Issues tab to view the issues AnthillPro created in Rally.
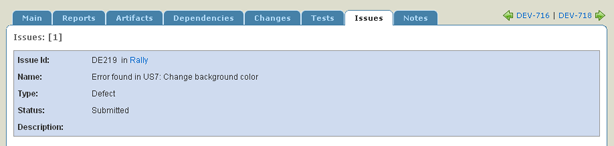
To drill down on each Rally step on the Build Life Summary page, see Trace a Build Life to Source.
Create defects, add comments to a defect, update the status of a defect, and report the build success with the Rally Plugin integration. AnthillPro users can also create a report of Rally defects from the changelog.
In order to use the Rally Plugin integration, AnthillPro must first be configured with Rally user permissions to create defects, add comments to a defect, update the status of a defect, and report the build success, etc.
| The integration is written as an AnthillPro Plugin, and expands upon the existing Rally integration to allow for multiple workspaces and tasks. For older AnthillPro 3.7 versions, you will need to download the integration from Supportal and then upload it to the server. Once uploaded, ensure the Plugin is active. |
The Rally Plugin integration is implemented as AnthillPro job steps configured on the Job Configuration page. When using the integration, click the Create Step button (or select the Insert After/Before icon) to add steps to a job. Once the job is configured, it is then added to the workflow under the Definition tab.
Rally Plugin Steps:
Create Defect. Creates a new issue in Rally. Typically used during a build job.
Add Comments. Adds Comments from the current changelog to matching Rally defects in the user story. Typically used during a build job.
Change Status. Updates the status of a Rally defect. Can be used as a post-deployment step added to a deploy workflow to update the state of a Rally defect.
Publish Defect Report. Creates A Report of Rally defects from the current changelog. Typically used during a build job.
Report Build Status. Reports the build status to Rally. Typically used during a build job.
Typical configuration: (a.) uses the add comments, publish defect report, create defect, and report build status steps as part of the build process; (b.) uses the change defect step as part of a post-deployment process; and (c.) makes the Rally defect report and issues available to the AnthillPro UI.
The Rally Plugin integration requires a base URL where the Rally server is located as well a user name and password for accessing it.
You must have AnthillPro administrative privileges to configure the integration. See Manage Security.
A project must be active in AnthillPro.
A Life-Cycle Model must be configured with the appropriate Status and Artifact Sets. See Using Life-Cycle Models.
All the fields on the Rally Plugin Integration page may contain scripts and/or property lookups. See Scripting.
| The integration is written as an AnthillPro Plugin, and expands upon the existing Rally integration to allow for multiple workspaces and tasks. For older AnthillPro 3.7 versions, you will need to download the integration from Supportal and then upload it to the server. Once uploaded, ensure the Plugin is active. |
Go to System > Rally Plugin from the Integration menu.
On the Rally Plugin page, click Create New.
Enter:
Name. Give a name to this integration. This name will be used by the AnthillPro system. If you configure more than one integration, make sure to select the correct configuration during job creation.
Rally Base URL. Provide the Rally server URL. Example: https://trial.rallydev.com (do not use a trailing slash).
Rally Version. Give the Rally server Webservices Version your Rally server supports. Example: 1.16 (the version must be an exact match for the integration to work). If you have multiple versions of Rally, you will need to configure a new integration for each version.
Rally Workspace Name. Provide the Rally workspace to use for this integration. Each configured integration supports only one workspace. If you want AnthillPro to participate in multiple workspaces, configure a separate integration for each.
User Name. The user name to be used to connect to the Rally server. This name must be configured in Rally in order for the integration to work.
Password. The password used to connect to the Rally server. This password must correspond to the Rally user name and must be configured in Rally.
Confirm password.
Password Script (optional). To use a script or property lookups for the password, leave the Password field blank and enter it here. See Scripting.
Click Set then Done.
The Rally Plugin integration allows AnthillPro users to create defects, add comments to a defect, update the status of a defect, and report the build success in Rally. The integration also allows AnthillPro users to create a report of Rally defects from the changelog.
Your build job will vary, but the Rally integration is added as a job step similar to what is described below. Though the example goes through the manual creation of a build job, it is possible to use the Job Wizard to create a build job and then manually configure a second job to run as part of the build workflow. For simplicity, the Rally integration steps have been included as part of the build job and part of the post-deployment job in the example. The change defect status is included as part of the post-deployment steps run as part of a deploy workflow.
Configuring the Rally Plugin Integration must be complete.
You must have AnthillPro administrative privileges to configure the integration. See Manage Security.
A project with at least one Build Life must be active in AnthillPro.
A Life-Cycle Model must be configured with the appropriate Status and Artifact Sets. See Using Life-Cycle Models.
Complete job configuration is beyond the scope of this tutorial. The topics covered in detail below are specific to using the Rally Plugin integration.
Go to Administration, select the appropriate project, and click the Add Job icon.
On the New Job Configuration page, choose No (do not use the Job Wizard). Click Select.
Follow the steps for creating a build job.
The Rally steps are typically included after the Populate Workspace, Changelog, Stamp, Dependency, Build, Publish Changelog, and Artifact Delivery step.
Add Comments. Select the Insert After icon of the step prior to the point where the Rally step is to be included (Artifact Delivery step in this example). Go to Issue Tracking > Rally Plugin, select the Add Comments step, and click Select.
Name. Provide a name.
Description (optional). Give a description of the step.
Working Directory Offset (optional). Give the working directory to use when executing this command. This is relative to current working directory. To use the current directory, leave this field blank.
Defect Id Pattern. Give a regular expression to locate a Rally defect Id within changelog comments. Add "()" around the portion of the pattern which identifies the actual Issue Id. The pattern "DE[0-9]+" would match (returning the same string as Issue Id) "DE1" and "DE932415", but not match "DEa", "DE", or "DE.1". The pattern "Issue:\[(DE[0-9]+)\]" would match "Issue:[DE1]" using Issue Id DE1.
In the example, the pattern includes DE which identifies the issues as belonging to Rally. Whenever AnthillPro comes across this regular expression, it will automatically add the appropriate defect comment in Rally.
Task Id Pattern. Give a regular expression to locate a Rally defect Id within changelog comments. Add "()" around the portion of the pattern which identifies the actual task Id. The pattern 'TA[0-9]+' would match (returning the same string as task ids) 'TA1' and 'TA932415', but not match 'TAa', 'TA', or 'TA.1' The pattern 'Issue:\[(TA[0-9]+)\]' would match 'Issue:[TA1]' using task ID TA1.
In the example, the pattern includes TA which identifies the issues as belonging to Rally. Whenever AnthillPro comes across this regular expression, it will automatically add the comment to the appropriate task in Rally.
User Story Id Pattern. Give a regular expression to locate a Rally defect Id within changelog comments. Add "()" around the portion of the pattern which identifies the actual user story Id. The pattern 'US[0-9]+' would match (returning the same string as user story ids) 'US1' and 'US932415', but not match 'USa', 'US', or 'US.1' The pattern 'Issue:\[(US[0-9]+)\]' would match 'Issue:[US1]' using user story ID US1.
In the example, the pattern includes US which identifies the issues as belonging to Rally. Whenever AnthillPro comes across this regular expression, it will automatically add the comment to the appropriate user story in Rally.
Additional Comment (optional). Use this field to add any additional information to the Rally defect.
Rally Workspace. Select the workspace you configured in the previous section.
Show Environment Variables (optional; advanced). Give any optional environment variables in "name=value" format.
Environment variables values may contain references to existing values in the following format:
name=${env/<NAME>};value. If the value of the <NAME> variable is "value2" in the current environment, then the above example will be expanded to:name=value2;value.Using this technique, it is possible add an entry to PATH in the following manner:
PATH=my/path/entry;0. Case is significant even on Windows systems.Show Additional Options (advanced). Select the Show Additional Options link to configure more options.
Is Active. Select No to temporarily deactivate the step without deleting it; otherwise select Yes.
Pre-Condition Script. From the drop down menu, select the condition which must be met for the step to continue. Before editing an existing script or creating a new one, see Step Pre-Condition Scripts.
Ignore Failures. Select Yes if this step should not effect the determination for step continuation or the status determination of the job.
PostProcessingScript. Select a script for determining when commands should count as fail or succeed. See Post Processing Scripts.
Timeout. Enter the time in minutes after the start of the step when AnthillPro will consider the step as timed out and abort it.
Click Save.
Publish Defect Report. Select the Insert After icon of the Add Comments step. Go to Issue Tracking > Rally Plugin, select the Publish Defect Report step, and click Select.
Name. Provide a name.
Description (optional). Give a description of the step.
Working Directory Offset (optional). Give the working directory to use when executing this command. This is relative to current working directory. To use the current directory, leave this field blank.
Report Name. Provide a name for the report in AnthillPro (default is the step name).
Defect Id Pattern. Give a regular expression to locate a Rally defect Id within changelog comments. Add "()" around the portion of the pattern which identifies the actual Issue Id. The pattern "DE[0-9]+" would match (returning the same string as Issue Id) "DE1" and "DE932415", but not match "DEa", "DE", or "DE.1". The pattern "Issue:\[(DE[0-9]+)\]" would match "Issue:[DE1]" using Issue Id DE1.
In the example, the pattern includes DE which identifies the issues as belonging to Rally. Whenever AnthillPro comes across this regular expression, it will automatically add the appropriate defect comment in Rally.
Task Id Pattern. Give a regular expression to locate a Rally defect Id within changelog comments. Add "()" around the portion of the pattern which identifies the actual task Id. The pattern 'TA[0-9]+' would match (returning the same string as task ids) 'TA1' and 'TA932415', but not match 'TAa', 'TA', or 'TA.1' The pattern 'Issue:\[(TA[0-9]+)\]' would match 'Issue:[TA1]' using task ID TA1.
In the example, the pattern includes TA, which identifies the issues as belonging to Rally. Whenever AnthillPro comes across this regular expression, it will automatically add the comment to the appropriate task in Rally.
User Story Id Pattern. Give a regular expression to locate a Rally defect Id within changelog comments. Add "()" around the portion of the pattern which identifies the actual user story Id. The pattern 'US[0-9]+' would match (returning the same string as user story ids) 'US1' and 'US932415', but not match 'USa', 'US', or 'US.1' The pattern 'Issue:\[(US[0-9]+)\]' would match 'Issue:[US1]' using user story ID US1.
In the example, the pattern includes US which identifies the issues as belonging to Rally. Whenever AnthillPro comes across this regular expression, it will automatically add the comment to the appropriate user story in Rally.
Rally Workspace. Select the workspace you configured in the previous section.
Show Environment Variables (advanced). See Show Environment Variables above.
Show Additional Options (advanced). See Show Additional Options above.
Click Save.
Create Defect. Select the Insert After icon of the Publish Defect Report step. Go to Issue Tracking > Rally Plugin, select the Create Defect step, and click Select. This step will create a defect in Rally on if one of the steps fail.
Name. Provide a name.
Description (optional). Give a description of the step.
Working Directory Offset (optional). Give the working directory to use when executing this command. This is relative to current working directory. To use the current directory, leave this field blank.
Project Name. Enter the Rally project key to create a general project but not for a specific requirement. Either use this field or the Requirement Key field below.
If you do note specify a project name, you must give the user story Id below -- but not both.
User Story Id Pattern. Give a regular expression to locate a Rally defect Id within changelog comments.
If you do not specify a user story Id, you must give a project name above -- but not both.
Add "()" around the portion of the pattern which identifies the actual user story Id. The pattern 'US[0-9]+' would match (returning the same string as user story ids) 'US1' and 'US932415', but not match 'USa', 'US', or 'US.1' The pattern 'Issue:\[(US[0-9]+)\]' would match 'Issue:[US1]' using user story ID US1.
In the example, the pattern includes US which identifies the issues as belonging to Rally. Whenever AnthillPro comes across this regular expression, it will automatically add the comment to the appropriate user story in Rally.
Defect Name. Give a name for the defect to be created in Rally.
Defect Description. Give a brief description of the defect. A URL may be included in this field.
Severity. Provide the severity, if desired, that this defect should be reported as. What is input here must match exactly the severity as defined in Rally.
Priority. Give the priority, if desired, that this defect should be reported as. What is input here must match exactly the priority as defined in Rally.
Environment. Give the environment, if desired, that this defect should be reported as. What is input here must match exactly the environment as defined in Rally.
State. Give the state, if desired, that this defect should be reported as. What is input here must match exactly the state as defined in Rally.
Submitted By. Input the name of the person that submitted the defect. This field must match a Rally user name (e.g., AnthillPro).
Rally Workspace. Select the workspace you configured in the previous section.
Show Environment Variables (advanced). See Show Environment Variables above.
Show Additional Options (advanced). See Show Additional Options above.
Click Save.
Report Build Status. Select the Insert After icon of the step prior to where the Report Build Status is to be included (typically after the Assign Status step). Go to Issue Tracking > Rally Plugin, select the Report Build Status step, and click Select.
To have AnthillPro notify Rally of a successful build, an Assign Status (with the success option selected) step must run prior to adding the Rally-Report Build Status (success) step.
Name. Provide a name.
Description (optional). Give a description of the step.
Working Directory Offset (optional). Give the working directory to use when executing this command. This is relative to current working directory. To use the current directory, leave this field blank.
Build Definition Id. Give the Rally Build Definition Id associated with the project status is being assigned to.
Status. Select the status from the drop-down menu. Select "success" from the drop-down. To have AnthillPro also report on failed builds, see Item 8 below.
Duration (optional). Identify the duration of the build in milliseconds.
Label. Provide the Label applied to the build.
Message (optional). Provide any messages to be sent to Rally.
Rally Workspace. Select the workspace you configured in the previous section.
Show Environment Variables (advanced). See Show Environment Variables above.
Show Additional Options (advanced). See Show Additional Options above.
Click Save.
Report Build Status (failure). Select the Insert After icon of the Report Build Status step. Go to Issue Tracking > Rally Plugin, select the Report Build Status step, and click Select. To have AnthillPro notify Rally of a failed build, an Assign Status (with the failure option selected) step must run prior to adding the Rally-Report Build Status (failure) step. The Status-Failure step is typically included in the job just after the Status-Success step.
Configure the Step as in Step 7 (previous), but select Failed from the drop-down menu.
The Rally-Change Defect Status step is typically used as part of a post-deployment job. Once the artifacts have been deployed (in the example there are two artifact sets: Database and Webapp), the Rally-Change Defect Status step is run as a separate job in order to ensure that all Rally user-story defects are resolved.
While each job is different, every job will typically run an Assign Status step; the Rally-Change Defect Status step; a Get Changelog step; a Publish Changelog step; and a Create Stamp Step.
Go to Administration, select the appropriate project, and click the Add Job Icon.
On the New Job Configuration page, choose No (do not use the Job Wizard). Click Select.
Follow the steps for creating a build job.
For this tutorial, the Rally-Change Defect Status is included after the Assign Status Step and prior to the other steps.
Change Defect Status. Select the Insert After icon of the step prior to where the Change Defect Step is to be inserted (typically after the Assign Status Step). Go to Issue Tracking > Rally Plugin, select the Change Defect Status step, and click Select.
Name. Provide a name.
Description (optional). Give a description.
Working Directory Offset (optional). Give the working directory to use when executing this command. This is relative to current working directory. To use the current directory, leave this field blank.
Defect Id. Give a comma-separated list of IDs of the defects or tasks for which the state should be updated. For example: Use
${gvy:def
                  result='';IssueHelper.getIssueArray().each{it -> result
                  += it.issueId + ","\};
return result} to update all issues in the current Build Life.Object Type. Select the correct object type you want this step to apply in Rally. Choose either Defect or Task.
New State. Provide the Rally state. What is given here must exactly match the state as defined in Rally.
Rally Workspace. Select the workspace you configured in the previous section.
Show Environment Variables (advanced). See Show Environment Variables above.
Show Additional Options (advanced). See Show Additional Options above.
Click Save.
The Jobs created in the Configure Jobs section must be executed as part of a workflow. This section will assume that an originating workflow and a deploy workflow have already been configured, and will cover the process of adding the jobs to the appropriate workflows. Complete workflow configuration is beyond the scope of this tutorial. The topics covered in detail below are specific to using the Rally integration.
Go to Administration, select the project, and select the build workflow.
On the workflow Main page, select the Definition tab.
From the drop-down menu, choose Embedded Definition and click Select.
Left-click the Start icon and select Insert Job After.
Select the Build Job created in Configure Jobs, a job pre-condition script, and click Insert Job.
Go to Administration, select the project, and select the deploy workflow.
On the workflow Main page, select the Definition tab.
From the drop-down menu, choose Embedded Definition and click Select.
Left-click the Stop icon and select Insert Job After.
Select the Post Deployment Steps Job created in the Configure Jobs section, a job pre-condition script, and click Insert Job.
Note that this jobs deploy two artifact sets and that the Post Deploy Steps job will change the Rally defect status for both artifact sets.
Go to Dashboard and select the workflows created in the Create Workflows section.
On the Workflow Main page, click the Build button for each workflow.
Once the workflows have completed, select the appropriate Build Life and click the Reports tab.
Select a link to view a report. To go to the defect that was generated in Rally, follow the Defect Id link.
Click the Issues tab to view the issues AnthillPro created in Rally.
To drill down on each Rally step on the Build Life Summary page, see Trace a Build Life to Source.
Create a new defect, add comments to a defect, and transition a defect with the TeamTrack integration. AnthillPro users can also create a report of TeamTrack defects from the changelog.
In order to use the integration, AnthillPro must first be configured with TeamTrack. The integration is implemented as AnthillPro job steps configured on the Job Configuration page. When using the integration, click the Create Step button (or select the Insert After/Before icon) to add steps to a job. Once the job is configured, it is then added to the workflow under the Definition tab. See Using the TeamTrack Integration.
TeamTrack Steps:
Add Comments. Add Comments from the current changelog to matching TeamTrack defects. In order to use this step, a set working directory, get changelog, and publish changelog step is necessary.
Create Defect. Create a new defect in a TeamTrack. Typically used during a secondary process in combination with the Transition Defect step.
Publish Defect Report. Create a Report of TeamTrack defects from the current changelog. In order to use this step, a set working directory, get changelog, and publish changelog step is necessary. Typically used in combination with the Add Comments step.
Transition Defect. Transition a defect in a TeamTrack. Typically used during a secondary process in combination with the Create Defect step. The Issue Key field of this step should include at least one property specified on the corresponding workflow. See Defects Workflow with TeamTrack Steps.
This tutorial will follow a simple project configuration that uses the Add Comments and Publish Defect Report steps as part of a build workflow. The Create Defect and Transition Defect steps are used as part of a secondary (non-originating) workflow. The example in this tutorial uses Maven, but the basic configuration is similar for any repository type. Your jobs will vary, but the TeamTrack integration is added as job steps similar to what is described below. Though the example goes through the manual creation of a build job, it is possible to use the Job Wizard to create a build job and then manually configure a second job to run as part of the same workflow.
Let AnthillPro know about TeamTrack. Any steps within AnthillPro relying on TeamTrack will not work until this integration is configured. These fields may all contain scripts and/or property lookups. See Scripting.
You must have AnthillPro administrative privileges to configure the integration. See Manage Security.
A project must be active in AnthillPro.
A Life-Cycle Model must be configured with the appropriate Status and Artifact Sets. See Using Life-Cycle Models.
AnthillPro must be set up as a TeamTrack user. See TeamTrack documentation.
Go to System > TeamTrack from the Integrations menu.
On the TeamTrack Integration page, click Edit.
Configure the integration:
TeamTrack Server URL. Provide the TeamTrack server URL.
Issue URL. You can have AnthillPro automatically generate a link to all of the issues it associates with a Build Life if you give the Issue URL here. Once you give the URL pattern, the issues that appear on the Issues Tab of a Build Life will be linked to the issue in your issue tracker tool for reviewing the issue, adding additional comments, making edits, etc.
Please provide a URL template such as
http://bugs.company.com/browse/${issueId}. The value${issueId}will be replaced in the template with the issue id of the associated issue. This field provides a template which is used throughout AnthillPro to generate links from issues directly to an issue description page within your issue tracker.User Name. Give the user name to be used to connect to the TeamTrack server.
Password. Provide the password to be used to connect to the TeamTrack server.
Password Script. To use a script or property lookups for the password, leave the Password field blank and enter it here. See Scripting.
Use Basic Authentication. Check the box to enable basic authentication. By Default, AnthillPro passes the user name password as an argument on the SOAP request.
Click Set then Done.
This tutorial adds a TeamTrack comment and publishes a TeamTrack report as part of the build workflow. Complete job configuration is beyond the scope of this tutorial. The topics covered in detail below are specific to using the TeamTrack integration.
The Configure TeamTrack section of this tutorial must be complete.
You must have AnthillPro administrative privileges to configure the integration. See Manage Security.
A project with at least one Build Life must be active in AnthillPro.
A Life-Cycle Model must be configured with the appropriate Status and Artifact Sets. See Using Life-Cycle Models.
This step will follow a job configuration that adds a comment, publishes a report, creates a defect, and transitions a defect in TeamTrack.
The Add Comments and Publish Defect Report steps are included after the Populate Workspace, Changelog, Stamp, Dependency, Build, Publish Changelog, and Artifact Delivery steps of the typical build job.
Go to Administration, select the appropriate project, and click the Add Job icon.
On the New Job Configuration page, choose No (do not use the Job Wizard). Click Select.
Follow the steps for creating a build job.
Add Comments. Select the Insert After icon of the step prior to the point where the TeamTrack step is to be included (Artifact Delivery step in this example). Go to Issue Tracking > TeamTrack, select the Add Comments step, and click Select.
Name the step.
Description. Provide a short description.
Issue Id Pattern. Give a regular expression to locate a TeamTrack defect Id within changelog comments. Add "()" around the portion of the pattern which identifies the actual Issue Id. The pattern "TST-[0-9]+" would match (returning the same string as Issue Id) "TST-1" and "TST-932415", but not match "TST-a", "TST-", or "TST.1". The pattern "Issue:\[(TST-[0-9]+)\]" would match "Issue:[TST-1]" using issue Id TST-1.
In the example below, the pattern (?:BUG|CHG|ENH|PRB|TSK)([0-9]+) identifies the issue as belonging to a TeamTrack project. Whenever AnthillPro comes across this regular expression, it will automatically add the appropriate comment in TeamTrack.
Title. Provide the TeamTrack title.
Additional Comment. Give any information to be added to the comment (in addition to the commit comment).
Show Additional Options (advanced). Select the Show Additional Options link to configure more options.
Is Active. Select No to temporarily deactivate the step without deleting it; otherwise select Yes.
Pre-Condition Script. From the drop down menu, select the condition which must be met for the step to continue. Before editing an existing script or creating a new one, see Step Pre-Condition Scripts.
Ignore Failures. Select Yes if this step should not effect the determination for step continuation or the status determination of the job.
PostProcessingScript. Select a script for determining when commands should count as fail or succeed. See Post Processing Scripts.
Timeout. Enter the time in minutes after the start of the step when AnthillPro will consider the step as timed out and abort it.
Click Save.
Publish Defect Report. Select the Insert After icon of the Add Comments step. Go to Issue Tracking > TeamTrack, select the Publish Defect Report step, and click Select.
Name the step.
Description. Provide a short description.
Report Name. Give the name for this report (default is same as step name).
Issue Id Pattern. Give a regular expression to locate a TeamTrack defect Id within changelog comments. Add "()" around the portion of the pattern which identifies the actual Issue Id. The pattern "TST-[0-9]+" would match (returning the same string as Issue Id) "TST-1" and "TST-932415", but not match "TST-a", "TST-", or "TST.1". The pattern "Bug:\[(TST-[0-9]+)\]" would match "Bug:[TST-1]" using Bug Id TST-1.
In the example below, the pattern (?:BUG|CHG|ENH|ORB|TSK)([0-9]+) identifies the issue as belonging to a TeamTrack project. Whenever AnthillPro comes across this regular expression, it will automatically add the appropriate comment in TeamTrack.
Include Dependencies. Check the box to include the change logs from dependencies when searching for issue references.
Show Additional Options. See Show Additional Options.
Click Save.
The Create Defect and Transition Defect steps are typically added to a job that run as part of a secondary, or non-originating, workflow. To ensure that the proper defects are transitioned, the Issue Key field of the Transition Defect step should include at least one property.
Go to Administration, select the appropriate project, and click the Add Job icon.
On the New Job Configuration page, choose No (do not use the Job Wizard). Click Select.
Follow the steps for creating a build job.
Select the Insert After icon of the step prior to the point where the TeamTrack step is to be included. Go to Issue Tracking > TeamTrack, select the Create Defect step, and click Select.
Name the step.
Description. Provide a short description.
Project Name. Give the TeamTrack project name that the defect belongs to. If not specified, the Fully Qualified Project Name must be specified.
Fully Qualified Project Name. Provide the Fully Qualified Project Name which includes the Folder Path separated by "||". If not specified, the Project Name must be specified.
Issue Type. Select the TeamTrack issue type from the drop-down menu. Choose Bug Report, Change Request, Enhancement Request, Problem Report, or Task. See TeamTrack documentation for more on issue types.
Title. Give the title for this defect.
Issue Description. Provide a description for this defect.
Functional Area. Give the Functional Area the defect appears in. Default value is Administrator.
How Found. Tell how the defect was found in the code base. Default value is Automated Test.
Severity. Provide the Severity of the defect. Default value is Low.
Detected By. Give the user the defect was detected by. Default is the user set up in the TeamTrack server configuration.
State. Provide the State for the defect. Default value is New.
Show Additional Options. See Show Additional Options.
Click Save.
Transition Defect. Select the Insert After icon of the Create Defect step. Go to Issue Tracking > TeamTrack, select the Transition Defect step, and click Select.
Name the step.
Description. Provide a short description.
Issue Key. Give the issue key to be transitioned in TeamTrack. This will typically be a property to ensure that the correct issue is transitioned. See also Defects Workflow with TeamTrack Steps.
Transition Name. Provide the name of the Transition to perform in TeamTrack.
Additional Options. Give any additional fields that are required to perform a transition. These fields can be entered on per line in name=value format, where name is the name of the property and value is the value that will be passed to TeamTrack.
Show Additional Options. See Show Additional Options.
Click Save.
The Jobs created in the Configure Jobs section must be executed as part of a workflow. This section will assume that both an originating workflow and non-originating (secondary) workflow have already been configured. The topics covered in detail below are specific to using the TeamTrack integration. Complete workflow configuration is beyond the scope of this tutorial.
Go to Administration, select the project, and select the build workflow.
On the workflow Main page, select the Definition tab.
From the drop-down menu, choose Embedded Definition and click Select.
Left-click the Start icon and select Insert Job After.
Select the Build job created in the Configure Jobs section, a job pre-condition script, and click Insert Job.
To ensure that the proper defects are transitioned, the Defects workflow will typically include a property to ensure that the correct issue is transitioned. The property specified on the workflow must correspond to the Issue Key field of the Transition Defect job step. See also Defects Job with TeamTrack Steps.
Go to Administration, select the project, and select the Defects workflow.
On the workflow Main page, select the Definition tab.
From the drop-down menu, choose Embedded Definition and click Select.
Left-click the Start icon and select Insert Job After.
Select the Defects Job created in the Configure Jobs section, a job pre-condition script, and click Insert Job.
Go to Properties > New Property to create a workflow property. A property must be set to ensure that the correct issue is transitioned, and must correspond to the Issue Key field of the Transition Defect job step. See also Defects Job with TeamTrack Steps.
Name the property.
Description. Give a description of the property.
Default Value. Provide the value of the property.
User May Override. Check the box to allow users to specify a new value when running the workflow.
Label. Give the label for the property that will be shown when a user is prompted for a value. If no Label is specified, the property name will be used.
Is Required. Check the box if a non-empty value for this property is required to run the workflow.
Allowed Values. Provide the values users are allowed to select for this property.
Click Save.
Go to Dashboard and select the workflow created in the Add Jobs to Workflow section.
On the workflow Main page, click the Build button for the workflow.
This procedure is the same for both workflows.
Once the workflow has completed, select the appropriate Build Life and click the Reports tab.
Select a link to view a report.

Click the Issues tab to view the issues AnthillPro created in TeamTrack.

To drill down on each TeamTrack step on the Build Life Summary page, see Trace a Build Life to Source.
The TFS integration is implemented as AnthillPro job steps configured on the Job Configuration page. Currently, AnthillPro enables users to create a new WorkItem, add comments to a WorkItem, publish a WorkItem report, and resolve WorkItems with the TFS integration. To use the TFS integration, AnthillPro must first be configured to run the appropriate job steps as well as configured with TFS source control (see Team Foundation Server (TFS) Source Control).
TFS Steps:
Create WorkItem. Create a new TFS WorkItem when this job runs. Typically used during a build job. See Build Job with TFS Steps.
Add Comments. Add comments from the current changelog to matching TFS issues. In order to use this step, a set working directory, get changelog, and publish changelog step is necessary. When used, the step will automatically look for WorkItems referenced in source changes. You may additionally configure it to search source change comments. See Build Job with TFS Steps.
Publish WorkItem Report. Create a Report of TFS WorkItems from the current changelog. In order to use this step, a set working directory, get changelog, and publish changelog step is necessary (as part of the job). The step will automatically look for WorkItems referenced in source changes, and may be configure to search source change comments. See Build Job with TFS Steps.
Resolve WorkItem. Used to resolve or close a TFS item. In order to use this step, a set working directory, get changelog, and publish changelog step is necessary. You can also have AnthillPro pass a comment at the time the issue is updated. Can be used as a post-deployment step added to a deploy workflow to update the state of a TFS item. See Deploy Job with TFS Resolve WorkItem Step.
When using the integration, click the Create Step button (or select the Insert After/Before icon) to add steps to a job. Once the job is configured, it is then added to the workflow under the Definition tab (see Add TFS Jobs to Workflows). Your jobs will vary, but the TFS integration is used similar to what is described below.
You must have AnthillPro administrative privileges to configure the integration. See Manage Security.
The TFS repository must first be configured with AnthillPro. A project must be active in AnthillPro that user TFS for source control. See Team Foundation Server (TFS) Source Control.
The TFS client must be installed on the same machine as the AnthillPro agent that will be responsible for running the TFS job steps (commands).
A Life-Cycle Model must be configured with the appropriate Status and Artifact Sets. See Using Life-Cycle Models.
Let AnthillPro know about the TFS integration. Any job steps within AnthillPro relying on TFS will not work until this integration is configured.
Go to System > TFS from the Integrations menu.
On the TFS Integration page, click Edit.
Give the TFS server URL provided during source configuration. See Team Foundation Server (TFS) Source Control.
Issue URL. You can have AnthillPro automatically generate a link to all of the issues it associates with a Build Life if you give the Issue URL here. Once you give the URL pattern, the issues that appear on the Issues Tab of a Build Life will be linked to the issue in your issue tracker tool for reviewing the issue, adding additional comments, making edits, etc.
Please provide a URL template such as
http://bugs.company.com/browse/${issueId}. The value${issueId}will be replaced in the template with the issue id of the associated issue. This field provides a template which is used throughout AnthillPro to generate links from issues directly to an issue description page within your issue tracker.
Click Set then Done.
Proceed to Using the TFS Integration to add TFS steps to a job.
Two jobs need to be created to use all the TFS integration steps: (a.) A build job with the TFS Add Comment, Publish WorkItem Report, and Create WorkItem steps. (b.) A post-deployment job that includes the Resolve WorkItem step. See Build Job with TFS Steps and Deploy Job with TFS Resolve WorkItem Step.
Before continuing, make sure the TFS repository has been configured with AnthillPro, and that the TFS integration has been configured. See Team Foundation Server (TFS) Source Control and Configure TFS Integration.
The Add Comments, Create Issue, and Publish Issue Report steps are included after the Populate Workspace, Changelog, Stamp, Dependency, Build, Publish Changelog, and Artifact Delivery steps of the typical Build job.
Go to Administration, select the appropriate project, and click the Add Job icon.
Follow the steps for creating a build job.
Add Comments. Select the Insert After icon of the step prior to the point where the TFS step is to be included (typically the Artifact Delivery step). Go to Issue Tracking > Team Foundation Server, select the Add Comments step, and click Select.
Name the step.
Description. Provide a short description.
WorkItem Id Pattern. Give a regular expression to locate a TFS defect Id within changelog comments. Add "()" around the portion of the pattern which identifies the actual WorkItem Id. The pattern "TST-[0-9]+" would match (returning the same string as WorkItem Id) "TST-1" and "TST-932415", but not match "TST-a", "TST-", or "TST.1". The pattern "Issue:\[(TST-[0-9]+)\]" would match "Issue:[TST-1]" using WorkItem Id TST-1.
Whenever AnthillPro comes across this regular expression, it will automatically add the appropriate comment in TFS.
Additional Comment. Give any information to be added to the TFS comment (in addition to the commit comment).
Show Additional Options (advanced). Select the Show Additional Options link to configure more options.
Is Active. Select No to temporarily deactivate the step without deleting it; otherwise select Yes.
Pre-Condition Script. From the drop down menu, select the condition which must be met for the step to continue. Before editing an existing script or creating a new one, see Step Pre-Condition Scripts.
Ignore Failures. Select Yes if this step should not effect the determination for step continuation or the status determination of the job.
PostProcessingScript. Select a script for determining when commands should count as fail or succeed. See Post Processing Scripts.
Timeout. Enter the time in minutes after the start of the step when AnthillPro will consider the step as timed out and abort it.
Click Save.
Create WorkItem. Select the Insert After icon of the Add Comments step. Go to Issue Tracking > Team Foundation Server, select the Create WorkItem step, and click Select. This step will create an issue if a failure occurs.
Name the step.
Description. Provide a short description.
Project Key. Enter the TFS project key to create the WorkItem under.
Summary. Enter the WorkItem summary.
Type. From the drop-down menu, select the type of WorkItem AnthillPro is to create. Currently, AnthillPro can automatically create either a Bug or Task Work Item.
Environment. Give the environment for the issue.
Issue Description. Enter the description.
Assignee. Provide the assignee for the new issue. An assignee of -1 will use TFS's automatic assignment.
Show Additional Options. See Show Additional Options.
Click Save.
Publish WorkItem Report. Select the Insert After icon of the Create Issue step. Go to Issue Tracking > Team Foundation Server, select the Publish WorkItem Report step, and click Select.
Name the step.
Description. Provide a short description.
Report Name. If a new name is not given, the step name will be used.
WorkItem Id Pattern. Give a regular expression to locate a TFS defect Id within changelog comments. Add "()" around the portion of the pattern which identifies the actual WorkItem Id. The pattern "TST-[0-9]+" would match (returning the same string as WorkItem Id) "TST-1" and "TST-932415", but not match "TST-a", "TST-", or "TST.1". The pattern "Issue:\[(TST-[0-9]+)\]" would match "Issue:[TST-1]" using WorkItem Id TST-1.
Whenever AnthillPro comes across this regular expression, it will automatically add the appropriate comment in TFS.
Include Dependencies. Check to include change logs from dependencies when searching for issues.
Show Additional Options. See Show Additional Options.
Click Save.
To have AnthillPro automatically resolve Work Items, Proceed to Deploy Job with TFS Resolve WorkItem Step. If not using the resolve step, see Add TFS Jobs to Workflows.
The Resolve WorkItem step is typically used as part of a post-deployment job. Once the artifacts have been deployed, the Resolve WorkItem step can be run as a separate job to ensure that all TFS WorkItems are resolved.
Go to Administration, select the appropriate project, and click the Add Job icon.
Follow the steps for creating a build job.
Select the Insert After icon of the step prior to the point where the TFS step is to be included. Go to Issue Tracking > Team Foundation Server, select the Resolve WorkItem step, and click Select.
Name the step.
Description. Provide a short description.
WorkItem ID. Give the name of the WorkItem to be resolved.
State. Give the state to set the WorkItem to.
Reason. Give the reason for the WorkItem state change.
Show Additional Options. See Show Additional Options.
Click Save.
The Jobs created in the Using the TFS Integration section must be executed as part of a workflow. This section will assume that an originating workflow has already been configured, and will cover the process of adding the TFS job(s) to the appropriate workflow(s). The topics covered in detail below are specific to using the TFS integration.
Go to Administration, select the project, and select the build workflow.
On the workflow Main page, select the Definition tab.
From the drop-down menu, choose Embedded Definition and click Select.
Left-click the Start icon and select Insert Job After.
Select the Build job created in the Using the TFS Integration section, a job pre-condition script, and click Insert Job.
Go to Administration, select the project, and select the deploy workflow.
On the workflow Main page, select the Definition tab.
From the drop-down menu, choose Embedded Definition and click Select.
Left-click the Start icon and select Insert Job After.
Select the Post Deployment Steps job created in the Using the TFS Integration section, a job pre-condition script, and click Insert Job.
Go to Dashboard and select the appropriate workflow.
On the workflow Main page, click the Build button for the workflow.
This procedure is the same for the build and deploy workflows.
Once the workflow has completed, select the appropriate Build Life and click the Reports tab.
Select a link to view a report. To go to the WorkItem that was generated in TFS, follow the link.
Click the Issues tab to view the WorkItems AnthillPro created in TFS.
To drill down on each TFS step on the Build Life Summary page, see Trace a Build Life to Source.
Create a new defect, add comments to an defect, and resolve defects with the VersionOne integration. AnthillPro users can also create a report of VersionOne defects from the changelog.
In order to use the VersionOne integration, AnthillPro must first be configured to run the appropriate steps within VersionOne. The VersionOne integration is implemented as AnthillPro job steps configured on the Job Configuration page. When using the integration, click the Create Step button (or select the Insert After/Before icon) to add steps to a job. Once the job is configured, it is then added to the workflow under the Definition tab.
VersionOne Steps:
Create Defect. Create a new defect in a VersionOne. Typically used during a build job.
Add Comments. Add comments from the current changelog to matching VersionOne defects. In order to use this step, a set working directory, get changelog, and publish changelog step is necessary.
Resolve Defect. Resolve VersionOne defect. In order to use this step, a set working directory, get changelog, and publish changelog step is necessary. Can be used as a post-deployment step added to a deploy workflow to update the state of a VersionOne defect.
Publisher Defect Report. Create a Report of VersionOne defects from the current changelog. In order to use this step, a set working directory, get changelog, and publish changelog step is necessary.
This tutorial will follow a simple project configuration using the VersionOne integration steps. The example in this tutorial uses Subversion, but the basic configuration is similar for any repository type. Your jobs will vary, but the VersionOne integration is added as a job step similar to what is described below. The example goes through the manual creation of a build job; however, it is possible to use the Job Wizard to create a build job and then manually configure a second job to run as part of the same workflow.
Let AnthillPro know about VersionOne. Any steps within AnthillPro relying on VersionOne will not work until this integration is configured. The VersionOne integration requires the URL where the VersionOne server is located as well a user name and password for accessing it. These fields may all contain scripts and/or property lookups. See Scripting.
You must have AnthillPro administrative privileges to configure the integration. See Manage Security.
A project must be active in AnthillPro.
A Life-Cycle Model must be configured with the appropriate Status and Artifact Sets. See Using Life-Cycle Models.
Go to System > VersionOne from the Integrations menu.
On the VersionOne Integration page, click Edit.
Configure the integration:
VersionOne Server URL. Input the VersionOne server URL.
Issue URL. You can have AnthillPro automatically generate a link to all of the issues it associates with a Build Life if you give the Issue URL here. Once you give the URL pattern, the issues that appear on the Issues Tab of a Build Life will be linked to the issue in your issue tracker tool for reviewing the issue, adding additional comments, making edits, etc.
Please provide a URL template such as
http://bugs.company.com/browse/${issueId}. The value${issueId}will be replaced in the template with the issue id of the associated issue. This field provides a template which is used throughout AnthillPro to generate links from issues directly to an issue description page within your issue tracker.User Name. Give the user name to be used to connect to the VersionOne server.
Password. Provide and confirm the password to be used to connect to the VersionOne server.
Password Script. To use a script or property lookups for the password, leave the Password field blank and enter it here. See Scripting.
Click Set then Done.
This tutorial will follow a job configuration that adds a VersionOne comment, publishes a VersionOne report, and creates a defect as part of a build workflow. The resolve defect step is added as a post-deployment step to a deploy workflow.
Configure VersionOne must be complete.
You must have AnthillPro administrative privileges to configure the integration. See Manage Security.
A project with at least one Build Life must be active in AnthillPro.
A Life-Cycle Model must be configured with the appropriate Status and Artifact Sets. See Using Life-Cycle Models.
Two jobs need to be created to use all the VersionOne integration steps. (a.) A build job is created with the Add Comment, Publish Defect Report, and Creates Defect steps. (b.) The Resolve Defect step is added as a post-deployment job.
The Add Comments, Create Defect, and Publish Defect Report steps are included after the Populate Workspace, Changelog, Stamp, Dependency, Build, Publish Changelog, and Artifact Delivery steps of the Build job.
Go to Administration, select the appropriate project, and click the Add Job icon.
On the New Job Configuration page, choose No (do not use the Job Wizard). Click Select.
Follow the steps for creating a build job.
Add Comments. Select the Insert After icon of the step prior to the point where the VersionOne step is to be included (Artifact Delivery step in this example). Go to Issue Tracking > VersionOne, select the Add Comments step, and click Select.
Name the step.
Description. Provide a short description.
Issue Id Pattern. Give a regular expression to locate a VersionOne defect Id within changelog comments. Add "()" around the portion of the pattern which identifies the actual Issue Id. The pattern "TST-[0-9]+" would match (returning the same string as Issue Id) "TST-1" and "TST-932415", but not match "TST-a", "TST-", or "TST.1". The pattern "Issue:\[(TST-[0-9]+)\]" would match "Issue:[TST-1]" using issue Id TST-1.
In the example below, the pattern identifies the issue as belonging to a specific VersionOne project. Whenever AnthillPro comes across this regular expression, it will automatically add the appropriate comment in VersionOne.
Title. Give the note title that VersionOne will use to identify this comment.
Additional Comment. Use this field to add any additional information to the VersionOne commit comment.
Show Additional Options (advanced). Select the Show Additional Options link to configure more options.
Is Active. Select No to temporarily deactivate the step without deleting it; otherwise select Yes.
Pre-Condition Script. From the drop down menu, select the condition which must be met for the step to continue. Before editing an existing script or creating a new one, see Step Pre-Condition Scripts.
Ignore Failures. Select Yes if this step should not effect the determination for step continuation or the status determination of the job.
PostProcessingScript. Select a script for determining when commands should count as fail or succeed. See Post Processing Scripts.
Timeout. Enter the time in minutes after the start of the step when AnthillPro will consider the step as timed out and abort it.
Click Save.
Create Defect. Select the Insert After icon of the Add Comments step. Go to Issue Tracking > VersionOne, select the Create Defect step, and click Select. This step will create a defect if a failure occurs.
Name the step.
Description. Provide a short description.
Project Key. Enter the VersionOne project key.
Summary. Enter the issue summary.
Issue Description. Enter the description.
Team. Give the VersionOne defect team.
Theme. Give the VersionOne defect theme.
Iteration. give the VersionOne defect iteration.
Show Additional Options. See Show Additional Options.
Click Save.
Publisher Defect Report. Select the Insert After icon of the Create Defect step. Go to Issue Tracking > VersionOne, select the Publisher Defect Report step, and click Select.
Name the step.
Description. Provide a short description.
Report Name. If a new name is not given, the step name will be used.
Issue Id Pattern. Give a regular expression to locate a VersionOne defect Id within changelog comments. Add "()" around the portion of the pattern which identifies the actual Issue Id. The pattern "TST-[0-9]+" would match (returning the same string as Issue Id) "TST-1" and "TST-932415", but not match "TST-a", "TST-", or "TST.1". The pattern "Issue:\[(TST-[0-9]+)\]" would match "Issue:[TST-1]" using issue Id TST-1.
Include Dependencies. Check to include change logs from dependencies when searching for issues.
Show Additional Options. See Show Additional Options.
Click Save.
The Resolve Defect step is typically used as part of a post-deployment job. Once the artifacts have been deployed (in the example there are two artifact sets: Database and Webapp), the Resolve Defect step is run as a separate job in order to ensure that all VersionOne defects are resolved.
Go to Administration, select the appropriate project, and click the Add Job icon.
On the New Job Configuration page, choose No (do not use the Job Wizard). Click Select.
Follow the steps for creating a build job.
Select the Insert After icon of the step prior to the point where the VersionOne step is to be included (Artifact Delivery step in this example). Go to Issue Tracking > VersionOne, select the Resolve Defect step, and click Select.
Name the step.
Description. Provide a short description.
Issue Key. Enter the issue key to be resolved in VersionOne.
Status. Give the VersionOne status to set the defect to. If none is provided, it will be marked as Resolved.
Resolution Reason. Provide a reason for resolving a defect.
Resolution Details. Input additional information regarding the resolution of this defect.
Close Issue. Check the box to automatically mark the issue as closed. If the box is not checked, the issue will be marked as resolved.
Show Additional Options. See Show Additional Options.
Click Save.
The Jobs created in the Configure Jobs section must be executed as part of a workflow. This section will assume that an originating workflow has already been configured, and will cover the process of adding the VersionOne jobs to the appropriate workflows. Complete workflow configuration is beyond the scope of this tutorial. The topics covered in detail below are specific to using the VersionOne integration.
Go to Administration, select the project, and select the build workflow.
On the workflow Main page, select the Definition tab.
From the drop-down menu, choose Embedded Definition and click Select.
Left-click the Start icon and select Insert Job After.
Select the Build job created in the Configure Jobs section, a job pre-condition script, and click Insert Job.
Go to Administration, select the project, and select the deploy workflow.
On the workflow Main page, select the Definition tab.
From the drop-down menu, choose Embedded Definition and click Select.
Left-click the Start icon and select Insert Job After.
Select the Post Deployment Steps job created in the Configure Jobs section, a job pre-condition script, and click Insert Job.
Note that this jobs deploys two artifact sets and that the Post Deploy Steps job will change the VersionOne issue status for both artifact sets.

Go to Dashboard and select the workflow created in the Create Workflow section.
On the workflow Main page, click the Build button for the workflow.
This procedure is the same for the build and deploy workflows.
Once the workflow has completed, select the appropriate Build Life and click the Reports tab.

Select a link to view a report. To go to the issue that was generated in VersionOne, follow the Issue Id link.
Click the Issues tab to view the issues AnthillPro created in VersionOne.
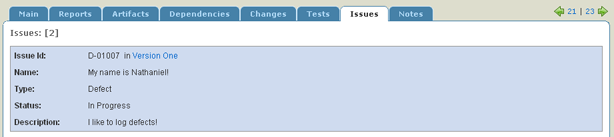
To drill down on each VersionOne step on the Build Life Summary page, see Trace a Build Life to Source.