There are a number of advanced tools available through the UI to help you diagnose problems and manage Build Lives. All of the tools listed below pertain to individual Build Lives, and any actions you take will only effect or apply to the Build Life you are on.
| Some of the Build Life tools can also be configured as part of the project's Life-Cycle Model. For example, deleting a Build Life and archiving a Build Life can be automated as part of the Life-Cycle Model's Cleanup Schedule. If you consistently use the manual versions of this feature, consider modifying the project's Life-Cycle Model. |
The Build Life page provides an overview of a Build Life history, showing the history of workflows executed for the Build Life, as well as what agents jobs ran on and when they ran.
To audit a Build Life, start from the Dashboard and select the project for which you want to audit a Build Life.
Select the Build Life number you are interested in.

Determine who triggered the workflow and how. Go to the Build Life page and click on the Build Request number.

In the example below, the user etm manually requested a build on December 2, 2007.

View similar logs to see who made the request to deploy a build to the QA environment If this build was triggered by a schedule, that would be reflected here as well.
View dependencies by selecting the Dependencies tab The Dependency tab details what Build Lives a particular Build Life is using. It also details uses of this Build Life by other projects.

Check status history and stamp Status and stamp history displays the history of when the project attained each status or stamp. If it attained a certain status or stamp more than once, each time that happened it would show up here.
Select the job number on the Status History or Stamp history to view the job trace.

Inactivating a Build Life removes the artifacts and permanently disables a Build Life. Once inactivated, a Build Life can never be enabled nor used in dependency relationships. (To temporarily deactivate a Build Life, see Archive and Unarchive Build Life.)
AnthillPro keeps a detailed record of all inactive Build Lives; however, they will not be visible on the normal project Dashboard pages. Inactive Build Lives are identified with a tombstone icon next to the Build Life number when a Search is run, and on the individual Build Life page. See Finding Inactive Build Lives.

AnthillPro will not allow a Build Life to be inactivated until all the dependency relationships, etc., have been resolved. If you attempt to inactivate a Build Life that is in use, the warning "This BuildLife could not be deactivated. It is in use by active Build Lives: XXXX" will appear.
Go to Dashboard and select the Workflow associated with the Build Life to be inactivated.
On the Main Workflow page, select the appropriate Build Life.
On the Main Build Life page, select the Inactivate link.

Click OK in the dialogue box.
Inactive Build Lives do not appear on the regular Dashboard pages, but can be accessed using the Search page.
Go to Search > Workflow.
Select a Project from the drop-down menu.
Determine how many workflows will be displayed per page.
Click Search.
Inactivated Build Lives have a tombstone icon next to the number. Selecting the Build Life number links to the Main Build Life page.

Archiving a Build Life stores the build properties (time of build, labels, build number, etc.) and removes the binary artifacts from AnthillPro's data warehouse. Once archived, any dependencies in the Build Life will be locked (see Archive Build Life). Archived Build Lives are automatically assigned the Archived status, and can be identified under the Status History menu on the Build Life Main page.

Unarchiving a Build Life runs a build based on the stored information, reproduces the binary artifacts, and makes the Build Life available to normal AnthillPro processes. See Unarchive Build Life.
In order to archive a Build Life, the SCM/Repository must be labeled during the originating workflow build process. Otherwise, the warning "Unable to archive the build life because the originating workflow did not label the repository" will appear.
Go to Dashboard and select the Workflow associated with the Build Life to be archived.
On the Main Workflow page, select the appropriate Build Life.
On the Main Build Life page, select the Archive link.

Click OK in the dialogue box.
When unarchiving a Build Life, the stored properties are used to reproduce the binary artifacts and restore the Build Life to its original condition. Because dependencies generally do not need to be rebuilt, AnthillPro does not assume they were built against the same label. If you need to rebuild dependencies for an unarchived Build Life, force the dependencies to build when building the master project.
Go to Dashboard and select the Workflow associated with the Build Life to be unarchived.
On the Main Workflow page, select the appropriate Build Life.
On the Main Build Life page, select the Unarchive link.

Click OK in the dialogue box.
Deleting a Build Life permanently removes all traces of the Build Life from AnthillPro, and cannot be reversed. To temporarily deactivate a Build Life, see Archive and Unarchive Build Life. To permanently remove the artifacts from the Build Life but still keep a record of its existence, see Inactivate Build Life.
You must have permissions to delete a Build Life. See Manage Security.
Go to Dashboard and select the Workflow associated with the Build Life to be deleted.
On the Main Workflow page, select the appropriate Build Life.
On the Main Build Life page, select the Delete link.

Click OK in the dialogue box.
Typically, when promoting a Build Life it is assigned a new status to reflect that change. Reviewing which Build Lives have been promoted, deployed, or released is pretty easy.
Go to Search > Status History tab.
From the drop-down menu, select the project to be searched.
Select the Life-Cycle Model status you are interested in. Only statuses associated with the selected project will appear in the drop-down menu.

Click the Search button to get a list of Build Lives.
To view a Project, Build Life, or Job, follow the appropriate link.
In order to be fully traceable and auditable, looking up the sources that a build originated from is important. There are two basic sources of information. The first is to examine the command used to check out the sources. Because checkout commands always uses an exact checkout like a date or baseline, determining what was checked out is straightforward. To do that from the Dashboard, go to the Build Life Main page.
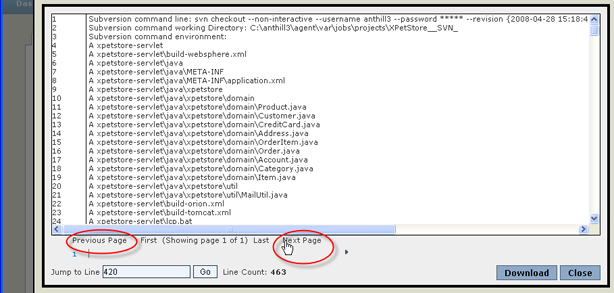
AnthillPro uses an AJAX log viewer, which makes the log available in 1,000-line increments, so you don't have to scroll through the entire log to find what you are looking for. The viewer allows you to jump to a specific line or view the log in 1,000-line increments by clicking the navigation links.
Go to Dashboard > Build Life to be traced.
On the Main Build Life page, click the View Job icon.

To view the output log of the Populate Workspace Step, Click the Output icon.

The checkout command is listed at the top of the log, and should read something like:
Subversion command line: svn checkout --non-interactive --username anthill3
   --password *****
   http://192.168.1.155/urbancode/xpetstore/trunk .
Subversion command working Directory: C:\anthill4\agent\var\jobs\projects
   \XPetStore__SVN_
Subversion command environment:
U    xpetstore-servlet\web\jsp\decorators\default.jsp
Checked out revision 243.
command exit code: 0
Alternately, lookup the label that has been applied to the source code. This is usually a modification of the stamp that was applied, but to be absolutely certain, view the output of the Label Source step. With the baseline label, check out the source tree used and review the source code.
It's well and good to know the sources used when building the project, but if you can't trace the library another team provided back to its source, there may be a problem. Fortunately, AnthillPro makes it easy to trace dependencies to source.
The Dependency tab on the Build Life page lists the projects your project is dependent on. It also details which Build Life was used, when the dependency was built, as well as the Build Life id and the latest status and stamp attained by the dependency's.
To view the project dependencies, select the Dependencies tab of the Build Life in question.
Clicking the dependency's Build Life id, traces its sources the same way sources were looked up in the first section.
