You can have AnthillPro run your source-code analysis tool and then collect the results. Implemented as job steps, the integrations allow AnthillPro to collect the test output and store it in the AnthillPro data warehouse.
Once set up, the integrations will make the test results available on the Analytics tab, where you can perform trending over time, see which tests are failing, track coverage, and even fail a build based on the captured results.
Use the Checkstyle integration to integrate source-code analysis into your existing AnthillPro release lifecycle. The integration exposes Checkstyle's findings, tracks changes between builds, references the change log, and makes that information available on the AnthillPro dashboard.
The Checkstyle integration is available as an AnthillPro Plugin for version 3.7 and above. To use the integration, it must be added to a job. Once Checkstyle has been added to a job, the Checkstyle report is available on the Dashboard under the Build Life Analytics tab when its workflow run. There, you can view results, track trends, and more.
| The integration is written as an AnthillPro Plugin, included in the normal distribution. For older AnthillPro 3.7 versions, you will need to download the integration from Supportal and then upload it to the server. Once uploaded, ensure the Plugin is active. |
You must have permissions to the System and Administration pages.
The Checkstyle results must be generated with a formatter type of
xml.The path to the output file must be available to complete the configuration.
The Checkstyle integration is added to AnthillPro jobs as a step. The Job with the Checkstyle step must be executed as part of a workflow. This section will assume that an originating workflow has already been configured, and will cover the process of adding the Checkstyle build job to the appropriate workflow. Complete workflow configuration is beyond the scope of this entry. The topics covered in detail below are specific to using the Checkstyle integration.
Typically, the Checkstyle step is included after the Populate Workspace, Changelog, Stamp, Dependency, Build, Publish Changelog, and Artifact Delivery steps of the Build job. However, each job will vary, and it is possible to set up AnthillPro to run Checkstyle as part of a secondary workflow.
Go to Administration, select the appropriate project, and click the Add Job icon.
On the New Job Configuration page, choose No (do not use the Job Wizard). Click Select.
Follow the steps for creating a build job.
Select the Insert After icon of the step that will run before the Publish Checkstyle Results step.
Go to Source Analytics > Checkstyle, select Publish Checkstyle Results, and click Select.
Configure step:
Name the step. This name will be used by the AnthillPro system.
Description. Give an optional description of this step.
Working Directory Offset (optional). Give the working directory to use when executing this command. This is relative to current working directory. To use the current directory, leave this field blank.
Report Name. Give the name of the report to be published on the AnthillPro dashboard.
Output File. Give the path to the Checkstyle XML output file from the working directory.
Include Description. Check the box to include a description on the AnthillPro dashboard for each finding. Please note that if this option is selected, large amounts of space in the database may be required.
Show Environment Variables (optional; advanced). Give any optional environment variables in "name=value" format.
Environment variables values may contain references to existing values in the following format:
name=${env/<NAME>};value. If the value of the <NAME> variable is "value2" in the current environment, then the above example will be expanded to:name=value2;value.Using this technique, it is possible add an entry to PATH in the following manner:
PATH=my/path/entry;0. Case is significant even on Windows systems.Show Additional Options (optional; advanced). Select the Show Additional Options link to configure more options.
Is Active. Select No to temporarily deactivate the step without deleting it; otherwise select Yes.
Pre-Condition Script. From the drop down menu, select the condition which must be met for the step to continue. Before editing an existing script or creating a new one, see Step Pre-Condition Scripts.
Ignore Failures. Select Yes if this step should not effect the determination for step continuation or the status determination of the job.
PostProcessingScript. Select a script for determining when commands should count as fail or succeed. See Post Processing Scripts.
Timeout. Enter the time in minutes after the start of the step when AnthillPro will consider the step as timed out and abort it.
Click Save.
Once the job with the Checkstyle step has been configured, run a build. The completed build will publish the report on the Dashboard. To view the results:
Go to the Dashboard, and select the completed Build Life.
On the Build Life page, select the Analytics tab.
On the Analytics tab, you can explore the number and type of findings, track changes between builds, and find out which defects are new. From the page, it is also possible to reference the change log for more information.
Use the CodeSonar integration to integrate source-code analysis into your existing AnthillPro release lifecycle. The integration runs CodeSonar, exposes findings, tracks changes between builds, references the change log, and makes that information available on the AnthillPro dashboard.
The CodeSonar integration is available as an AnthillPro Plugin for version 3.7 and above. To use the integration, it must be configured on the AnthillPro System page, and then added to a job. Once the integration has been configured and added to a job, the CodeSonar report is available on the Dashboard under the Build Life Analytics tab. There, you can view results, track trends, and more.
| The integration is written as an AnthillPro Plugin, included in the normal distribution. For older AnthillPro 3.7 versions, you will need to download the integration from Supportal and then upload it to the server. Once uploaded, ensure the Plugin is active. |
You must have permissions to the System and Administration pages.
CodeSonar must be installed on the AnthillPro Agent machine which will perform the build, scan, etc.
The CodeSonar hub host name and hub port must be available to complete the configuration.
The CodeSonar integration must be configured on the System page before it is added to any jobs.
On the System page, select CodeSonar from the Integration menu.
Click Create New on the CodeSonar configuration page.
Configure integration:
Name. Give a name for this integration. This name will be used by the AnthillPro system.
Hub Host. Give the Hub host name. The hub host name is required in order to use the integration.
Hub Port. Specify the HTTP port on the Hub host given above. The port is required in order to use the integration.
Hub Username (optional). When AnthillPro runs CodeSonar, it will automatically log into the hub. Depending on how your CodeSonar is configured, a user name (e.g., AnthillPro) may be required.
Hub Password (optional). Depending on how CodeSonar is configured, a password may be required for AnthillPro to log into the server. If a password is required, give it here. Leave this field blank if a password is not required for AnthillPro to log into the server.
Confirm Password. Retype the password in the field if one is in use.
Command Path (optional). Give the path to the CodeSonar executables if they are not in the default location (i.e., already on the path). This should only be the path to the directory containing them.
Severity Threshold. Set the severity threshold that will be used to mark a finding as Critical or not. Since CodeSonar produces a severity number for each finding, any number CodeSonar finding with a number equal to or greater than the threshold set here will be marked as an Error in the results; an finding assigned a number less than the threshold you set here will be marked as Critical. For example, if you use the default value of 10.0, a finding that CodeSonar assigns a severity number of 9 to will be marked as Critical in the results; and one assigned a vale of 10.1 will be marked as Error in the results.
Click Save.
See Add CodeSonar to Job.
The CodeSonar integration is added to AnthillPro jobs as a step. The Job with the CodeSonar step must be executed as part of a workflow. This section will assume that an originating workflow has already been configured, and will cover the process of adding the CodeSonar build job to the appropriate workflow.
Once the job has been created, you will need to ensure that the job runs on the agent machine that has CodeSonar installed on it. This is done by selecting the appropriate agent when configuring the workflow definition. See Complete Build Process Configuration and Agent Management for information on agent selection.
Complete workflow configuration is beyond the scope of this entry. The topics covered in detail below are specific to using the CodeSonar integration.
Typically, the CodeSonar step is included after the Populate Workspace, Changelog, Stamp, Dependency, Build, Publish Changelog, and Artifact Delivery steps of the Build job. However, each job will vary, and it is possible to set up AnthillPro to run CodeSonar as part of a secondary workflow (if you do, it may be necessary to run a cleanup step prior to running the CodeSonar step).
Go to Administration, select the appropriate project, and click the Add Job icon.
On the New Job Configuration page, choose No (do not use the Job Wizard). Click Select.
Follow the steps for creating a build job.
When configuring the workflow definition, make sure that the job runs on the machine that has both CodeSonar and the AnthillPro Agent installed. See Complete Build Process Configuration and Agent Management for information on agent selection.
Run CodeSonar step. Select the Insert After icon of the step that will run before the Run CodeSonar step.
Go to Source Analytics > CodeSonar, select Run CodeSonar, and click Select.
Configure step:
Name the step. This name will be used by the AnthillPro system.
Description. Give an optional description of this step.
Working Directory Offset (optional). Give the working directory to use when executing this command. This is relative to current working directory. To use the current directory, leave this field blank.
Report Name. Give the name of the CodeSonar report. The report name is used to publish results to the AnthillPro Dashboard. See View CodeSonar Results and Trending.
Project Name. Give the name of the project as set in CodeSonar.
No Services. If CodeSonar is not running as a Windows service, check the box to pass the
-no-servicesflag so CodeSonar does not run as a service.Command. Enter the current command(s) used to build the project. If multiple commands are used, each one must begin on a new line.
CodeSonar. Select the correct CodeSonar configuration. AnthillPro supports multiple configurations as part of its CodeSonar integration. For example, it is possible to configure two servers that run different test suites, etc. The names appearing in this drop-down menu were set during the configuration process. If you don't see the correct configuration, see Configure CodeSonar to add the appropriate configuration before continuing.
Show Environment Variables (optional; advanced). Give any optional environment variables in "name=value" format.
Environment variables values may contain references to existing values in the following format:
name=${env/<NAME>};value. If the value of the <NAME> variable is "value2" in the current environment, then the above example will be expanded to:name=value2;value.Using this technique, it is possible add an entry to PATH in the following manner:
PATH=my/path/entry;0. Case is significant even on Windows systems.Show Additional Options (optional; advanced). Select the Show Additional Options link to configure more options.
Is Active. Select No to temporarily deactivate the step without deleting it; otherwise select Yes.
Pre-Condition Script. From the drop down menu, select the condition which must be met for the step to continue. Before editing an existing script or creating a new one, see Step Pre-Condition Scripts.
Ignore Failures. Select Yes if this step should not effect the determination for step continuation or the status determination of the job.
PostProcessingScript. Select a script for determining when commands should count as fail or succeed. See Post Processing Scripts.
Timeout. Enter the time in minutes after the start of the step when AnthillPro will consider the step as timed out and abort it.
Click Save.
Once the job with the CodeSonar step has been configured, run a build. The build will kick off CodeSonar, run the tests, and publish the reports on the Dashboard. To view the results:
Go to the Dashboard, and select the completed Build Life.
On the Build Life page, select the Analytics tab.
On the Analytics tab, you can explore the number and type of findings, track changes between builds, and find out which defects are new. From the page, it is also possible to reference the change log for more information.
Use the Coverity Prevent integration to integrate source-code analysis into your existing AnthillPro release lifecycle. The integration runs Coverity Prevent, exposes findings, tracks changes between builds, references the change log, and makes that information available on the AnthillPro dashboard.
The Coverity Prevent integration is available as an AnthillPro Plugin for version 3.7 and above. To use the integration, it must be configured on the AnthillPro System page, and then added to a job. Once the integration has been configured and added to a job, the Coverity Prevent report is available on the Dashboard under the Build Life Analytics tab. There, you can view results, track trends, and more.
| The integration is written as an AnthillPro Plugin, included in the normal distribution. For older AnthillPro 3.7 versions, you will need to download the integration from Supportal and then upload it to the server. Once uploaded, ensure the Plugin is active. |
You must have permissions to the System and Administration pages.
The Coverity Prevent server remote host name and remote port must be available to complete the configuration.
Coverity Prevent must be installed and configured on the same physical machine as the AnthillPro agent, otherwise the integration will not work.
The Coverity Prevent integration must be configured before it is added to any jobs.
On the System page, select Coverity Prevent from the Integration menu.
Click Create New on the Coverity Prevent configuration page.
Configure integration:
Name. Give a name for this integration. This name will be used by the AnthillPro system.
Remote Host. Give the Defect Manager remote host name of the server that results are published to. The server remote host name is required in order to use the integration.
Remote Port. Specify the HTTP port on the remote Defect Manager host given above. The port is required in order to use the integration.
Username (optional). When AnthillPro runs Coverity Prevent, it will automatically commit the test results. Depending on how your Defect Manager is configured, a user name (e.g., AnthillPro) may be required.
Password (optional). Depending on how Coverity Prevent is configured, a password may be required for AnthillPro to log into the server. If a password is required, give it here. Leave this field blank if a password is not required for AnthillPro to log into the server.
Confirm Password. Retype the password in the field if one is in use.
Command Path (optional). Give the path to the Coverity Prevent executables if they are not in the default location (i.e., already on the path). This should only be the path to the directory containing them.
Click Save.
The Coverity Prevent integration is added to AnthillPro jobs as a step. The Job with the Coverity Prevent step must be executed as part of a workflow. This section will assume that an originating workflow has already been configured, and will cover the process of adding the Coverity Prevent job to the appropriate workflow.
Once the job has been created, you will need to ensure that the job runs on the agent machine that has Coverity Prevent installed on it. This is done by selecting the appropriate agent when configuring the workflow definition. See Complete Build Process Configuration and Agent Management for information on agent selection.
Complete workflow configuration is beyond the scope of this entry. The topics covered in detail below are specific to using the Coverity Prevent integration.
Typically, the Coverity Prevent step is included after the Populate Workspace, Changelog, Stamp, Dependency, Build, Publish Changelog, and Artifact Delivery steps of the Build job. However, each job will vary, and it is possible to set up AnthillPro to run Coverity Prevent as part of a secondary workflow (if you do, it may be necessary to run a cleanup step prior to running the Coverity Prevent step).
Go to Administration, select the appropriate project, and click the Add Job icon.
On the New Job Configuration page, choose No (do not use the Job Wizard). Click Select.
Follow the steps for creating a build job.
When configuring the workflow definition, make sure that the job runs on the machine that has both Coverity Prevent and the AnthillPro Agent installed. See Complete Build Process Configuration and Agent Management for information on agent selection.
Run Coverity Prevent Step. Select the Insert After icon of the step that will run before the Run Coverity Prevent step.
Please note that Coverity Prevent must be installed and configured on the same physical machine as the AnthillPro agent, otherwise the integration will not work when the job is run. There are a number of ways to ensure that the job runs on the correct agent. For example, you can use a fixed agent filter (see Configure and Edit Agent Filters) or an agent filter script to select the appropriate agent.
Go to Source Analytics > Coverity Prevent, select Run Coverity Prevent, and click Select.
Configure step:
Name the step. This name will be used by the AnthillPro system.
Description. Give an optional description of this step.
Working Directory Offset (optional). Give the working directory to use when executing this command. This is relative to current working directory. To use the current directory, leave this field blank.
Report Name. Give the name of the Coverity Prevent report. The report name is used to publish results to the AnthillPro Dashboard. See View Coverity Prevent Results and Trending.
Product Name. Give the name of the product to which AnthillPro will commit the defects.
Source Type. Select the source-code type that will be analyzed. Currently, you can choose C/C++, C#, or Java from the drop-down menu.
Command. Enter the current command(s) used to build the project. If multiple commands are used, each one must begin on a new line.
Coverity Prevent. Select the correct Coverity Prevent configuration. AnthillPro supports multiple configurations as part of its Coverity Prevent integration. For example, it is possible to configure two servers that run different test suites, etc. The names appearing in this drop-down menu were set during the configuration process. If you don't see the correct configuration, see Configure Coverity Prevent to add the appropriate configuration before continuing.
Show Environment Variables (optional; advanced). Give any optional environment variables in "name=value" format.
Environment variables values may contain references to existing values in the following format:
name=${env/<NAME>};value. If the value of the <NAME> variable is "value2" in the current environment, then the above example will be expanded to:name=value2;value.Using this technique, it is possible add an entry to PATH in the following manner:
PATH=my/path/entry;0. Case is significant even on Windows systems.Show Additional Options (optional; advanced). Select the Show Additional Options link to configure more options.
Is Active. Select No to temporarily deactivate the step without deleting it; otherwise select Yes.
Pre-Condition Script. From the drop down menu, select the condition which must be met for the step to continue. Before editing an existing script or creating a new one, see Step Pre-Condition Scripts.
Ignore Failures. Select Yes if this step should not effect the determination for step continuation or the status determination of the job.
PostProcessingScript. Select a script for determining when commands should count as fail or succeed. See Post Processing Scripts.
Timeout. Enter the time in minutes after the start of the step when AnthillPro will consider the step as timed out and abort it.
Click Save.
Once the job with the Coverity Prevent step has been configured, run a build. The build will kick off Coverity Prevent, run the tests, and publish the reports on the Dashboard. To view the results:
Go to the Dashboard, and select the completed Build Life.
On the Build Life page, select the Analytics tab.
On the Analytics tab, you can explore the number and type of findings, track changes between builds, and find out which defects are new. From the page, it is also possible to reference the change log for more information.
Use the FindBugs integration to integrate source-code analysis into your existing AnthillPro release lifecycle. The integration exposes FindBugs' findings, tracks changes between builds, references the change log, and makes that information available on the AnthillPro dashboard.
The FindBugs integration is available as an AnthillPro Plugin for version 3.7 and above. To use the integration, it must be added to a job. Once FindBugs has been added to a job, the FindBugs report is available on the Dashboard under the Build Life Analytics tab when its workflow run. There, you can view results, track trends, and more.
| The integration is written as an AnthillPro Plugin, included in the normal distribution. For older AnthillPro 3.7 versions, you will need to download the integration from Supportal and then upload it to the server. Once uploaded, ensure the Plugin is active. |
You must have permissions to the System and Administration pages.
The FindBugs results must be generated with a formatter type of
xml.The path to the output file must be available to complete the configuration.
The FindBugs integration is added to AnthillPro jobs as a step. The Job with the FindBugs step must be executed as part of a workflow. This section will assume that an originating workflow has already been configured, and will cover the process of adding the FindBugs build job to the appropriate workflow. Complete workflow configuration is beyond the scope of this entry. The topics covered in detail below are specific to using the FindBugs integration.
Typically, the FindBugs step is included after the Populate Workspace, Changelog, Stamp, Dependency, Build, Publish Changelog, and Artifact Delivery steps of the Build job. However, each job will vary, and it is possible to set up AnthillPro to run FindBugs as part of a secondary workflow.
Go to Administration, select the appropriate project, and click the Add Job icon.
On the New Job Configuration page, choose No (do not use the Job Wizard). Click Select.
Follow the steps for creating a build job.
Select the Insert After icon of the step that will run before the Publish FindBugs Results step.
Go to Source Analytics > FindBugs, select Publish FindBugs Results, and click Select.
Configure step:
Name the step. This name will be used by the AnthillPro system.
Description. Give an optional description of this step.
Working Directory Offset (optional). Give the working directory to use when executing this command. This is relative to current working directory. To use the current directory, leave this field blank.
Report Name. Give the name of the report to be published on the AnthillPro dashboard.
Output File. Give the path to the FindBugs XML output file from the working directory.
Include Description. Check the box to include a description on the AnthillPro dashboard for each finding. Please note that if this option is selected, large amounts of space in the database may be required.
Show Environment Variables (optional; advanced). Give any optional environment variables in "name=value" format.
Environment variables values may contain references to existing values in the following format:
name=${env/<NAME>};value. If the value of the <NAME> variable is "value2" in the current environment, then the above example will be expanded to:name=value2;value.Using this technique, it is possible add an entry to PATH in the following manner:
PATH=my/path/entry;0. Case is significant even on Windows systems.Show Additional Options (optional; advanced). Select the Show Additional Options link to configure more options.
Is Active. Select No to temporarily deactivate the step without deleting it; otherwise select Yes.
Pre-Condition Script. From the drop down menu, select the condition which must be met for the step to continue. Before editing an existing script or creating a new one, see Step Pre-Condition Scripts.
Ignore Failures. Select Yes if this step should not effect the determination for step continuation or the status determination of the job.
PostProcessingScript. Select a script for determining when commands should count as fail or succeed. See Post Processing Scripts.
Timeout. Enter the time in minutes after the start of the step when AnthillPro will consider the step as timed out and abort it.
Click Save.
Once the job with the FindBugs step has been configured, run a build. When the build is complete, the report will be visible on the Dashboard. To view the results:
Go to the Dashboard, and select the completed Build Life.
On the Build Life page, select the Analytics tab.
On the Analytics tab, you can explore the number and type of findings, track changes between builds, and find out which defects are new. From the page, it is also possible to reference the change log for more information.
Use the Fortify 360 integration to integrate source-code analysis into your existing AnthillPro release lifecycle. The integration exposes Fortify 360's findings, tracks changes between builds, references the change log, and makes that information available on the AnthillPro dashboard.
The Fortify 360 integration is available as an AnthillPro Plugin for version 3.7 and above. To use the integration, it must be configured on the AnthillPro System page, and then added to a job. Once the integration has been configured and added to a job, the Fortify 360 report is available on the Dashboard under the Build Life Analytics tab. There, you can view results, track trends, and more.
| The integration is written as an AnthillPro Plugin, included in the normal distribution. For older AnthillPro 3.7 versions, you will need to download the integration from Supportal and then upload it to the server. Once uploaded, ensure the Plugin is active. |
Fortify must be installed on the AnthillPro Agent machine which will perform the build, scan, etc.
You must have permissions to the System and Administration pages.
The Fortify 360 Server URL must be available to complete the configuration. The server URL is only required if you are using the "upload" step.
A user name and password that AnthillPro can use to log into the Fortify 360 server, if required.
The Fortify 360 integration must be configured before it is added to any jobs.
On the System page, select Fortify 360 from the Integration menu.
Click Create New on the Fortify 360 configuration page.
Configure integration:
Name. Give a name for this integration. This name will be used by the AnthillPro system. For example, the name you give here will be chosen when configuring the Fortify 360 job step.
Server URL. Give the URL to the Fortify 360 server web interface. This should include protocol and port if needed. The server URL is only required if you are using the "upload" step.
If you are using Fortify without the 360 server, leave this field blank. Note that you will need the Fortify sourceanalyzer installed on the target machine. In addition, you need to ensure that you are not using any "upload" options. Used in this way, AnthillPro will run the scan, parse the results and display the data on its own. Username. Give the user name to login to the Fortify 360 server. Leave this blank if no user name or password is required.
Password. Give the password associated with the user name above, if your Fortify 360 server requires a password.
Confirm password, if one is used.
Access Token. Optionally, you can also use an access token to use instead of user name and password to login to the Fortify 360 server. Note that it is possible to use both a username/password and an access token.
Confirm access token, if one is used.
Command Path (optional). Give the path to the sourceanalyzer and fortify client executables if they are not on the path. This should only be the path to the directory containing them. If the executables are not in the default location, you may have to specify the path here.
Click Save.
The Fortify 360 integration is added to AnthillPro jobs as a step. The Job with the Fortify 360 step must be executed as part of a workflow. The Fortify 360 integration step enables AnthillPro to build and scan the project, and then upload the results to the Fortify server. If a scan or upload is performed, the scan results are also loaded into AnthillPro on the Build Life as a source analytics report.
Once the job has been created, you will need to ensure that the job runs on the agent machine that has Fortify installed on it. This is done by selecting the appropriate agent when configuring the workflow definition. See Complete Build Process Configuration and Agent Management for information on agent selection.
This section will assume that an originating workflow has already been configured, and will cover the process of adding the Fortify 360 build job to the appropriate workflow. Complete workflow configuration is beyond the scope of this entry. The topics covered in detail below are specific to using the Fortify 360 integration.
Typically, the Fortify 360 steps are included after the Populate Workspace, Changelog, Stamp, Dependency, Build, Publish Changelog, and Artifact Delivery steps of the Build job. However, each job will vary, and it is possible to set up AnthillPro to run Fortify 360 as part of a secondary workflow.
Go to Administration, select the appropriate project, and click the Add Job icon.
On the New Job Configuration page, choose No (do not use the Job Wizard). Click Select.
Follow the steps for creating a build job.
When configuring the workflow definition, make sure that the job runs on the machine that has both Fortify and the AnthillPro Agent installed. See Complete Build Process Configuration and Agent Management for information on agent selection.
Fortify Build/Scan/Upload Step. Select the Insert After icon of the step that will run before the Run Fortify 360 step.
Expand the Source Analytics folder. Then expand the Fortify 360 folder.
Select Fortify Build/Scan/Upload and click Select.
Configure step:
Name the step. This name will be used by the AnthillPro system.
Description. Give an optional description of this step.
Working Directory Offset (optional). Give the working directory to use when executing this command. This is relative to current working directory. To use the current directory, leave this field blank.
Fortify. Select the correct Fortify 360 configuration. AnthillPro supports multiple configurations as part of its Fortify 360 integration. For example, it is possible to configure two servers that run different test suites, etc. The names appearing in this drop-down menu were set during the configuration process. If you don't see the correct configuration, see Configure Fortify 360 to add the appropriate configuration before continuing.
Report Name. Give the name of the Fortify 360 report. The report name is used to publish results to the AnthillPro Dashboard. See View Fortify 360 Results and Trending.
Build ID. Give the build ID for Fortify 360.
Clean. By default, AnthillPro will perform a cleanup. If you don't want to run a cleanup, de-select this option.
Build. Perform the build. This requires the Build Options (below) to be entered if the default is used.
Build Options. If the build field is checked above, you must give the build options that will be passed to the sourceanalyzer when the build runs. Each argument should be started on a new line.
Scan. By default, a scan is performed. If you don't want AnthillPro to run a scan, de-select this option. If you have AnthillPro run a scan, you will need to give the scan's output file below.
Scan File.The output file of the scan. This is required if performing a scan or uploading. The file name should be in
fvdlformat. For example:anthill-fortify-scan.fvdl.Upload. By default, AnthillPro will perform the upload to the Fortify server. To perform an upload, you will need give the Project and Version below, as well as give the Scan File above.
If you are using Fortify without the 360 server, leave this field blank. Note that you will need the Fortify sourceanalyzer installed on the target machine. In addition, you need to ensure that you are not using any "upload" options. Used in this way, AnthillPro will run the scan, parse the results and display the data on its own. Project. Give the name of the project as set in Fortify 360. This is only necessary if the Upload option is selected above.
Version. Give the Project Version name in the Fortify server to upload results to. This is only necessary if the Upload option is selected above.
Show Environment Variables (optional; advanced). Give any optional environment variables in "name=value" format.
Environment variables values may contain references to existing values in the following format:
name=${env/<NAME>};value. If the value of the <NAME> variable is "value2" in the current environment, then the above example will be expanded to:name=value2;value.Using this technique, it is possible add an entry to PATH in the following manner:
PATH=my/path/entry;0. Case is significant even on Windows systems.Show Additional Options (optional; advanced). Select the Show Additional Options link to configure more options.
Is Active. Select No to temporarily deactivate the step without deleting it; otherwise select Yes.
Pre-Condition Script. From the drop down menu, select the condition which must be met for the step to continue. Before editing an existing script or creating a new one, see Step Pre-Condition Scripts.
Ignore Failures. Select Yes if this step should not effect the determination for step continuation or the status determination of the job.
PostProcessingScript. Select a script for determining when commands should count as fail or succeed. See Post Processing Scripts.
Timeout. Enter the time in minutes after the start of the step when AnthillPro will consider the step as timed out and abort it.
Once the job with the Fortify 360 step has been configured, run a build. The build will kick off Fortify 360, run the tests, and publish the reports on the Dashboard. To view the results:
Go to the Dashboard, and select the completed Build Life.
On the Build Life page, select the Analytics tab.
On the Analytics tab, you can explore the number and type of findings, track changes between builds, and find out which defects are new. From the page, it is also possible to reference the change log for more information.
Use the Klocwork Insight integration to integrate source-code analysis into your existing AnthillPro release lifecycle. The integration exposes Insight's findings, tracks changes between builds, references the change log, and makes that information available on the AnthillPro dashboard.
The Klocwork Insight integration is available as an AnthillPro Plugin for version 3.7 and above. To use the integration, it must be configured on the AnthillPro System page, and then added to a job. Once the integration has been configured and added to a job, the Klocwork Insight report is available on the Dashboard under the Build Life Analytics tab. There, you can view results, track trends, and more.
| The integration is written as an AnthillPro Plugin, included in the normal distribution. For older AnthillPro 3.7 versions, you will need to download the integration from Supportal and then upload it to the server. Once uploaded, ensure the Plugin is active. |
You must have permissions to the System and Administration pages.
The AnthillPro Agent that will run the Klocwork step must be installed on the same machine as Klocwork Insight.
The Klocwork Insight Server URL must be available to complete the configuration.
The Klocwork Insight integration must be configured before it is added to any jobs.
On the System page, select Klocwork Insight from the Integration menu.
Click Create New on the Klocwork Insight configuration page.
Configure integration:
Name. Give a name for this integration. This name will be used by the AnthillPro system.
Server URL. Give the URL to the Klocwork Insight server web interface. This should include protocol and port if needed. The server URL is required in order to use the integration.
Command Path (optional). Give the path to the
kwcheckandkwadminexecutables. This should only be the path to the directory containing them. If the executables are not in the default location, you may have to specify the path here.
Click Save.
The Klocwork Insight integration is added to AnthillPro jobs as a step. The Job with the Klocwork Insight step must be executed as part of a workflow. The Klocwork Insight step can be configured to build, analyze and upload the results of any project (C, C++, Java Ant, MS Visual Studio) already configured in Klocwork.
This section will assume that an originating workflow has already been configured, and will cover the process of adding the Klocwork Insight build job to the appropriate workflow.
Once the job has been created, you will need to ensure that the job runs on the machine that has both Klocwork and the AnthillPro Agent (which will run the job) installed on it. This is done by selecting the appropriate agent when configuring the workflow definition. See Complete Build Process Configuration and Agent Management for information on agent selection.
Complete workflow configuration is beyond the scope of this entry. The topics covered in detail below are specific to using the Klocwork Insight integration.
Typically, the Klocwork Insight step is included after the Populate Workspace, Changelog, Stamp, Dependency, Build, Publish Changelog, and Artifact Delivery steps of the Build job. However, each job will vary, and it is possible to set up AnthillPro to run Klocwork Insight as part of a secondary workflow.
Go to Administration, select the appropriate project, and click the Add Job icon.
On the New Job Configuration page, choose No (do not use the Job Wizard). Click Select.
Follow the steps for creating a build job.
When configuring the workflow definition, make sure that the job runs on the machine that has both Klocwork Insight and the AnthillPro Agent installed. See Complete Build Process Configuration and Agent Management for information on agent selection.
Run Klocwork Step. Select the Insert After icon of the step that will run before the Run Klocwork Insight step.
Expand the Source Analytics folder. Then expand the Klocwork Insight folder.
Select Run Klocwork and click Select.
Configure step:
Name the step. This name will be used by the AnthillPro system.
Description. Give an optional description of this step.
Working Directory Offset (optional). Give the working directory to use when executing this command. This is relative to current working directory. To use the current directory, leave this field blank.
Report Name. Give the name of the Klocwork Insight report. The report name is used to publish results to the AnthillPro Dashboard. See View Klocwork Insight Results and Trending.
Project Name. Give the name of the project as set in Klocwork Insight.
Note that in order for the integration to work, the project name must start with a letter (i.e., a, b, c, etc.). In addition, only digits (0 through 9), Latin letters (A through Z, a through z) and the underscore character are allowed in a project name. A project name must not be no more than 54 characters.
Build. Perform the build. This requires the Build Options to be entered below.
Build Type. Select the type of project that is being built and analyzed.
Build Options. If the build field is checked above, you must give the build options that will be passed to the sourceanalyzer when the build runs. Each argument should be started on a new line.
Build Specification. Give the path to the Klocwork build specification file, if different than the default kwinject.out location.
Run. By default, the integration will perform the analysis. If this box is checked, you must give the Build Specification above.
Include Description (optional). Check the box to include a description with each Klocwork Insight finding. Note that if this option is selected, it may consume large amounts of space in the database. If you experience problems when including descriptions, change this setting back to the default.
Upload. By default, AnthillPro will perform the upload to the Fortify server. To perform an upload, you will need give the Project and Version below, as well as give the Scan File above.
Build Name. Give the name of the build to load the results as. Typically, the following AnthillPro stamp value is most often used:
${bsh:StampLookup.getLatestStampValue()}.Note that only digits (0 through 9), Latin letters (A through Z, a through z) and the underscore character are allowed in a project or build name.
In addition, the AnthillPro Build Life ID can be used for the build name:
${bsh:BuildLifeLookup.getCurrent().getId()}. As well as the AnthillPro Stamp Value:${bsh:StampLookup.getLatestStampValue()}.Klocwork. Select the correct Klocwork configuration. AnthillPro supports multiple configurations as part of its Klocwork integration. For example, it is possible to configure two servers that run different test suites, etc. The names appearing in this drop-down menu were set during the configuration process. If you don't see the correct configuration, see Configure Klocwork Insight to add the appropriate configuration before continuing.
Show Environment Variables (optional; advanced). Give any optional environment variables in "name=value" format.
Environment variables values may contain references to existing values in the following format:
name=${env/<NAME>};value. If the value of the <NAME> variable is "value2" in the current environment, then the above example will be expanded to:name=value2;value.Using this technique, it is possible add an entry to PATH in the following manner:
PATH=my/path/entry;0. Case is significant even on Windows systems.Show Additional Options (optional; advanced). Select the Show Additional Options link to configure more options.
Is Active. Select No to temporarily deactivate the step without deleting it; otherwise select Yes.
Pre-Condition Script. From the drop down menu, select the condition which must be met for the step to continue. Before editing an existing script or creating a new one, see Step Pre-Condition Scripts.
Ignore Failures. Select Yes if this step should not effect the determination for step continuation or the status determination of the job.
PostProcessingScript. Select a script for determining when commands should count as fail or succeed. See Post Processing Scripts.
Timeout. Enter the time in minutes after the start of the step when AnthillPro will consider the step as timed out and abort it.
Once the job with the Klocwork step has been configured, run a build. The build will kick off Klocwork, run the tests, and publish the reports on the Dashboard. To view the results:
Go to the Dashboard, and select the completed Build Life.
On the Build Life page, select the Analytics tab.
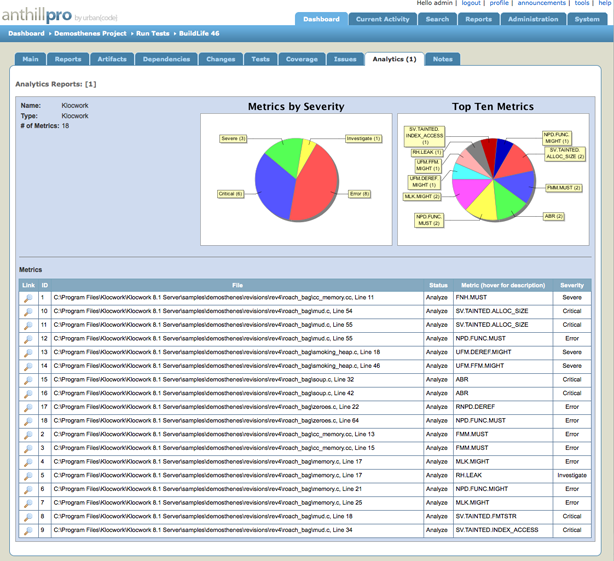
On the Analytics tab, you can explore the number and type of findings, track changes between builds, and find out which defects are new. From the page, it is also possible to reference the change log for more information.
Use the PMD integration to integrate source-code analysis into your existing AnthillPro release lifecycle. The integration exposes PMD's findings, tracks changes between builds, references the change log, and makes that information available on the AnthillPro dashboard.
The PMD integration is available as an AnthillPro Plugin for version 3.7 and above. To use the integration, it must be added to a job. Once PMD has been added to a job, the PMD report is available on the Dashboard under the Build Life Analytics tab when its workflow run. There, you can view results, track trends, and more.
| The integration is written as an AnthillPro Plugin, included in the normal distribution. For older AnthillPro 3.7 versions, you will need to download the integration from Supportal and then upload it to the server. Once uploaded, ensure the Plugin is active. |
You must have permissions to the System and Administration pages.
The PMD results must be generated with a formatter type of
xml.The path to the output file must be available to complete the configuration.
The PMD integration is added to AnthillPro jobs as a step. The Job with the PMD step must be executed as part of a workflow. This section will assume that an originating workflow has already been configured, and will cover the process of adding the PMD build job to the appropriate workflow. Complete workflow configuration is beyond the scope of this entry. The topics covered in detail below are specific to using the PMD integration.
Typically, the PMD step is included after the Populate Workspace, Changelog, Stamp, Dependency, Build, Publish Changelog, and Artifact Delivery steps of the Build job. However, each job will vary, and it is possible to set up AnthillPro to run PMD as part of a secondary workflow.
Go to Administration, select the appropriate project, and click the Add Job icon.
On the New Job Configuration page, choose No (do not use the Job Wizard). Click Select.
Follow the steps for creating a build job.
Select the Insert After icon of the step that will run before the Publish PMD Results step.
Go to Source Analytics > PMD, select Publish PMD Results, and click Select.
Configure step:
Name the step. This name will be used by the AnthillPro system.
Description. Give an optional description of this step.
Working Directory Offset (optional). Give the working directory to use when executing this command. This is relative to current working directory. To use the current directory, leave this field blank.
Report Name. Give the name of the report to be published on the AnthillPro dashboard.
Output File. Give the path to the PMD XML output file from the working directory.
Show Environment Variables (optional; advanced). Give any optional environment variables in "name=value" format.
Environment variables values may contain references to existing values in the following format:
name=${env/<NAME>};value. If the value of the <NAME> variable is "value2" in the current environment, then the above example will be expanded to:name=value2;value.Using this technique, it is possible add an entry to PATH in the following manner:
PATH=my/path/entry;0. Case is significant even on Windows systems.Show Additional Options (optional; advanced). Select the Show Additional Options link to configure more options.
Is Active. Select No to temporarily deactivate the step without deleting it; otherwise select Yes.
Pre-Condition Script. From the drop down menu, select the condition which must be met for the step to continue. Before editing an existing script or creating a new one, see Step Pre-Condition Scripts.
Ignore Failures. Select Yes if this step should not effect the determination for step continuation or the status determination of the job.
PostProcessingScript. Select a script for determining when commands should count as fail or succeed. See Post Processing Scripts.
Timeout. Enter the time in minutes after the start of the step when AnthillPro will consider the step as timed out and abort it.
Click Save.
Once the job with the PMD step has been configured, run a build. The build will publish the report on the Dashboard when complete. To view the results:
Go to the Dashboard, and select the completed Build Life.
On the Build Life page, select the Analytics tab.
On the Analytics tab, you can explore the number and type of findings, track changes between builds, and find out which defects are new. From the page, it is also possible to reference the change log for more information.
You can use the Sonar integration to have AnthillPro publish your test results (for the most recent build) to the Sonar Dashboard. If you are already using AnthillPro to run the testing tools Sonar supports, you can add the Run Sonar step to your build job, and the test results will be published to the Sonar Dashboard.
The Sonar integration is available as a Plugin for AnthillPro 3.7 and above. To use the integration, it must be configured on the AnthillPro System page, and then added to a job. Once the integration has been configured and added to a job, you can then run it within the context of a workflow.
| The integration is written as an AnthillPro Plugin, included in the normal distribution. For older AnthillPro 3.7 versions, you will need to download the integration from Supportal and then upload it to the server. Once uploaded, ensure the Plugin is active. |
You must have permissions to the System and Administration pages, including the ability to configure workflows and jobs.
The Sonar URL must be available to complete the configuration.
If you are running Sonar with other than the default database, you will also need to know the:
name and password Sonar uses to access the database;
URL to access the database; and
driver you are using for the Sonar database.
Additionally, if this information is not included in your POM file (or if the project is not configured in Maven), you will need to provide it during configuration.
The Sonar integration must be configured on the System page before it is added to any jobs. The information given here will be reused by all of your jobs that include the Run Sonar step. If you have multiple Sonar servers, you will need to create a unique configuration for each one. Then, during job creation, you will select the appropriate configuration.
| The integration is written as an AnthillPro Plugin, included in the normal distribution. For older AnthillPro 3.7 versions, you will need to download the integration from Supportal and then upload it to the server. Once uploaded, ensure the Plugin is active. |
If you are using Sonar with Derby and the connection is defined in your POM file, you need only provide a name and Sonar URL here. However, if you are using a different database and the connection information is not defined in your POM file, you will need to add some additional configuration.
On the System page, select Sonar from the Integration menu.
If you do not see Sonar in the menu, go to Server > Plugins (scroll down on the System page). Make sure that Sonar is active (if the icon in the Active menu is red, click on it). If you do not see the Sonar Plugin, download it from Supportal and then upload the Plugin to your AnthillPro server.
Click Create New on the Sonar configuration page.
Configure the integration:
Name. Give a name for this integration. This name will be used by the AnthillPro system. For example, when configuring the Sonar step, the name given here will be populated in the Sonar drop-down.
Sonar URL. Give the URL AnthillPro will use to connect to Sonar. The URL name is required in order to use the integration. For example:
http://www.mysonar.com:9000.
If you are running Sonar with a database other than Derby and your database connection is not defined in your Maven POM file (for example, if you are running Sonar in "Light" mode), you will have to give the following (see Add Sonar to Job for more):
Database Driver. Specify the JDBC driver Sonar uses to connect to its database. For example:
com.mysql.jdbc.driver.Database Username. Give the name Sonar uses to connect to its database. For example: Sonar1, Sonar2, etc. This should correspond to the
sonar.jdbc.usernamesetting.Database Password. Give the password Sonar uses when connecting to the database. This should correspond to the
sonar.jdbc.passwordsetting.Confirm Password. Retype the password in the field.
Database URL. Give the location of the Sonar database. This should correspond to the
sonar.jdbc.urlsetting. For example:jdbc:mysql:www.mysonar.com:9000.
Click Save.
See Add Sonar to Job.
The Sonar integration is added to AnthillPro jobs as a step, and must be executed as part of a workflow. In general, the Sonar step is included after the Populate Workspace, Changelog, Stamp, Dependency, Build, Publish Changelog, Artifact Delivery steps, as well as any testing-tool steps that may be required. For example, add the Run Sonar step to you build job after your other "publishing" steps.
Actual job configuration will vary; depend on the requirements of your testing tools; and depend on the projects' repository types.
| This section assumes an originating workflow has been configured in AnthillPro; that Sonar is already collecting data from your testing tools and publishing the results to the Sonar Dashboard; and that AnthillPro has been configured with Sonar (see Configure Sonar). Complete workflow/job configuration is beyond the scope of this entry. The topics covered in detail below are specific to using the Sonar integration. |
Typically, Sonar is not used as part of a Continuous Integration build because the Dashboard only shows data for one build/test run at a time. Running the Sonar job as part of a daily build (i.e., nightly) is recommended unless your specific needs dictate otherwise.
Because Sonar depends on Maven, it may be necessary to configure two different jobs so Sonar will capture the data from all your tests (it may also be necessary to modify how you run your tests). For example, the integration allows you to run Sonar in both regular and "Light" modes, but not during the same job step (see the Sonar documentation for more information):
The regular mode is used when all the projects being tested are in a Maven repository (i.e., already have a POM file).
The "Light" mode is used when your projects do not use a Maven repository. During job configuration, you will have to check "Create POM File" and specify the Source and Artifact Directories and a Project Name (see Create POM File below).
If you want to run Sonar for both Maven and non-Maven projects, you will have to configure two job steps (possibly two jobs) and then group your tests accordingly.
Once the job has been created, ensure that any agent the Job runs on can establish a connection to Sonar. AnthillPro allows you to do this in many different ways: see Complete Build Process Configuration and Agent Management for information on agent selection.
Go to Administration, select the appropriate project, and click the Add Job icon. If you are adding the Sonar step to an existing job, select that job and proceed to Item 4.
On the New Job Configuration page, choose No (do not use the Job Wizard). Click Select.
Follow the steps for creating a build job.
When configuring the workflow definition (i.e., adding the job to a workflow), make sure that the job runs on a machine that has access to the Sonar server. See Complete Build Process Configuration and Agent Management for information on agent selection.
Run Sonar step. Select the Insert After icon of the step that will run before the Run Sonar step. If you are running tests as part of the same job, make sure the Sonar step is add after the tests have run -- usually near the end of the job when AnthillPro is performing publishing tasks.
Go to Source Analytics > Sonar, select Run Sonar, and click Select.
Configure step:
Name the step. This name will be used by the AnthillPro system.
Description. Give an optional description of this step.
Working Directory Offset (optional). Give the working directory to use when executing this command. This is relative to current working directory. To use the current directory, leave this field blank.
Maven Home. Give the path to the installation of Maven that will be used. For example:
${MAVEN_2.0_HOME}.If the Maven home is on the path, leave this field blank.JVM Properties. If you have any properties that need to be passed to the JVM, give them here. For example, you can add a property to add memory, etc.
Sonar. Select the correct Sonar configuration. AnthillPro supports multiple configurations as part of its Sonar integration. For example, it is possible to configure two servers that run different test suites, etc. The names appearing in this drop-down menu were set during the configuration process. If you don't see the correct configuration, see Configure Sonar to add the appropriate configuration before continuing.
Create POM file. Check the box if your projects are not configured in Maven. This will allow AnthillPro to run Sonar in "Light" mode. If you check this box, AnthillPro will create a POM file at runtime. In order to run Sonar in this manner, you will need to give the following:
Source Directory. Give the relative path to the directory where the source resides if Create POM File is checked above. Otherwise, leave this field blank. This is required if you are running Sonar in "Light" mode: i.e., the projects you are testing are not in a Maven repository.
Artifact Directory. Give the relative path to the directory where artifacts are stored if Create POM File is checked above. Otherwise, leave this field blank. This is required if you are running Sonar in "Light" mode: i.e., the projects you are testing are not in a Maven repository.
Project Name. Give the name to be displayed by Sonar if Create POM File is checked above. Otherwise, leave this field blank. This is required if you are running Sonar in "Light" mode: i.e., the projects you are testing are not in a Maven repository.
Show Environment Variables (optional; advanced). Give any optional environment variables in "name=value" format.
Environment variables values may contain references to existing values in the following format:
name=${env/<NAME>};value. If the value of the <NAME> variable is "value2" in the current environment, then the above example will be expanded to:name=value2;value.Using this technique, it is possible add an entry to PATH in the following manner:
PATH=my/path/entry;0. Case is significant even on Windows systems.Show Additional Options (optional; advanced). Select the Show Additional Options link to configure more options.
Is Active. Select No to temporarily deactivate the step without deleting it; otherwise select Yes.
Pre-Condition Script. From the drop down menu, select the condition which must be met for the step to continue. Before editing an existing script or creating a new one, see Step Pre-Condition Scripts.
Ignore Failures. Select Yes if this step should not effect the determination for step continuation or the status determination of the job.
PostProcessingScript. Select a script for determining when commands should count as fail or succeed. See Post Processing Scripts.
Timeout. Enter the time in minutes after the start of the step when AnthillPro will consider the step as timed out and abort it.
Click Save.
Run the Sonar workflow. Go to the AnthillPro Dashboard and select the appropriate workflow. Click Build. When the build completes, you can view the results on the Sonar Dashboard.