All types of workflows are created, edited, copied, copied to another project, deactivated, activated, deleted, on the Main Administration page by selecting the appropriate icon. Only those with the appropriate permissions are able to perform these tasks. If you do not have the required permissions, contact your AnthillPro administrator. There are numerous advanced-authoring tools that enable you add additional automation, enforce process rules, and map AnthillPro processes to your existing strategies:
Stamping. In AnthillPro, a stamp is a configurable name for the build number, build identifier, or version number used to identify a build. This allows you to mimic your current strategies.
Lockable Resources. Use a Lockable Resource to specify a resource that needs to be identified and/or reserved (e.g., an agent or environment) when executing a workflow. AnthillPro prevents access to the resource when the lock is acquired, and queues all other requests for that resource until the lock is released upon workflow completion.
Workflow Tasks. Workflow tasks allow you to set up manual gates, etc., that must be performed. For example, a task could be created for the QA lead to approve a build being promoted to another environment.
Triggers and Scheduled Builds. With Triggers, builds may be performed in a number of ways. For Continuous Integration builds, it is ideal to run the build every time a file is checked in with a Repository Trigger. Other regular builds, such as nightly builds, are managed by schedules and kicked off by Scheduled Triggers.
In AnthillPro, a stamp is a generic name for the build number, build
identifier, or version number used to identify a build. Each stamp type
may use a different algorithm to generate the stamp. Though stamps can be
converted into labels (or baselines) on the corresponding source control,
it is not required. In general, the stamp value should contain an
incremental property with the syntax
${+property:<propname>} on the project's originating
workflow, making the property transparent to other originating
workflows.
| Though less robust, it is possible to generate a simple stamp using a short BeanShell script that returns the build ID. An example of this can be seen in the Setting Up a Build Process section. |
Most projects will use numerous stamps: For example, a stamp may be applied to development builds using a source-control version number or may simply count build numbers. Another stamp may be applied only to more tested builds and use a releasable version number, etc. Because multiple stamps may identify the same build (within the Build Life), stamps are organized into stamp style for differentiation. See Applying Multiple Stamps to a Build.
Stamp styles are tied to stamp-value and/or stamp-context-script attributes that track version numbers and increment stamps through workflows. For example, a DEV stamp style would be used for marking development builds, a QA stamp style would be used for releasing to QA, etc. Typically, a new stamp style is used to identify when a build has reached a different stage of the application life-cycle. See Stamp Style.
To use a stamp style, it must first be created on the project's Life-Cycle Model. See Using Life-Cycle Models.
To use more than one stamp to track a build throughout its life-cycle, see Applying Multiple Stamps to a Build.
Once configured, all the stamps applied to a build can be viewed/traced on the Dashboard and Current Activity page.
Stamp configuration is (primarily) done with a string for each stamp style that may contain:
Foo. Constant material.
${property:<propname>}. Property material.
${+property:<propname>}. Incrementing property.
${stampContext:<valuename>}. Values generated from the stamp context script.
The ${+property:} token can only reference
originating-workflow properties and project properties, and is primarily
used for a build-counter type functionality. It should not be referenced
elsewhere in the workflow via ${property:} notation because
there is no guarantee that another concurrently running build has not
incremented the value since the stamp was created. To have a separate
counter for each originating workflow, it is usually necessary to create
a workflow property.
| See the Setting Up a Build Process section if you just want to return the build ID. In this way, there is no need to set any properties and the stamp will be assigned the Build Life number. |
Use stamp context scripts to generate values for variables in the stamp context when creating a stamp (for builds, etc.). The stamp context script is used by the stamping strategy to create a stamp within a workflow. The script should not modify any properties or objects, etc. Stamp context scripts are similar to normal AnthillPro scripts, except that the additional variable "stampContext" is provided an empty HashMap.
Any stamp configuration may be concatenated similar to:
${property:ProductName}-b${+property:buildCounter}.${stampContext:revision}
with a stamp context script. The ${stampContext:} tokens
are resolved by looking up values from the map generated by the stamp
context script. For example, a stamp context script can be used
to:
Get the SCM revision number of the source that went into the build.
Place the revision number in the map variable stamp context within the script.
It would look something like: stampContext.put("revision",
revisionNumber). The script can then be incorporate into the
stamp by using the token ${stampContext:revision}. The
advantages over a simple ${bsh:} in the stamp value is that
a stamp context script can be reused by multiple workflows/stamps and
can be written in scripting languages other than BeanShell. See Scripting.
The ChangeSet ID script below gets the most
recent change set and is accessible to the stamp via
${stampContext:<name>} syntax.
import com.urbancode.vcsdriver3.*;
import com.urbancode.anthill3.runtime.scripting.helpers.*;
int getMaxChangeSet(ChangeLog[] changelogArray) {
  int result = 0;
  for (int i = 0; i < changelogArray.length; i++) {
    ChangeSet[] changesetArray = changelogArray[i].getChangeSetArray();
    for (int j = 0; j < changesetArray.length; j++) {
      ChangeSet changeset = changesetArray[j];
      id = changeset.getId();
      // edit out the "r" character for svn
      if (id.startsWith("r")) {
        id = id.substring(1)
      }
      int num = (new Integer(id.trim())).intValue();
      if (num > result) {
        result = num;
      }
    }
  }
  return result;
}
int highestChangeset = getMaxChangeSet(ChangeLogHelper.getChangeLogArray());
// If there is no changelog, look up the most recent failed and good build
// and take the highest number. We assume that the version number will
// be the first stamp.
if (highestChangeset == 0) {
 lastSuccess = BuildLifeLookup.mostRecentSuccess();
 lastFailure = BuildLifeLookup.mostRecentFailure();
 if (lastSuccess != null) {
   int num = getMaxChangeSet(ChangeLogHelper.getChangeLogArray(lastSuccess));
   if (num > highestChangeset) {
     highestChangeset = num;
   }
 }
 if (lastFailure != null) {
   int num = getMaxChangeSet(ChangeLogHelper.getChangeLogArray(lastFailure));
   if (num > highestChangeset) {
     highestChangeset = num;
   }
 }
}
stampContext.put("changeset", ""+highestChangeset);Go to Administration and select the appropriate project.
On the Project page, select the Properties tab.
On the Properties tab, click the New Property button under the Project Properties menu.
Name the property and give it a description (optional). Give the value as myStamp or another name that easily identifies it as a stamp.
Pass to Builders. Check Yes to automatically pass this property to applicable builders. Otherwise, check No. Automatically passing the property to the builder is not recommended, as it can lead to inaccurate stamps under certain conditions. If the stamp is going to be incorporated into the product, then pass something like this BeanShell script
${bsh:StampLookup.getLatestStampValue()}, or${bsh:StampLookup.getLatestStampValue("dev")}, etc.Set in Environment. Check Yes to automatically set this property in the environment for applicable builders.
Automatically setting the property in the environment is not recommended, as it can lead to inaccurate stamps under certain conditions.
Value. Input the property value.
Click Save.

Go to Administration and select the Originating Workflow that you want to stamp.
Under the Stamping Strategies menu, click the Create Value icon under the Action menu to add a stamping strategy.

On the Stamping Strategy configuration page, enter the string used to generate stamps.
Properties may be used as per the normal
${property:<propname>}syntax.Any properties that should be auto-incremented (such as a build counter) should be specified as ${+property:<propname>}.

To set Advanced Settings, see Stamp Context Scripts (Advanced).
Click Save.
In order to use the advanced settings, first create a stamp context script and then add it to the appropriate workflow.
Go to System > Stamp Context under the Script Library menu.
On the Stamp Context Scripts page, click the Create New button.
Name the script and provide a description (optional).
Language. Choose a scripting language from the drop-down menu. AnthillPro supports BeanShell, Groovy, and JavaScript.
Script. Input the script body. Set the properties in the stampContext map variable. These will then be accessible to the stamp via
${stampContext:<name>}syntax. See Stamp Context Scripts (above) and Scripting.Click Save.

Go to the appropriate Stamping Strategy configuration page and select the Show Advanced Settings link.
From the drop-down menu, select the script used to populate the stampContext attributes for the stamp (you may access them via
${stampContext:<attributeName>}in the stamp).Enter the string used to generate stamp.
Click Save.

To identify the same build with different stamps, the Create Stamp step must be included in the secondary process (workflow) job. (While the step may be included anywhere within the job, most users include it after the Populate Workspace and Get Changelog steps if applicable.) For example, to stamp a build when it is sent to QA, the deploy (secondary) workflow must contain the Create Stamp step that tells AnthillPro to apply a new stamp whenever the workflow is performed. To apply additional stamps, each secondary workflow must contain the appropriate stamp style.
Add a new stamp to a build when a secondary process is run, typically to identify that the build has been sent to a different environment, etc. The process for applying a second (or third, etc.) stamp to a build is similar for stamping the build, except that the new stamp is tied to the secondary (non-originating) workflow used to send the build to another environment (QA, PROD, etc.). This is done by including a Create Stamp step in the deploy job.
Create new Stamp Style. Create the new stamp style that you want to apply to a build when the secondary workflow is run. See Using Life-Cycle Models.
Create a Project Property. In addition to the property for stamping the originating workflow, create a property for stamping the build when running a secondary workflow (process) with a different stamp. See Create a Project Property.
Create the secondary workflow that will apply the new stamp (via the job).
Create Job to be run by the Secondary Workflow. Once the secondary workflow has been created, configure the job that will deploy the artifacts.
Include the Create Stamp step near the beginning of the job.
Make sure to select the Stamp Style (from the drop-down menu) you want to apply when running this workflow.
Add job to workflow.
To add different stamps, for QAT, PROD, etc., follow Items 1-5 for each secondary process (workflow) that deploys the artifacts to the specific environment.
Use a Lockable Resource to specify a resource that needs to be identified and/or reserved (e.g., an agent or environment) when executing a workflow. AnthillPro prevents access to the resource when the lock is acquired, and queues all other requests for that resource until the lock is released upon workflow completion.
After creating a Lockable Resource at System > Lockable Resources (see Configure Lockable Resources), it may be edited, reset, or deleted on the Lockable Resources page:
Edit. Select the edit icon to change the Lock Resource configuration.
Reset. Selecting the Reset icon removes all locks that have been acquired on the resource. For example, if the workflow is taking too long, or is hung up, clicking the Reset button will allow other workflows to acquire the resource. Resetting the Lockable Resource only effects workflows that have acquired the resource. Subsequent workflows will still use the Lockable Resource normally.
Delete. A Lockable Resource configured on at least one workflow cannot be deleted.

When adding Locks to a workflow, there are two options:
Lock the Environment. Select "Lock Environment" icon to have AnthillPro exclusively lock the environment when this workflow runs. See Exclusively Lock the Environment.
Resources to Lock. Select the Add Resource link to have AnthillPro obtain a lock during workflow execution. Either choose a resource from the drop-down menu (see Use Lockable Resources); or select a resource dynamically with a BeanShell script.
If scripting a Resource Lock, it must return the name of a resource or a LockableResource object. When the workflow is run, AnthillPro will add the scripted Resource Lock to the Lockable Resources page. See Scripting.
Once a Lockable Resource is configured, it may be viewed (but not edited) by AnthillPro users with permissions to the Current Activity page.
You must have administrative permissions. See Manage Security.
At least one project must be active in AnthillPro.
After creating a Lockable Resource, it must be added to a workflow so AnthillPro will lock a resource at workflow execution. See Use Lockable Resources.
Go to System > Lockable Resources under the Project Support menu.
On the Lockable Resources page, click Create New.
Configure:
Name the Lockable Resource.
Description (optional). Give a description.
Maximum Number Of Lock Holders. Determine the maximum number of objects that can acquire this resource at any one time. Specifying "1" means that only one workflow can be run on the resource; specifying "5" means that a maximum of five different workflows can run concurrently using this resource.
It is also possible to override this setting for individual workflows. See Use Lockable Resources, Item Three.
Click Save then Done.
Proceed to Use Lockable Resources.
Once a Lockable Resource is configured (see Configure Lockable Resources), add it to a workflow on the Administration Workflow Main Page. This section covers the steps necessary to add an existing Lockable Resource to an existing workflow. To select a resource dynamically, see Scripted Lockable Resources.
Go to Administration and select the workflow the resource is to be acquired on.
On the Workflow Main page, select the Add Resource link.
Set the Lockable Resource:
Explicit Resource. Select an existing Lockable Resource from the drop-down menu. See Configure Lockable Resources.
Scripted Resource. If a Lockable Resource was selected above, skip this item. To dynamically set a Lockable Resource, see Scripted Lockable Resources.
Exclusive. Check "Yes" to have AnthillPro exclusively lock the resource. When enabled, AnthillPro will obtain an exclusive lock for this resource, and override the Maximum Number of Lock Holders set during resource configuration. See Configure Lockable Resources. When enabled, all other requests to acquire the resource will be queued.
Click Save then Done.
To add another Lockable Resource, repeat Items One through Four.
Select the "Lock Environment" icon to have AnthillPro lock the environment when this workflow runs. When enabled, this option exclusively locks the environment, and ensures that no other workflow is able to run in the environment while this workflow is running. Additionally, if a request to run this workflow is made, and another workflow is currently running in the environment, this workflow will be placed on hold until the environment is free.
To turn exclusive environment locking off, select the icon again.
Assign the "task execute" permission to a user, on a workflow-by-workflow basis, to restrict that user's ability to execute another workflow. When a user is assigned this permission, they are allowed to only execute a workflow (such as a deployment, etc.) via a task (see Create and Use Workflow Choice Task and Create and Use Yes/No Task). Users with the "task execute" permission will not be allowed to manually run a secondary process, etc., and have no system permissions. This is useful in situations where AnthillPro users are only tasked with deploying, but not building, a project or workflow. To set a "task execute" permission, see Setting Workflow Permissions.
The task is cerated for originating workflows of Life-Cycle-Based projects, and typically result in a secondary workflow (such as a deployment) being run. See Create and Use Workflow Choice Task and Create and Use Yes/No Task.
Use the Workflow Choice Task to require specific users to manually answer a question. When the question is answered with a workflow selected from all available workflows, that workflow will be run on the Build Life. To create a Task, add it to the job. When the job is run, the Task will appear on the Dashboard Tasks Tab for the users with the appropriate role (see Use Workflow Choice Task).
The Workflow Choice Task can be used with both an Embedded Job and a Library Job. (The Yes/No Task also may be used with a Library Job. See Create and Use Yes/No Task.) Because it requires a Build Life, the Task cannot be used in conjunction with Operational projects.
See also Execute Workflow via Task and Setting Workflow Permissions.
You must have administrative permissions. See Manage Security.
At least one Life-Cycle Based project must be active in AnthillPro. The Task will not work with Operational (Non-Life-Cycle Based) projects.
The workflow to run the Task and the workflow(s) to be run when the Task is complete must be created.
While there is no restriction where the Workflow Choice Task is placed within the job, most users include it near the end of the job. For a typical build job, it is included after the Set Working Directory, Populate Workspace, Get Dependency Artifacts, and Build steps. The Workflow Choice Task may be added to either an originating or secondary (non-originating) workflow; however, it may only kick off a secondary (non-originating) workflow.
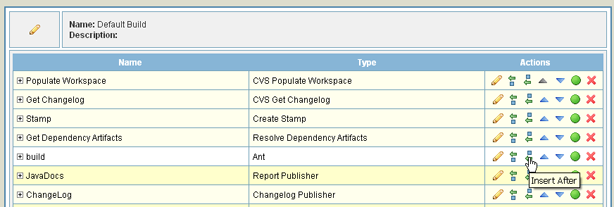
Go to Administration and select the job to add the Workflow Choice Task to. For detailed instructions on job creation.
Select the Insert After icon of the job step prior to where the Create Workflow Task step is to be included. For example, if inserting the Task step after the Build step, select the Insert After icon of the Build step.
Expand the Miscellaneous folder, select Manual Workflow Choice Task, and click Select.
Configure step:
Name the step.
Question. Give the question that a user must answer. The filed may be scripted (advanced). See Scripting.
Role. Select a role from the drop-down menu. Only one role may be selected. Any user assigned the selected role will be able to answer the question by selecting one of the available workflows.
To restrict who can answer the question and execute the workflow, See Execute Workflow via Task.
Workflow Choices. Check the secondary workflow(s) that will be displayed for the user to choose from (see Use Workflow Choice Task). For example, if multiple workflows are available to the user, one can be used to send the artifacts to QA, or one used to send the artifacts to QAT, etc.
Only secondary workflows associated with the project are available: i.e., a Library Workflow cannot be kicked off with this Task. For details on creating secondary workflows.
Show Additional Options (advanced). Select the Show Additional Options link to configure more options.
Is Active. Select No to temporarily deactivate the step without deleting it; otherwise select Yes.
Pre-Condition Script. Select the pre-condition script which must pass before the step will execute. Editing an existing script will effect all projects that use the script.
Ignore Failures. Select Yes if this step should not effect the determination for step continuation or the status determination of the job.
PostProcessingScript. Select a script for determining when commands should count as fail or succeed. See Post Processing Scripts.
Timeout. Enter the time in minutes after the start of the step when AnthillPro will consider the step as timed out and abort it.
Click Save.
For usage, see Use Workflow Choice Task.
Run the workflow that contains the job configured in Create Workflow Choice Task.
Once the workflow is complete, go to Dashboard > Tasks. If you have the appropriate role, the Task will be listed.
Under the Description menu, select the appropriate Task.
In the Task dialog box, answer the question configured in Create Workflow Choice Task.
Workflow. Select the workflow to be run from the drop-down menu. Because there are multiple options, make sure you know which workflow to choose before completing the Task.
Click Yes to add the appropriate workflow.
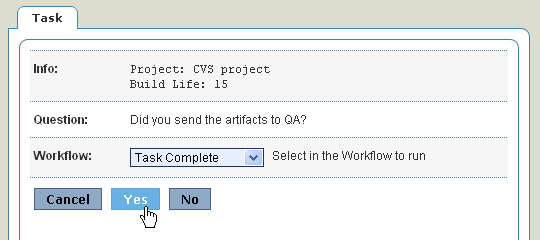
Click Yes again to kick of the workflow. If you click No the workflow will not run. Clicking Cancel will return you to the main Tasks tab.
To view the status and history of every Task, see Task History Tab.
Use a Yes/No Task to require a specified user role to perform a manual procedure in order to kick off another workflow. To create a Task, add it to the job. When the job is run, the Task will appear on the Dashboard Tasks Tab for the users with the appropriate role (see Use Yes/No Task).
For example, use a Task to verify that a QA lead reviewed the automated test logs. When "Yes" is selected (indicating approval) a workflow that deploys the application to QA is triggered.
The Yes/No Task may be used with both an Embedded Job (see Create Yes/No Task with Embedded Job) and a Library Job (see Create Yes/No Task with Library Job). Because it requires a Build Life, the Task cannot be used in conjunction with Operational projects.
See also Execute Workflow via Task and Setting Workflow Permissions.
You must have administrative permissions. See Manage Security.
At least one Life-Cycle Based project must be active in AnthillPro. The Task will not work with Operational (Non-Life-Cycle Based) Projects.
The workflow to run the Task and the workflow to be run by the Task must already be created.
For a typical build job, the Task is included after the Set Working Directory, Populate Workspace, Get Dependency Artifacts, and Build steps. Most users include the step near the end of the Job. The Yes/No Task may be added to either an originating or secondary workflow; however, it may only kick off a secondary (non-originating) workflow for the same Build Life.
Go to Administration and select the job to add the Yes/No Task to. For detailed instructions on job creation.
Select the Insert After icon of the job step prior to the point where the Yes/No Task step is to be included. For example, if inserting the Task step after the Build step, select the Insert After icon of the Build step to add the Task step after the Build step.

Expand the Miscellaneous folder, select Manual Yes/No Question Task, and click Select.
Configure step:
Name the step.
Question. Give the question that a user must answer. The filed may be scripted. See Scripting.
Role. Select a role from the drop-down menu. Only one role may be selected. Any user assigned the selected role will be able to answer the question.
To restrict who can answer the question and execute the workflow, See Execute Workflow via Task.
Workflow to Run. Select the workflow that will run when the question is answered. Only when the user answers "Yes" to the question will the secondary workflow execute on the Build Life.
Environment. Select the environment the secondary workflow will run in (once it has been kicked off by the manual Task). If "Any Environment" is chosen, AnthillPro will run the workflow on the first available agent associated with the project. If the workflow to be run requires a resource only available in a single environment, select that environment. See Environments.
Show Additional Options (advanced). Select the Show Additional Options link to configure more options.
Is Active. Select No to temporarily deactivate the step without deleting it; otherwise select Yes.
Pre-Condition Script. Select the pre-condition script which must pass before the step will execute. Editing an existing script will effect all projects that use the script.
Ignore Failures. Select Yes if this step should not effect the determination for step continuation or the status determination of the job.
PostProcessingScript. Select a script for determining when commands should count as fail or succeed. See Post Processing Scripts.
Timeout. Enter the time in minutes after the start of the step when AnthillPro will consider the step as timed out and abort it.
Click Save.
For usage, see Use Yes/No Task.
Creating a Yes/No Task for a Library Job follows much the same process described in Create Yes/No Task with Embedded Job; however, because the Library Job may be used by multiple projects, the workflow to be run and the specific environment must be determined by a short script.
To use the Task with a Library Job, you should already be familiar with AnthillPro scripting. See Scripting.
Follow the directions for creating a Library Job.
Go to Administration and select the Library Job to add the Yes/No Task to.
Select the Insert After icon of the job step prior to the point where the Yes/No Task step is to be included. For example, if inserting the Task step after the Build step, select the Insert After icon of the Build step to add the Task step after the Build step.
Expand the Miscellaneous folder, select Manual Yes/No Question Task, and click Select.
Configure step:
Name the step.
Question. Give the question that a user must answer. The filed may be scripted (see Scripting).
Role. Select a role from the drop-down menu. Only one role may be selected. Any user assigned the selected role will be able to answer the question.
To restrict who can answer the question and execute the workflow, See Execute Workflow via Task.
Workflow Script. Give the script (see Scripting) that will determine the workflow to run when the question is answered "Yes". The script should return the name of the workflow or the workflow object to run.
For example, enter
return
                  "Deploy";
to kick off the secondary workflow named Deploy when the question is answered "Yes";or
return
                  ProjectLookup.getCurrent().getWorkflow("Deploy");
to first look up the current project and kick off the secondary workflow named Deploy when the question is answered "Yes".
Environment Script. Give the script (see Scripting) that will determine the environment to run the workflow when the question is answered "Yes". The script should return the name of the environment.
For example, enter
return
                  "QA";
to run the secondary workflow in the QA environment when the question is answered "Yes". See Environments.
Show Additional Options (advanced). Select the Show Additional Options link to configure more options.
Is Active. Select No to temporarily deactivate the step without deleting it; otherwise select Yes.
Pre-Condition Script. Select the pre-condition script which must pass before the step will execute. Editing an existing script will effect all projects that use the script.
Ignore Failures. Select Yes if this step should not effect the determination for step continuation or the status determination of the job.
PostProcessingScript. Select a script for determining when commands should count as fail or succeed. See Post Processing Scripts.
Timeout. Enter the time in minutes after the start of the step when AnthillPro will consider the step as timed out and abort it.
Click Save.
For usage, see Use Yes/No Task.
Run the workflow that includes the job configured in either Create Yes/No Task with Embedded Job or Create Yes/No Task with Library Job. See Run Builds for originating workflows or Run Deployment for secondary workflows.
Once the build is complete, go to Dashboard > Tasks. If you have the appropriate role, the Task will be listed.
Under the Description menu, select the appropriate Task.
In the Task dialog box, answer the question configured in Create Yes/No Task with Embedded Job or Create Yes/No Task with Library Job. Click Yes to kick of another workflow. If you click No the workflow will not run. Clicking Cancel will return you to the main Tasks tab. Once a Task has been completed, it will be removed from the Tasks tab.

To view the status and history of every Task, see Task History Tab.
With Triggers, builds may be performed in a number of ways. For Continuous Integration builds, it is ideal to run the build every time a file is checked in with a Repository Trigger. Other regular builds, such as nightly builds, are managed by schedules and kicked off by Scheduled Triggers.
Builds (and deployments) may also be started based on arbitrary events in the system using a scripted Event Trigger. For example, event triggers can be used to look for actions such as a completed build of a related project or completion of an originating workflow with the auto-deploy flag set to "true".
If you use Subversion, see also Using Triggers with Subversion.
AnthillPro supports three trigger types:
Event Triggers. Looks for actions automatically thrown by AnthillPro and initiates another action (e.g., initiates a deployment on successful completion of an originating workflow). See Event Triggers.
Repository Triggers. Kicks off a build when changes are committed to source. Most commonly used for CI. See Repository Triggers.
Scheduled Trigger. Each schedule runs on its own timer. The build is registered with the schedule and kicked off when the schedule fires. See Scheduled Triggers.
You must have Administrative permissions. See Manage Security.
Prior to adding an Event Trigger to the workflow, the Event Script must be created. See Event Scripts.
If you are unfamiliar with AnthillPro scripting, see Scripting and Tools > Developer Tools before creating an Event Trigger.
See also Use Agent Filters and Quiet Periods.
Event Triggers use scripts to create an Event Filter that listens to events passing through the AnthillPro Event Service. When the Event Script detects an event (e.g., that a dependency of the trigger's workflow is used; a completed build of a related project; or a completed originating workflow with the auto-deploy flag set to "true"; etc.), it can then trigger another action by the AnthillPro server.
In general, once configured, the scripts are immediately active and listening for events. The trigger, workflow, and project parameters provide references to the Event Trigger itself, as well as the workflow and project it belongs to. The AnthillPro API exposes its event service so the Trigger may be configured to listen for specific events. See Event Scripts and Scripting.
See also Use Agent Filters and Quiet Periods.
Go to Administration and select the workflow the trigger is to be added to.
Select the Triggers tab, and click the New Trigger button.
Select Event Trigger from the drop-down menu and click Select.
Configure trigger:
Name the trigger.
Force. Check the box to force a build every time this trigger executes.
Event Script. Select the script that returns an EventListener. Available parameters are the workflow to be triggered (workflow); this project (project); and this trigger (trigger). See Event Scripts.
Click Save then Done.
For Continuous Integration builds, it is ideal to build every time a file is checked in. In this case, a post-commit script is added to the SCM that alerts AnthillPro of source changes. Once the Repository Trigger is active for a workflow, every commit of source changes will initiate a build.
See also Use Agent Filters and Quiet Periods.
Go to Administration and select the workflow the trigger is to be added to.
If using Subversion, triggers can be set up at the repository level. Once done, they are available to all workflows using that repository. An individual workflow trigger does not need to be created. See Subversion Repository Trigger Configuration.
Select the Triggers tab, and click the New Trigger button.
Select Repository Trigger from the drop-down menu and click Select.
Configure trigger:
Name the trigger.
Force. Check the box to force a build every time this trigger executes.
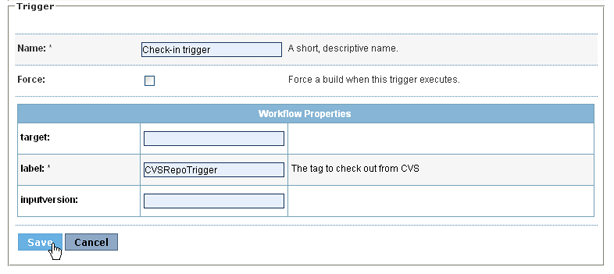
Click Save then Done.
Add a Scheduled Trigger to workflows in a similar manner to the Repository Trigger. Each Schedule Trigger runs on its own timer that polls the SCM for changes. If changes are detected, the build is registered with the schedule and kicked off when the schedule fires.
Scheduled Triggers give the option to force a build regardless of whether source changes have occurred. Unless the forced option is set, AnthillPro will not initiate a build if no source changes are detected.
See also Use Agent Filters and Quiet Periods.
A schedule must be created prior to adding to the trigger. To do so, go to System > Schedules under the Project Support menu. When creating a schedule, make sure to give it a name and description that makes it easy for others to identify (e.g., Name: Hourly Schedule; Description: kicks off a build every hour).
To create a schedule, see Create Schedules.
Before continuing, make sure you have already created a schedule. See Create Schedule for Trigger.
Go to Administration and select the workflow the trigger is to be added to.
Select the Triggers tab, and click the New Trigger button.
Select Scheduled Trigger from the drop-down menu and click Select.
Configure trigger:
Name the trigger.
Schedule. Select a schedule from the drop-down menu. See Create Schedule for Trigger.
Force. Check the box to force a build every time this trigger executes, even if source changes have not been detected.
Click Save then Done.