AnthillPro sends a number of notifications to users in a variety of formats. Most commonly, AnthillPro is configured to send either an e-mail or IM message regarding the state of a CI build. The recipient list of these notifications, as with other notifications AnthillPro sends out, are usually tied to the LDAP integration, etc., which is configured as part of AnthillPro's security system; as well as your mail server and/or IM provider. This allows you an easy way to send notifications to AnthillPro users (it is also possible to send notifications to non-users as well). You can even compose custom notifications that send the information you want in the format you want.
In addition to sending notifications via e-mail and IM, administrators can send out announcements to all AnthillPro users. Once an announcement is sent, it will appear at the top of the UI for all AnthillPro users. Common uses for announcements are to let everyone know when the server is going down for maintenance, report network problems, etc.
AnthillPro requires an external mail server to route messages through (via SMTP). It is recommended that you set up an 'AnthillPro' user on the server so that e-mails can be sent (e.g., anthill@yourcompany.com).
Some e-mail servers and firewalls will treat e-mails with different Sender and User names as suspicious. If this happens, use the same name for both fields.
You must have administrative permissions to the System page. See Manage Security.
An external mail server must already have an 'AnthillPro' user account created (e.g., anthill@yourcompany.com).
Go to System > Mail Server from the Notification menu.
Click Edit and configure the Mail Server.
Name the Mail Server.
Mail Host. Give the mail server host name. This should be an IP or a network name that can be resolved from the server running Anthill Pro.
Mail Port. Provide the mail server port. Default value is 25.
Sender. Give the email address to send messages as (e.g., anthill3@yourcompany.com). This will appear in the 'From' header of the e-mail.
User Name. Provide the user name to be used to authenticate with the SMTP server. The user name is used to log into the SMTP server and to actually send the e-mail.
Password. Give the password to be used to authenticate with the SMTP server.
Use TLS if available. Check the box to use TLS.
Click Set.
AnthillPro can be used to send instant messages using Google Talk, Jabber, or MSN IM. For example, AnthillPro may be configured to send an instant message to a group of committing developers when a build fails, etc. See Managing Notifications.
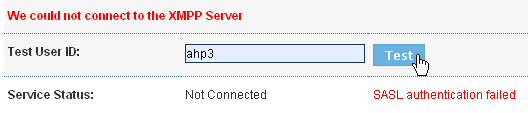
The Google Talk and Jabber integrations are configured by following the XMPP IM link under the Notification menu on the System page. The integration can be disabled any time by clicking the Disable button. Using the Test User ID and Service Status fields allow you to troubleshoot the connection.
AnthillPro requires an external Google Talk server to route messages. Any steps within AnthillPro relying on Google Talk (XMPP) will not work until this configuration is complete.
You must have administrative permissions to the System page. See Manage Security.
AnthillPro notification and security systems must be configured in order for the integration to work. See Managing Notifications.
AnthillPro is added as a Google Talk user.
Go to System > XMPP IM from the Notification menu.
On the XMPP page, click Enable then click Edit.
Configure the integration:
Name. Give the name of this XMPP configuration.
Server Host. Provide the XMPP server host name, typically an IP or host name that can be resolved from the server running AnthillPro. For example: jabber.org or talk.google.com.
Server Port. Give the XMPP server port. If using multiple ports, separate then with commas (e.g., 5222, 5223, 5224).
Domain. Provide the XMPP user domain.
Username. Give the user name (e.g., anthill3).
Password. Give the password.
Click Set then Done.
To begin sending instant messages, click Enable. (If Disable is visible, the instant message integration is currently active.)
AnthillPro requires an external Jabber server to route messages. Any steps within AnthillPro relying on Jabber (XMPP) will not work until this configuration is complete.
You must have administrative permissions to the System page. See Manage Security.
AnthillPro notification and security systems must be configured in order for the integration to work. See Managing Notifications.
AnthillPro is added as a valid Jabber user.
Go to System > XMPP IM from the Notification menu.
On the XMPP page, click Enable then click Edit.
Configure the integration:
Name. Give the name of this XMPP configuration.
Server Host. Provide the XMPP server host name, typically an IP or host name that can be resolved from the server running AnthillPro. For example: jabber.org or talk.google.com.
Server Port. Give the XMPP server port. If using multiple ports, separate then with commas (e.g., 5222, 5223, 5224).
Domain. Provide the XMPP user domain.
Username. Give the user name (e.g., anthill3).
Password. Give the password.
Click Set then Done.
To begin sending instant messages, click Enable. (If Disable is visible, the instant message integration is currently active.)

Configure MSN instant messaging. AnthillPro requires an external IM server to route messages. Any steps within AnthillPro relying on MSN IM will not work until it is configured.
You must have administrative permissions to the System page. See Manage Security.
AnthillPro notification and security systems must be configured in order for the integration to work. See Managing Notifications.
AnthillPro is added as a valid MSN IM user.
Go to System > MSN IM from the Notification menu.
On the MSN page, click Enable then click Edit.
Configure the integration:
Name. Give the name of this MSN configuration.
Email (owner). Provide the e-mail address used to authenticate with the MSN server.
Password. Give the password.
Click Set then Done.
To begin sending instant messages, click Enable. (If Disable is visible, the instant message integration is currently active.)

Once configured, AnthillPro can routinely run builds with no interaction with the development or build team. However, if it fails to communicate the results of builds, deployments, and promotions back to the team, it is only useful when people log-in to the system to manually check the status. That is not very good. A better model is to have AnthillPro send e-mails, instant messages, and other notifications to select team members.
The fundamental unit for managing notifications sent by AnthillPro is the Notification Scheme. A notification scheme sets rules determining what groups of users are sent which kind of notification about specified events. Each workflow is configured with a notification scheme within AnthillPro. The same scheme may be shared by many workflows, even workflows in different projects.
A Notification Scheme is composed of the following (See Composing a Notification Scheme):
Recipient Generator. Selects which users to contact. For existing mailing lists (e.g., generated from LDAP), it may be helpful to create a user representing a mailing list. See Manage Security.
Event Selector. Selects which events (created by a workflow event) to send notifications about.
Medium. Selects how the notification will be sent (e-mail or instant message).
Notification Template. AnthillPro uses Velocity templates to generate the notification text. See Scripting Notification Templates.
In order to manage notifications, you must have read and write permissions to the System page.
An existing Authentication Realm and at least one user must be created. See Manage Security.
In order to send e-mails, the email server must be configured. See Configure Mail Server.
To send instant messages, AnthillPro must first be configured. See Configuring Instant Messaging.
Users in the system are going to be interested in different events, with most users only interested in notifications about projects they work on. For example, developers are more concerned about the state of a broken build than a system administrator, who is more interested in knowing when a build does not start due to problems with source control.
The default options, All Users, All Users for Project, Committing Developers, or Tasked Users allow administrators to determine who is notified based on the Role(s) assigned to them. Adding additional Roles (see Manage Security) or creating new Generator scripts (see also Recipient Generator Scripts) provides flexibility to customize Recipient Generators.
Go to System > Recipient Generators under the Notification menu.
Click the Create Recipient Generator button.
Select the Notification Recipient Generator Type from the drop-down menu.
Fixed. Enter the recipient information such as email or IM address. Proceed to Item Five.
Role-Based. Generate notification recipients based on roles (see Manage Security). Proceed to Item Six.
Scripted. Use a BeanShell script to generate notification recipients (see Recipient Generator Scripts). Proceed to Item Seven.
Click Set.
Configure the Fixed Notification Recipient Generator.
Name the Generator.
Description. Provide a description.
Click Save. The Recipients menu will appear.
Under the Recipients menu, give the Email, XMPP, and/or MSN address(es). Click Add.
The e-mail values can be set as AnthillPro properties. This enables you to send a notification to an existing mail list, etc., without having to configure individual e-mail addresses in AnthillPro. For example, in the Email field, you can configure the selector to send a notification to: ${property:mailing-list}@mycompany.com. Then add a Project Property calledmailing-listwith a value ofmyProjectTeam, to you project. Once this is done, AnthillPro will send notifications to myProjectTeam@mycompany.com. Using this approach, you can send notifications to any number of lists. See Managing Properties.Click Done.
Configure the Role-Based Notification Recipient Generator.
Name the Generator.
Description. Provide a description.
Roles. Check the Roles to associate with this Generator. See Manage Security.
Click Save then Done.
Configure the Scripted Recipient Generator.
Name the Generator.
Description. Provide a description.
BeanShell script. Input the script that generates the list of recipients. See Recipient Generator Scripts.
Click Save then Done.

In order to determine which events should trigger a notification, AnthillPro maintains a set of event selectors. These are scripts that examine events generated by workflows and workflow requests, and return true if a notification should occur and false otherwise. For most circumstances, users will not need to write new event selectors. The product ships with a good set of default scripts:
Workflow Success. Triggers notifications when the workflow completed successfully.
Workflow Fails. Triggers notifications when the workflow completes without success.
Workflow Success or Failure. Triggers when a workflow completes regardless of status.
Build Request Failed. Triggers when a workflow does not occur due to an error in the build request. See Scripting.
Go to System > Event Selectors under the Notification menu.
Click the Create Event Selector button on the main page.
Name the new Event Selector, give it a description (optional), provide a script, and click Save. See Event Selector (Scripting).

AnthillPro Notification Templates are Velocity templates that take
information about the build and produce a document. Appropriate
templates need to be paired with the appropriate event cases. If there
is a WorkflowEvent, that means that a
WorkflowCase was created and will be the main piece of
information provided to the script as workflow.
Likewise, a BuildRequest will be passed to the script as
request.
Different templates will also be appropriate to send out on different mediums. Generally, a template used for instant messages will be very short, while one that targets e-mail will need to be longer. A template targeted at instant messages will not have a subject section.
AnthillPro ships with a catalog of Velocity templates that can be used as a reference in creating your own templates. At System > Notification Templates under the Notification menu, view the templates similar to the one you wish to create. See Scripting Notification Templates.
Best practices for writing templates is beyond the scope of this tutorial. However, it should be noted that the type of event handled will dictate the inputs to the template. See Velocity Documentation.
Go to System > Notification Templates under the Notification menu.
Click the Create New button.
Input a name, description (optional), context script (optional for IM), and template script. Click Set. See Scripting Notification Templates.
Once the notification components have been configured, they are composed into a new Notification Scheme. The Notification Scheme defines who will be notified and when they will be notified. For example, a "Default" scheme can be used to notify everyone on a project about a failed build; or a "Unit Test" scheme can be configured to notify only committing developers if the tests fail, etc.
To compose a scheme, a series of Recipient Generators (e.g., one Generator for sending e-mails; one copying [CC] e-mails; and for sending blind [BCC] e-mails) are typically created. In addition, the appropriate Case Selector(s) must be created for each scheme. See Recipient Generator and Event Selector.
Go to System > Notification Schemes under the Notification menu.
Click the Create Notification Scheme button on the Notification Schemes main page.
Name, provide a description (optional), and click Save.
Click the Add Who-When button to specify who should be contacted when a specific event occurs.
Specify combinations of users, message types, and events that need unique notification formats.
Recipient Generator. Select the Recipient Generator from the drop-down menu. This field allows AnthillPro to send an e-mail "To" users.
CC Recipient Generator. Select the appropriate Recipient Generator from the drop-down menu. This field allows AnthillPro to copy, "CC", a defined group on an e-mail. Leave this field blank to not send copies or if configuring Instant Messaging.
BCC Recipient Generator. Select the appropriate Recipient Generator from the drop-down menu. This field allows AnthillPro to anonymously copy, "BCC", a defined group on an e-mail. Leave this field blank to not send copies or if configuring Instant Messaging.
Case Selector. Select the appropriate case selector from the drop-down menu.
Click Save.
Determine how users are notified. Click the Add Medium-Template button.
Select the Notification Medium and the Message Template from the drop-down menus. Click Save.
Creating a series of who-when-how combinations establishes a scheme of sending the appropriate notifications out that can be used between project teams.
Once an announcement is created by an AnthillPro administrator, the message will automatically appear at the top of the AnthillPro UI for every user. Users can hide any announcement by following the hide link within any announcement. Selecting the announcements link in the upper right-hand corner of the AnthillPro UI allows users to view all active messages, including those previously hidden.
Go to System > Announcements under the Server menu.
On the Announcements page, Click the New button.
Configure the message:
Message. Enter the message. Up to 4,000 characters maximum.
Priority. Select the priority (default is normal) from the drop-down menu.
Low. Displays message in gray.
Normal. Displays message in black.
High. Displays message in red.
Click Save then Done.
Go to System > Announcements under the Server menu.
On the Announcements page, select the Edit icon of the announcement to be edited.
Modify the text in the Message filed and/or change the Priority. When done, click Save then Done.
If an announcement has been hidden by a user, changes are only viewable on the Your Announcements page. See Viewing Announcements.
To delete an announcement, click the Delete icon and then OK.
Once an announcement has been sent, it appears at the top of every user's AnthillPro UI. If an announcement has been hidden, it can be viewed on the Your Announcements page.
Hide any announcement by following the hide link within any announcement. If the hidden announcement is edited by the sender, it will not automatically reappear.

Select the announcements link in the upper right-hand corner of the AnthillPro UI to view all active announcements on the Your Announcements page.
