Regular backups of AnthillPro is advisable to protect your data. While AnthillPro supports automated backups with the Derby database (see Backups with Derby), other databases must be backed up using the backup tool that came with the particular database (see Backups with Other Databases).
The var\db directory should never be backed up with a file system backup (it is the location of the database files) because this will almost always result in file corruption.
Because the Agent does not store critical data (other than agent configurations), Agent upgrade is unnecessary.
AnthillPro supports scheduled backups of the Derby database through the UI, using a backup schedule. The backup interval will vary depending on the size of your organization, number of artifacts, etc. Backup schedules may be deactivated or changed on the Server Settings page. See Deactivate or Change Backup Schedule.
The var\db directory should never be backed up with a file system backup (it is the location of the Derby database files) because this will almost always result in file corruption.
Backups are saved in the var\db\backup directory (e.g.,
C:\AnthillPro\server\var\db\backup\). Every update will be
named according to the date and time of the backup (in the format
year-month-day_hour-minute-second; i.e., similar to
2008-10-08_10-59-48).
To restore AnthillPro to a clean state from backup files, overlay the installation with the backup files. See Restore AnthillPro to a Clean State.
Because the Agent does not store critical data (other than agent configurations), Agent upgrade is unnecessary.
You must have read and write permissions to the System page. See Manage Security.
Before editing a backup setting, create a special schedule or use an existing schedule. See Create a Backup Schedule.
The var\db directory should never be backed up with a file system backup (it is the location of the Derby database files) because this will almost always result in file corruption.
Go to System > Schedules under the Project Support menu.
Click the Create Schedule button to create a new schedule.
For backups, creating a basic schedule with a rather long interval works well. Select the Interval Schedule option and click Set.
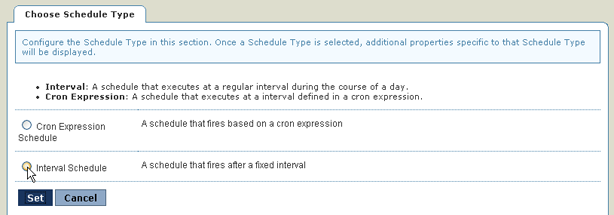
Configure the Schedule.
Name. the schedule.
Provide a description (optional).
Set the interval in minutes. An interval of 1,440 minutes will trigger a backup once a day.
Give the start time. Set the backup to start while system loads are low. A start time of 23:30 will trigger a backup to start at 11:30 p.m.
Setting a start time is most useful for infrequent schedules, such as one that triggers twice a day, where the first daily execution dictates the second.

Click Set.
Go to System > Backup Settings link under the Server menu.
To manually backup AnthillPro, click the Backup Now button.
To choose a schedule or change the number of stored backups, on the Main tab click the Edit button.
Backup Schedule. Select an existing schedule from the drop-down menu. See Create a Backup Schedule.
Max Backups. Enter the maximum number of backups that will be stored. Use -1 to keep all backups. If Max Backups is set to 25, AnthillPro will save the first 25 backups. When the 26th backup is created, AnthillPro will automatically delete the oldest backup.
If reducing the number of backups stored, AnthillPro will delete all backups in excess of the new setting. For example, if changing backup storage from 25 to 20, the next time a backup runs AnthillPro will automatically remove the 6 (six) oldest backups and add the new backup.
Click Save.

Select the Backups tab to view stored backups that can be restored or deleted. Backups are saved in the var\db directory (e.g.,
C:\AnthillPro\server\var\db\backup\). Every update will be named according to the date and time of the backup (in the format year-month-day_hour-minute-second; i.e., similar to2008-10-08_10-59-48).
Select the History tab for a list of database changes.

When deactivating or changing a backup schedule, make sure that the schedule (created in Create a Backup Schedule) is not inadvertently deactivated or deleted. Because different AnthillPro activities may rely on a single schedule, deleting or deactivating the actual schedule (at System > Schedules) may effect other activities.
To deactivate or change the backup schedule:
Go to System > Backup Settings link under the Server menu.
Click Edit on the Backup Setting Main tab.
To deactivate backups: Select None from the Backup Schedule drop-down menu to deactivate backups. When none is selected, no further backups will occur.
To change to a different schedule: Select it from the drop-down menu. This may require creating a new schedule (see Create a Backup Schedule). One complete, a backup will occur when the new schedule fires.
Click Save then Done.
Restoring AnthillPro to a clean state requires overlaying the installation with backed-up data files. The directions outlined below are for backups of the embedded Derby database (see Backups with Derby). If using another database type, you must follow the procedures listed in the Backups with Other Databases section. Typically, restoring AnthillPro to a backed-up version is an option of last resort, and should only be used if there is no other way to correct an issue.
Note that restoration requires shutting down the server and agent(s).
Shutdown the server and the agent(s).
Go to the AnthillPro instance.
In the
var\db\directory, rename the data folder. In Item 7, a copy of the backed-up data folder will be added (renaming the existing data folder reduces the chances of corruption).Go to the
var\db\backup\directory and open the appropriate backup folder. Every backup is identified in the format year-month-date_hour-minute-second (e.g., 2008-10-08_10-59-48).Open the backup you want to restore AnthillPro to, and copy the data folder located within the directory (e.g., the data folder is located in the
var\db\backup\2008-10-08_10-59-48\directory of a backup that was performed on October 8, 2008 at 10:59:48 a.m.).Go back to the
var\db\directory.Paste the backup's data folder into the
var\db\directory. Do not delete the old (renamed) data folder until you have verified that the restoration was successful.Restart the server and agent(s). Ensure that the restoration was successful. If there is a problem, please contact the AnthillPro support team with details.
If using AnthillPro with Oracle, MySQL, or Microsoft SQL Server database, backups are not performed through the AnthillPro UI. Each database has its own backup tool that should be used for backups (see documentation for your particular tool). The var/db directory should never be backed up with a file system backup (it is the location of the database files) because this will almost always result in corrupted files.
The following directories also need to be backed up using a file system backup tool:
Because the Agent does not store critical data (other than agent configurations), Agent upgrade is unnecessary.
To use a backed up database, see Using a Backed Up Non-derby Database.
Perform a clean install of the AnthillPro server. See Installing AnthillPro.
If the server is running, stop the server. Go to the
\bindirectory and runstop_ah3server.cmdfor Windows; or./ah3server stopfor Linux/Unix.Open the
installed.propertiesfile located in the\conf\serverdirectory.The
install.db.url=jdbc\:property must be changed to point to the backed up database. For example,install.db.url=jdbc\:yourdatabasetype\://localhost\:11366/data.Save change.
Open the
base.xmlfile located in the\conf\spring-serverdirectory. Modify two properties to point to the backed up database:Under
<!-- DataSource used for persistence
              -->
, modify the'url'property:<property name="url"> <value>jdbc:yourdatabase://localhost:11366/data</value> </property>
Under
<!-- DataSource used for identity
              generation so it does not create deadlocks -->
, modify the'url'property:<property name="url"> <value>jdbc:yourdatabase://localhost:11366/data</value> </property>
Depending on how the new installation was completed, the
'username'and'password'properties may also need to be changed in both locations:<property name="username"> <value>anthill3</value> </property> <property name="password"> <value>abc{}</value> </property>Save changes.
Copy over the directories that were backed up using the file system backup tool. See Additional Directories to Backup (Non-derby).
Start the Server.