This tutorial shows how to facilitate code reuse in a controlled manner, and is based on the Release Reuse Equivalency principle first published by Robert Martin in Granularity.
| For dependency configuration instruction, see the main Configure Dependencies section. |
Using the ABC Dependency project (hosted on Urbancode's public CVS server), this tutorial is designed to illustrate how dependencies are configured and how to troubleshoot problems. Projects B and C are each standalone (children) projects that generate Java libraries. Project A, the parent, uses those libraries (i.e., it depends on the other two projects).
To start, the
b.jarandc.jarlibraries are removed from project A.Both jar files are configured as an independent AnthillPro project (Project B and Project C respectively).
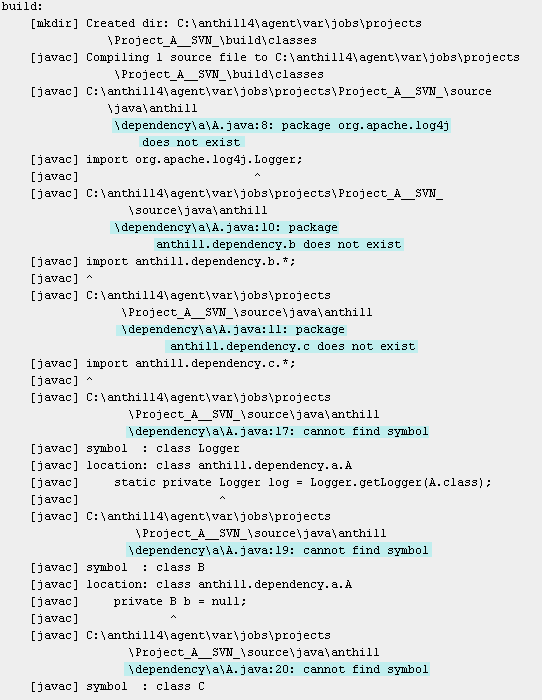
Now, projects B and C compile fine, but without their libraries, Project A will not compile (as illustrated in the image below).

Drilling down into the build output log shows that the libraries from B and C were not available to the build.
Any project that another project depends on is going to generate one or more collections of files (artifacts) the dependent project uses. In AnthillPro, each artifact collection is named to create an artifact set. For this set of projects, Project B and Project C are each going to have an artifact set for the libraries they produce, and are configured in a similar manner.
Artifact sets. are also used to specify files that may be used in secondary workflows.
Example Artifacts:
A code library used by multiple projects.
A platform-specific client.
Documentation of the shared library to be rolled into developer documentation (
javadoc).The deployable executable of a top-level project.
Because these are existing projects, the artifact sets have already been configured as part of a Life-Cycle Model. To view the artifact sets, follow the Artifact Sets link on the Life-Cycle Model page. The lib artifact set to hold the libraries and a test artifact set to manage test suites should be visible. See Using Life-Cycle Models.

Once the artifact sets are in place, go back to Project B (and C) and select this new group for those projects. You can also use this new artifact set for any other library-style project that might produce some tests. Now, you need to tell AnthillPro which libraries should be treated as part of the lib artifact set and when to publish the artifacts. Do this by editing the build job and workflow.
In order for Project A to build successfully, the build jobs on Projects B and C must be edited so that the appropriate artifact sets are delivered. The process is the same for both projects.
From the Project B Administration page, select the Edit Job icon.
Select the Edit icon for the Artifacts Deliver step.
Select the artifact set to be delivered (lib). Click Save.

In order for Project A to build successfully, the workflows on Projects B and C must be edited so that the appropriate artifact sets are delivered. The process is the same for both projects.
From the Project B configuration page, select the Edit Workflow icon.
Select the Artifacts tab and specify what artifacts generated by this workflow are available for AnthillPro to retrieve and provide to other workflows and projects (the lib artifact set).

Identify the artifacts. Enter the base directory (relative to the directory that the checkout happened from) and one or more artifact patterns to include. Click Save.
For a simple jar file, the base directory and the name of that file are sufficient.
Include Artifacts. Lists artifacts to be retrieved. The wild card
**indicates every directory and the wild card*indicates every file. So the patterndist/**/*would retrieve the entire file tree underneath this dist directory. Project and workflow properties are the only scripting allowed. See Scripting.To include symbolic links and empty directories, add the link/directory as part of your include pattern. See Configure Server Miscellaneous Settings.
Exclude Artifacts. Patterns of artifacts that are in the include pattern but should be skipped. Project and workflow properties are the only scripting allowed. See Scripting.

Once the artifacts are configured, future workflow executions of the build job will publish that library to AnthillPro's artifact store (Codestation). See Using Codestation Projects.
Now that Projects B and C are delivering their artifacts to AnthillPro, instruct Project A to retrieve those artifacts.
Go to the Project A Main page (Administration) and select the Edit Workflow icon for the project a build workflow.
Select the Dependencies tab and choose Fail from the drop-down menu.
This will let you know a conflict has occurred which needs to be resolved before continuing.

Click the New Dependency button to create a dependency with Project B and Project C. Select the project and workflow creating the dependency and then determine how the dependency artifacts are to be provided.
Tell AnthillPro which Artifact Set to put in what location. The locations are relative to the workflow working directory. If an artifact set is not needed for this workflow (like the tests) simply do not check the box for it. In the example below, the artifacts for the lib artifact set (just the library produced by B) will be copied into the lib directory directly under the Project A root (shortly after checkout).
Artifact Retrieval. 'Retrieve' indicates which artifact sets to retrieve from the dependency build life. 'Transitive' indicates whether the artifact sets with the same name from transitive dependency build lives should also be retrieved. 'Location' specifies the relative path(s) from the working directory to copy the dependency artifacts to. You can set multiple locations by using the add link. Project and Workflow properties are the only scripting allowed; e.g., ${property:deps_dir}. (Use '.' for the current working directory, leave empty to remove).

Once both dependencies have been listed, rebuild both Project B and C to generate and deliver their artifacts for the first time. When a build of Project A is requested, the artifacts from Projects B and C that were delivered to the lib directory will be used to build Project A.